Do you ever feel the necessity to edit your writer’s name from a WordPress post? But immediately get confused about how to change the author in WordPress.
Well, there might be several reasons to change the author of a WordPress post. For example, your previous writer left your agency. Now, you want to update one of his written posts by someone else and include the new author’s name.
Or you need to display a different writer’s name, rather than the person who uploaded the post in WordPress. There could be many more scenarios like these.
Luckily, you’ll get a number of options to change, update, and edit the author of a WordPress post. It’s up to you which path you want to choose. In this post, we’ll show you five different ways to accomplish your task with just a few clicks.
Let’s get started!
Are you in a hurry? Then directly jump into the section that suits your needs:
- Change the author name from Quick Edit
- Update Author Name from WordPress Block Editor
- Change the Author for Posts in Bulk
- Remove or Hide the Author Name
- Update an Author’s Display Name
How to Change the Author of a Post in WordPress? (The Simplest Way)

To change the author name of your exciting WordPress post, login to your WordPress admin dashboard. Then, select All Posts and find the post you want to update.
Click on Quick Edit. Here, you’ll get a field called Author. Now, from the drop-down menu select the new author name.
Finally, click on Update.
Some Other Ways to Change Author Name of WordPress Post
Here, we’ll describe another 4 different ways to modify the writer’s name to your WordPress site. Depending on the scenario you want to modify the name, you can pick any of the following options indeed:
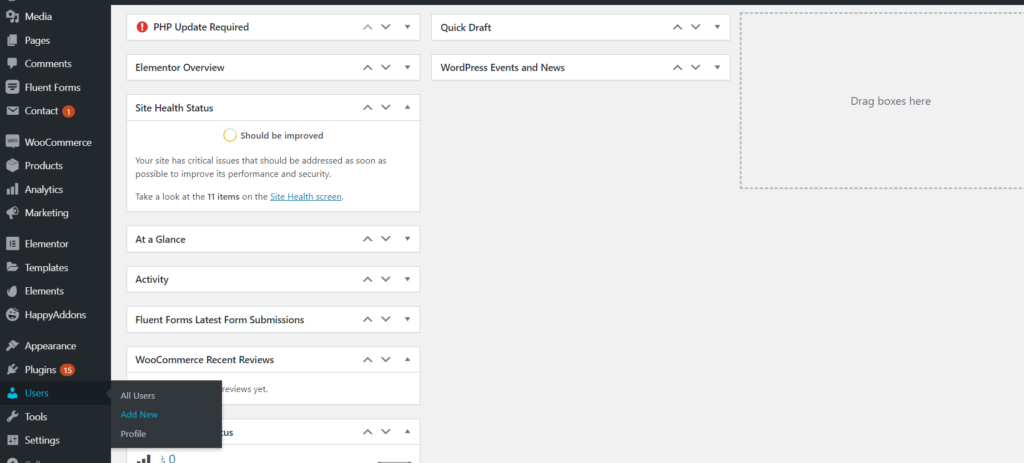
But before that make sure you have the user(s) registered as Author in your WordPress site. If not you can easily add a new user by navigating to WordPress Admin Dashboard → Users → Add New.

Insert all the required information. Don’t forget to set the user role as Author from the drop-down menu.

Once you are done, click the ‘Add New User’ button and proceed.
After adding all your authors to WordPress, you can easily set authorship per post.
1. Change Author Name from WordPress Block Editor
Log in to WordPress Dashboard and go to All posts. Then click on the post whose author you want to change.
On the right side of the screen, you’ll find an editing panel. Select the Document tab and there you’ll get an option named Author under the Status & Visibility heading. Here you can change the author name from a drop-down menu.

Select your desired author and click on the Update button to make the change live.
2. Change the Author for Posts in Bulk
Suppose one of your blog contributors leaves your site. Now you want to reassign his works to another blog writer. Instead of checking into the individual posts, you can make the change in bulk.
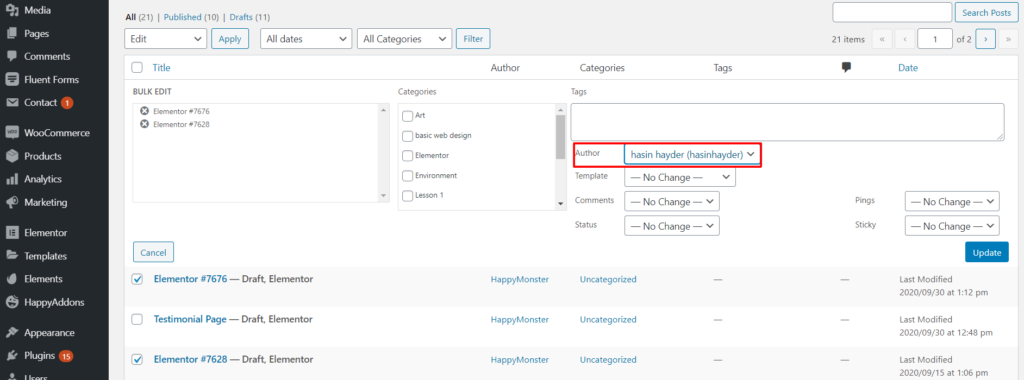
Go to All Posts. Then, select all the posts whose author you want to change. Or hit Title to select them all.
Next click the Bulk Actions dropdown menu and select Edit then hit Apply.


You’ll get a window including several options. Here, you see Author field followed by a drop-down menu.

Here, you can assign only one new author to the blog, you’ve selected. So, if you wish to assign several blogs to different writers then you need to repeat the task multiple times.
3. Remove or Hide the Author Name on WordPress Posts
Sometimes you may not want to display your author name at all. You might be the only person who writes for your site or wish your readers focus on your content only. However, you can easily add/hide an author bio box on your WordPress site.
In order to hide your author’s details from any post manually, you have to edit your site’s theme.
Go to Appearance then
Navigate to Appearance → Customize in your dashboard. Then scroll down to the Additional CSS area of the Customizer:

Add the following code in the provided field. This will hide the author’s information from posts and publish the changes.
/* Remove meta data */
.entry-meta .byline, .entry-meta .cat-links { display: none; }
.entry-meta .posted-on { display: none; }
4. Update an Author’s Display Name in WordPress
Sometimes, there are some situations where you need to update an author’s display name. It might be because you want to show any fancy or pseudo name related to their work instead of their real name. Or they’ve legally changed their name and now want to show that name on their posts. Moreover, a writer may ask for using a pen name to create a unique identity that they also use everywhere they work.
Well, whatever the reason you can perform this action within a few clicks only. From your WordPress dashboard go to the menu named ‘Users’ there. Select a user’s name you wish to change. After that, you’ll get a setting window related to the author’s all information.

Select the “Display name publicly as” and insert the name that you want to show for your readers.
Final Thoughts
WordPress is famous for its user-friendly nature. Also, you’ll get all the tutorials easily on its official website or any other authentic platform like its forum and all. If you want to modify an author’s information or reassign an existing post to another writer- on WordPress it’s super easy.
Let’s recap. You can choose any of the following methods to accomplish your goal:
- Change the author name from Quick Edit
- Update Author Name from WordPress Block Editor
- Change the Author for Posts in Bulk
- Remove or Hide the Author Name
- Update an Author’s Display Name
Still, have any query in your mind? Do use the comment section below and let us clear your doubts!


Thanks for the article!
Hello Chee,
It’s a pleasure to hear from you. You can check our other blogs as well on similar topics. Cheers 🙂
If I change the author, will that user be able to edit the post?
Nice read, Sabirah. Got crystal clear instructions for changing author in WordPress posts and thanks for sharing this helpful tutorial with us. Keep it up.
A great guide to someone who doesn’t know how to change Author in a WordPress. Thank you for this!