Are you looking to host your very first WordPress site? Not sure how to make a WordPress website? Then you have come to the right place. Here in this post today, we will discuss and provide you with a complete step-by-step guide to building your very first WordPress website.
Now we all know creating a full-fledged website requires hard work & patience. From choosing a catchy website name to the promotion part, you’ll need a precise plan & perfect execution to finish it on time.
Once it was a nightmare for those who didn’t have any coding experience or programming skills. But the scenario is not the same as before. The popular CMS platform WordPress has played a role here to overcome this barrier.
The world’s most popular and widely used content management system WordPress now powers over 43% of all websites on the internet
W3Tech
It has opened each & every door for the users. The available resources, free themes & plugins, and drag-drop widgets encourage anyone to make a WordPress dynamic website even if you’re not a tech-seavy person.
Apart from controlling a huge chunk of the internet arsenal (which is more than 6.80%), WordPress is also incredibly efficient for eCommerce platforms!
In today’s tutorial post, we’ll show a detailed process to create the first WordPress website. Besides, we’ll present an in-depth discussion about WordPress, why it’s popular, and share some expert suggestions in the end.
Keep reading:
Quick navigation:
- A short comparison between WordPress.com vs WordPress.org
- A Step By Step Guide To Make a WordPress Website
- Set your purpose
- Choose a domain name
- Register your domain name
- Install WordPress
- Choose a theme
- Install required plugins
- Set up essential web pages
- WordPress general settings
- Configure permalink structure
- Create a sitemap and submit it to the search console
- Create your first content
- SEO guidelines to make your website visible
- A Few Suggestions From WordPress Experts To Make Your Site Successful
- Some FAQ About WordPress & Its Functions
- Useful Resources About WordPress Tutorial
- Conclusion
Comparing the Two Popular platforms WordPress.com and WordPress.org
The difference between WordPress.org and WordPress.com has to do with who is actually hosting your website.
HubSpot
That means WordPress.org lets you host your own website or blog, whereas WordPress.com manages your website by itself. Apart from managing your site’s server, these two platforms have a lot more functions & settings that you should consider.
Let’s see a brief comparison between these two platforms and check what are the variations that you look for. Hopefully, you’ll find the right platform for your website.
| WordPress.org | WordPress.Com |
| Users have to manage their own server (third-party) | It manages your website |
| Gives you an individual URL. For example, (www.example.com) | In WordPress.com, your website will look like – (www.yourwebsite.wordpress.com) |
| Opportunities to use different plugins & themes and third-party features | You have to use default features. Upgrading to the paid version could enable you to use more features |
| It requires hard work & effort to build a website on WordPress.org | It will give you a pre-built designed template for your website |
| Easy to add, edit and remove codes if you need | You can’t customize code as it comes with the default version |
| You need to download the WordPress version before using | There is no need to download or install WordPress—it’s part of the hosting services |
| WordPress.org is controlled by its community | A commercial community – Automatic controls WordPress.com |
From the comparison, you can assume which platform is efficient for blogging or creating a website. It seems WordPress.org is more effective than WordPress.com. The reason is it helps anyone to create a website from scratch.
Also, there are a number of reasons why WordPress.org is more reliable for users. Let’s have a look:
- 100% open source
- Highly customizable
- Easy to customize with themes & plugins
- SEO friendly
- Safe & secured
In case you don’t know the real reason to use the WordPress platform for your business, here we’ve shared why to use WordPress to get the maximum benefit.
Check out the guide to learn why you should use WordPress to create website for your enterprise
How To Build a WordPress Website (A Step-by-Step Guide)

Creating a website needs patience and a proper plan. You have to be careful and keep your strategies precise to stay aligned. Now it’s time to show the step-by-step process of creating a full-fledged WordPress.
For that, you would need to follow all the below instructions:
01. Set Your Purpose
The first and foremost task before creating a website is to have a definite purpose. From earning money online to providing services to others, a website has multi-purposes.
Such as:
- Showcase your talent
- Work for clients
- Provide services
- Share educational experiences
- Or online marketing services, etc.
Note down these points if it matches with your ones. You should be concerned before thinking to create your website. It’s a big project and a simple mistake could hamper your business workflow. So take your time, have patience and choose the right intention before designing your website.

02. Choose a Domain Name
After you set your goal, it’s time to choose a catchy name for your website. Your domain name or a website name holds your brand identity and it normally stays constant. Once you’re done with a name, it’s not wise to change it further.
A memorable domain name makes all the difference when it comes to creating a successful online presence.
Host.ie
People will easily recognize your brand through the domain name. Apart from these, it also establishes credibility, controls your URL structure, improves SEO, and makes real sense to your audiences.
So what else you should consider before choosing a domain name? Let’s find below:
- Choose a name that is easy to remember & proclaim
- Keep the name short & precise (For example, www.wperp.com)
- Make sure that it doesn’t contain any hyphens or numbers
- Ensures it relates to your brand
Once you are done with that, let’s see the domain name service provider below to get your website name easily:
- Domain.com
- Bluehost
- GoDaddy Domains
- Namecheap
Let’s assume you have selected a domain name for your website. Now visit any of these websites. Type your domain name in the search box and follow the instructions to purchase it.
That’s all! You have purchased your domain name!
Also Read: How to Choose the Perfect Domain Name for Your Business – 15+ Proven Tips

03. Register Your Domain Name
Next up, you need to buy a hosting plan. Hosting means a place where your website’s data will be stored. It’s like a book cabinet where you organize all the books. For that, you have to pay for it.
You can get different hosting service providers online. They all are great in terms of giving strong data security & backup; you can pick up any of them.

Here are some top managed WordPress hosting service providers that you can consider for your website hosting:-
- Bluehost:- Being the official partner of WordPress, it also provides a world-class hosting service to users. The official support team of BlueHost regularly provides web management tools, automatic updates to improve their user experience.
- WP Engine:- It’s also a renowned & oldest ‘managed hosting‘ provider for WordPress. You will get shared, dedicated, or cloud-based hosting services with high security.
- Hostgator:- Hostgator is one of the cost-effective hosting providers. You can get unlimited email addresses, fast & secure, and affordable hosting plans.
- Cloudways:- With cloudways, you will get the newest PHP versions, MYSQL as a database, and more.
- Kinsta:- It’s mostly suitable for users who love easy options. You may not get their package affordable for its high price. Other than that, Kinsta could be a wise option in order to get a user-friendly & powerful ‘managed hosting’ for your site.
Apart from these popular solutions, there are more solutions out there in the market. Check out the below guide to get up to 15 reliable managed hosting providers.
Also, Choose From the Top 15 Reliable Managed Hosting for WordPress
04. Install WordPress
Once you’re done with the domain name & hosting plan, the next task is to download & install WordPress on your server. You can find different tutorials online to install WordPress.

To get on with the WordPress installation, we’ll show the process with BlueHost. Do make sure you’ve successfully purchased your website’s domain name & hosting plan.
Note: You can do the same thing with any hosting providerNow head to the BlueHost landing page. After that navigate to the login page.

Insert your account ID and password to install WordPress.

Once you logged into your account, choose WordPress to get started.

After that, you’ll get some steps to complete your installation process. You can continue or, complete them later.
In the last step, you need to choose a theme for your website. Skip this section as we have a separate section for adding a theme on the WordPress site.

After that, WordPress will be installed on your site automatically.

You’ll be redirected to the BlueHost dashboard. Here as you can see, your site isn’t published yet. So log in to your WordPress site and then activate it.
To do that click on the Login into WordPress.

Once you get in your WordPress Dashboard, you will see the button to activate your website. Click on Launch Your Site.

Finally, your site will be marked as published.

Well, that’s how you can install a WordPress site using BlueHost. Just follow the instructions and apply them step-by-step.
In case you don’t know how to install WordPress on a localhost server, you can check out the following guide:
☞ How to Install WordPress on Localhost (5 Easy Steps)
05. Choose a Theme
After completing the above steps, your next move is to download & install a suitable theme depending on your WordPress site.
You have two options – buy a premium theme, or stay with the free ones. There are different available marketplaces that offer versatile themes.
At the initial stage, you can use a free theme, but we recommend you use a PAID one. The PAID version benefits you to use more features & functions on your website.

However, WordPress itself offers a variety of themes. By heading to the WordPress theme section, you can choose the most suitable theme for your website.
You can also sort out the themes that you’re looking for. Try to pick up the right theme for your WordPress site. Otherwise, it will be a hassle for you, especially if it doesn’t match your business type or website structure.
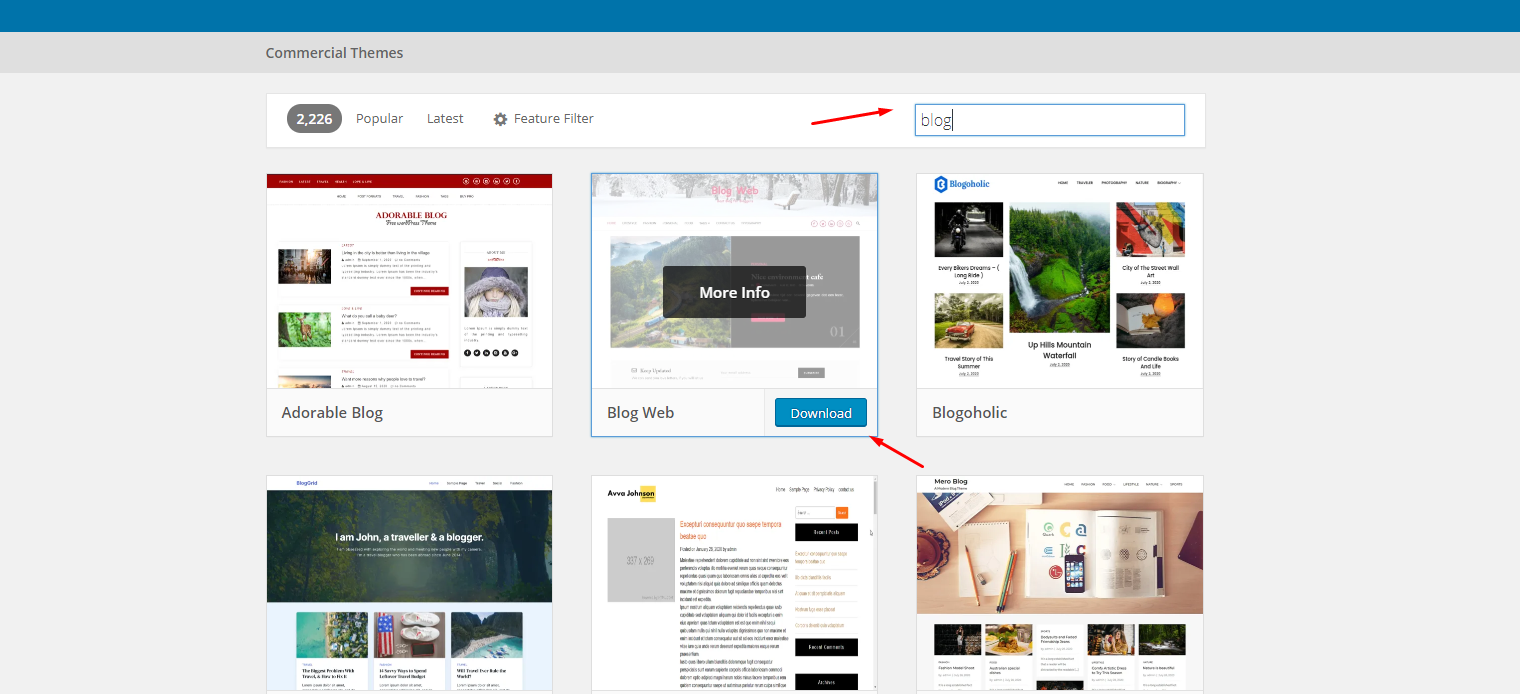
Now visit the WordPress theme, and you can search for your preferable theme.

Select the desired theme for your WordPress site, simply download it.
Next, navigate to your WordPress Dashboard>Appearance> Themes> Upload the Downloaded File> Activate.
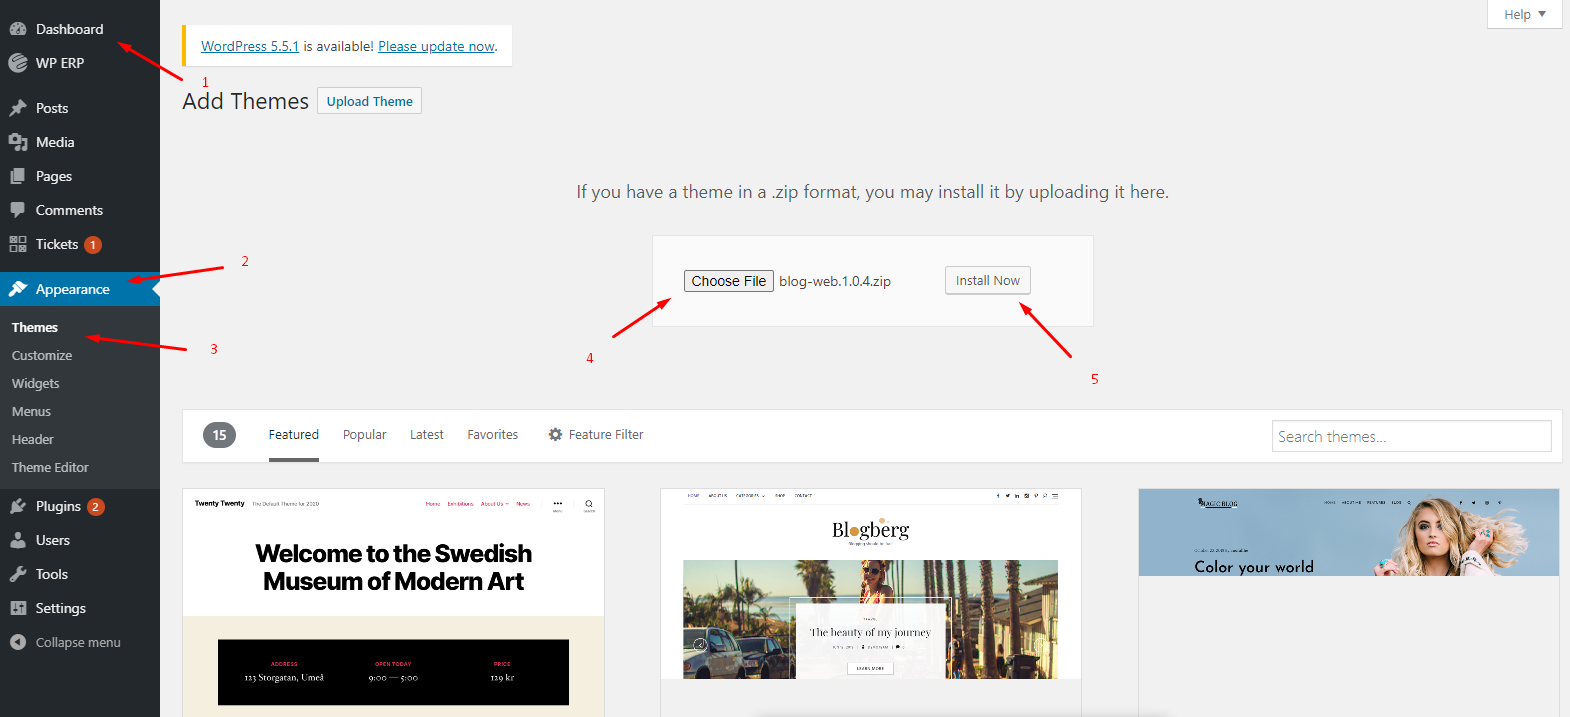
That’s it your theme is uploaded and ready for use.
If you plan to create an academy website, school website, kindergarten website, etc, then Eduma is a premium WordPress education theme that you can try out. Check the detailed review on the Eduma theme before purchasing it.
Moreover, you can create your own website with the powerful website builder Happy Addons. It lets you customize certain things on your theme to beautify your website structure.
Also Read: How To Choose A Perfect WordPress Theme
06. Install Required Plugins
From improving your website SEO to generating real-time customer data, a plugin plays both roles here. Apart from these, it can also better your site’s experience and improve customer engagement. There are a number of available plugins in the WordPress repository.
Depending on your niche and business type, you need to install the right amount of plugins that are easy to use, apply and implement.
Here we’re going to recommend some useful plugins that you can use on your website:

Essential Plugins to Consider For Your WordPress Website
- Jetpack: It’s an all-in-one tool to help users manage their content, visitor engagement, and sharing social content and comments. Jetpack could an efficient tool for your website that can give you all these essential features in one dashboard.
- Yoast SEO (Free): Yoast SEO offers a set of tools that improves your website’s position in the search results. Also, it helps you to add XML Sitemaps, and OpenGraph data and makes it easier to create your posts or pages SEO-friendly.
- Google Analytics Plugin – Analytify (FREE & Pro): If you are concerned about your site’s performance, then you can use the Analytify plugin to get unlimited features like tracking user visits, site popularity, and insights about visitors, page or post-performance, powerful analytics, and much more.
- W3 Total Cache (FREE): W3 Total Cache improves server performance, and reduces page load & download times. It amazingly helps to develop your rank in search results.
- Security Plugin – Sucuri (FREE & Pro): Security plugin like Securi can secure your website from DDoS, XSS attacks, malware threats, brute force, etc.
- Elementor Page Builder (FREE & Pro): Design your web pages easily without coding skills with Elementor. It provides a live page or visual page building facilities with a lot of features with ease.
- Backup Plugin – Updraftplus (FREE & Pro): Backup can be a great solution for you, especially if something unusual happens to your website.
- WP User Frontend: Effortlessly build Registration Forms, Profiles, WooCommerce Products, Subscriptions & Contact Forms with Custom Post Types support.
- WP Project Manager: WSmartly manage your projects, tasks, and team, and collaborate with your co-workers using WP Project manager pro.
- weMail: It helps users to send the newsletter, collect leads, and automated emails, auto-add subscribers to a list, and manage subscribers all inside the WordPress dashboard.
To get a detailed idea of essential plugins for a WordPress website, read the article below!
Also Read: 20+ Essential Plugins for Your WordPress Site
07. Set Up Essential Web Pages & Add a Menu
Once you’re done with the basic things for your website, now you need to create web pages. It’s easy and simple to add a page.
But before you proceed, consider the structure of your website (it may vary depending on your business)
Such as:
- About Page
- Contact Us Page
- Gallery Page
- Services, etc.
Navigate to WordPress> Pages> Add new Page> Publish the page when you’re done.
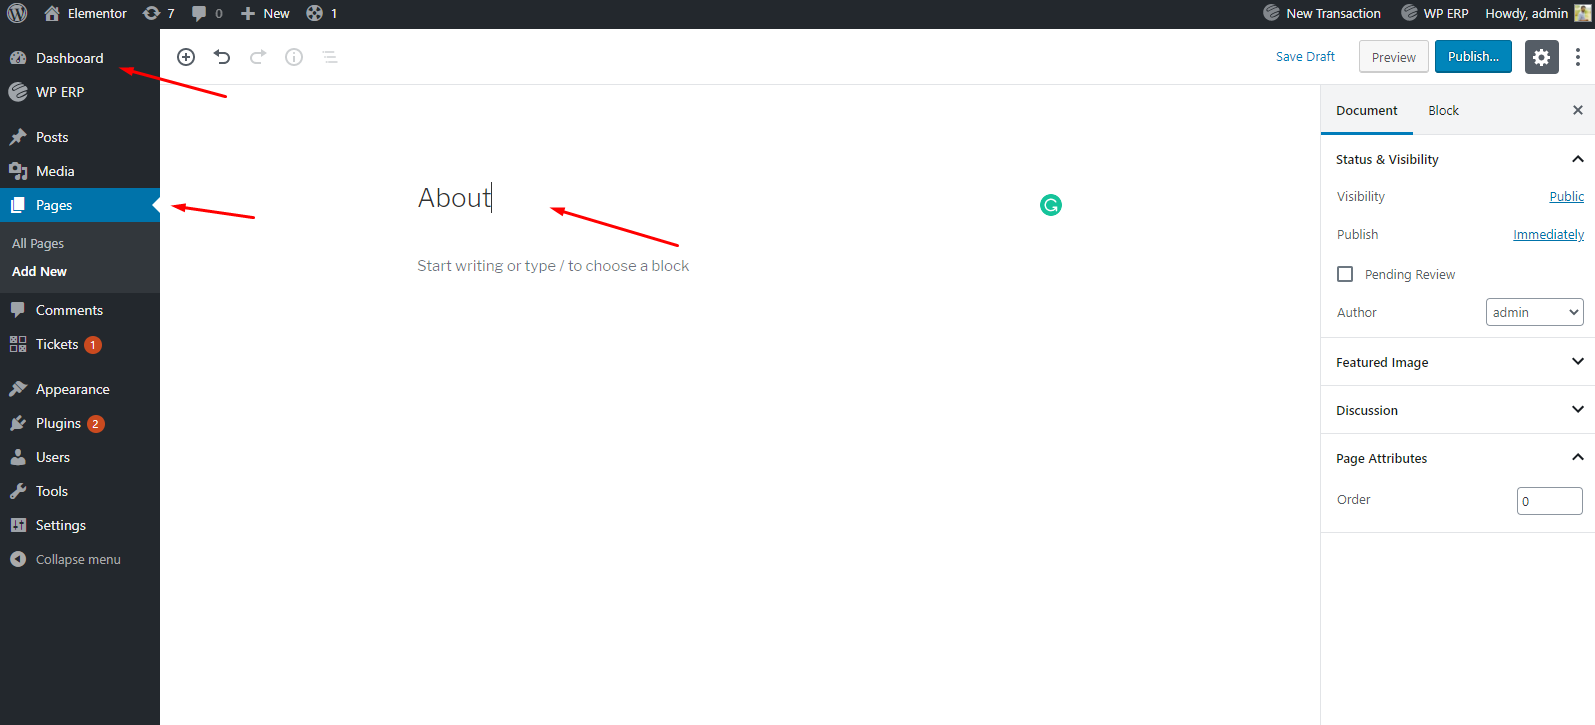
Therefore, following the same process, you can add other pages that you want to add.
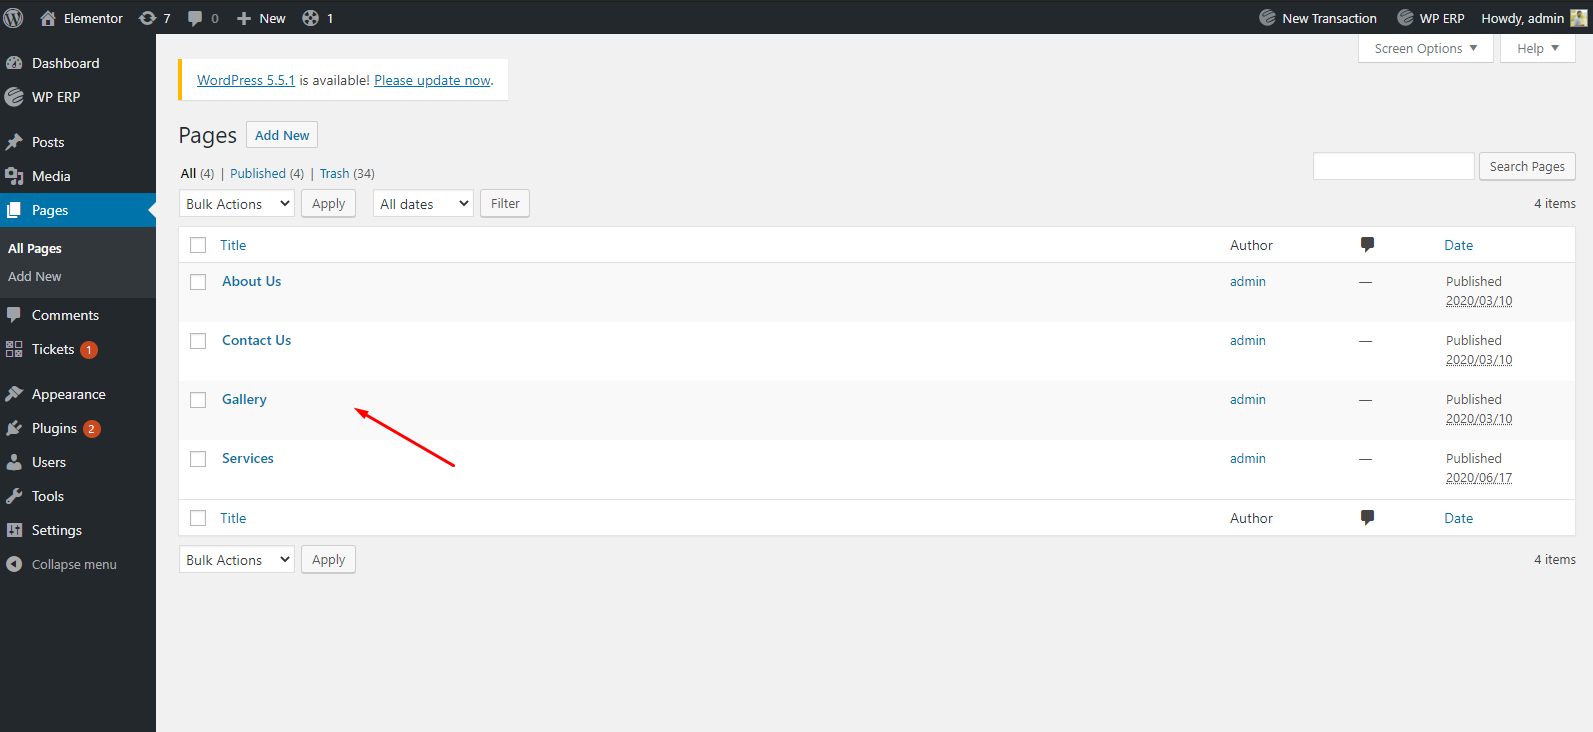
Once you added all the pages, now you need to create a menu on your WordPress site.
To do that navigate to Appearance> Create a menu> Save menu.

Select the pages you want to add to the menu. After that, all the pages will be added to your menu.

Here’s the frontend view of the created page. As you can see all the web pages are appearing here, including the About Us/Me page. So in this way you can design your website to make it more appealing & beautiful.

08. Configure WordPress General Settings
Well, you have created web pages, and installed the required plugin & theme. Now before you proceed to the next step, you need to customize some general settings of your site. This will help your site to run smoothly without any bother.
Let’s see how you can do that:
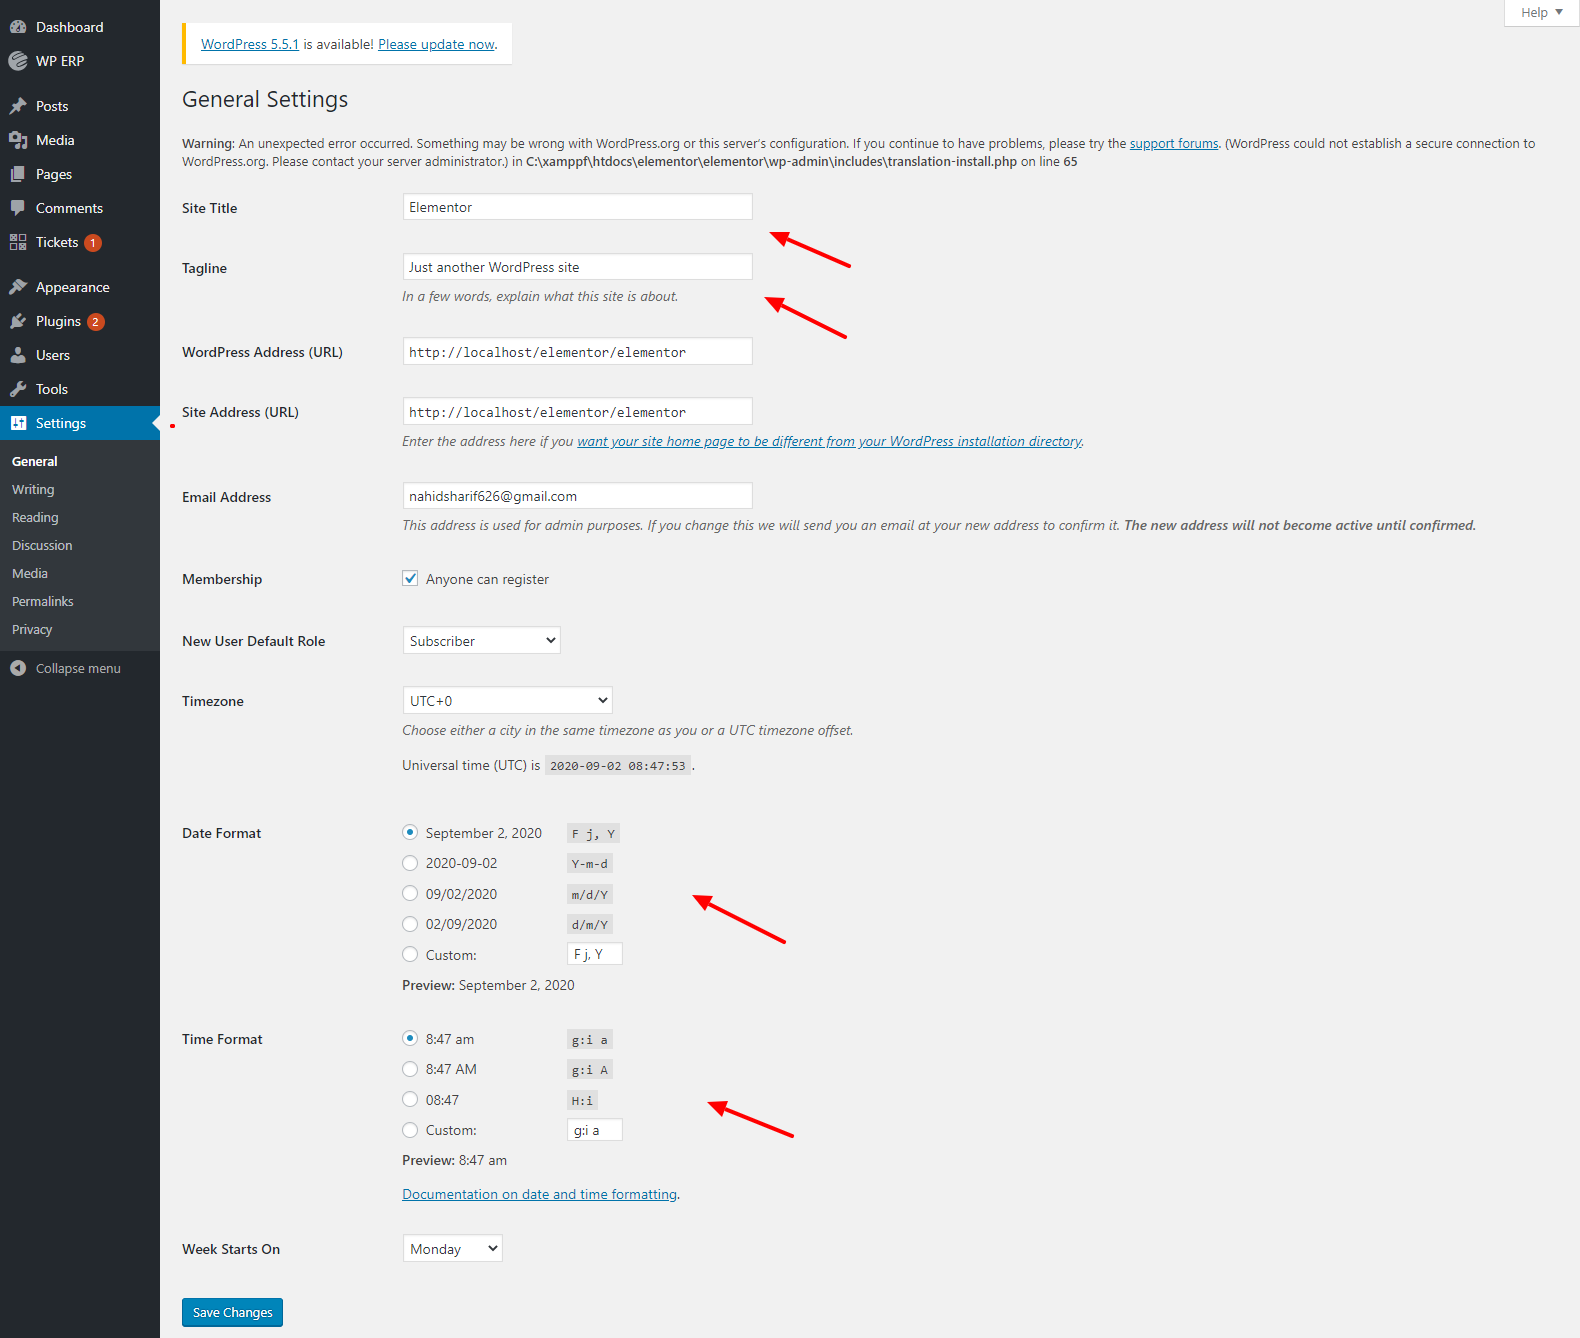
To customize the general settings of WordPress, head to WordPress> Settings> General.
- Give your site title
- Add a tagline
- Edit your site’s URL
- Email Address
- Check mark to open registration for all
- User role
- Timezone
- Date format, etc.
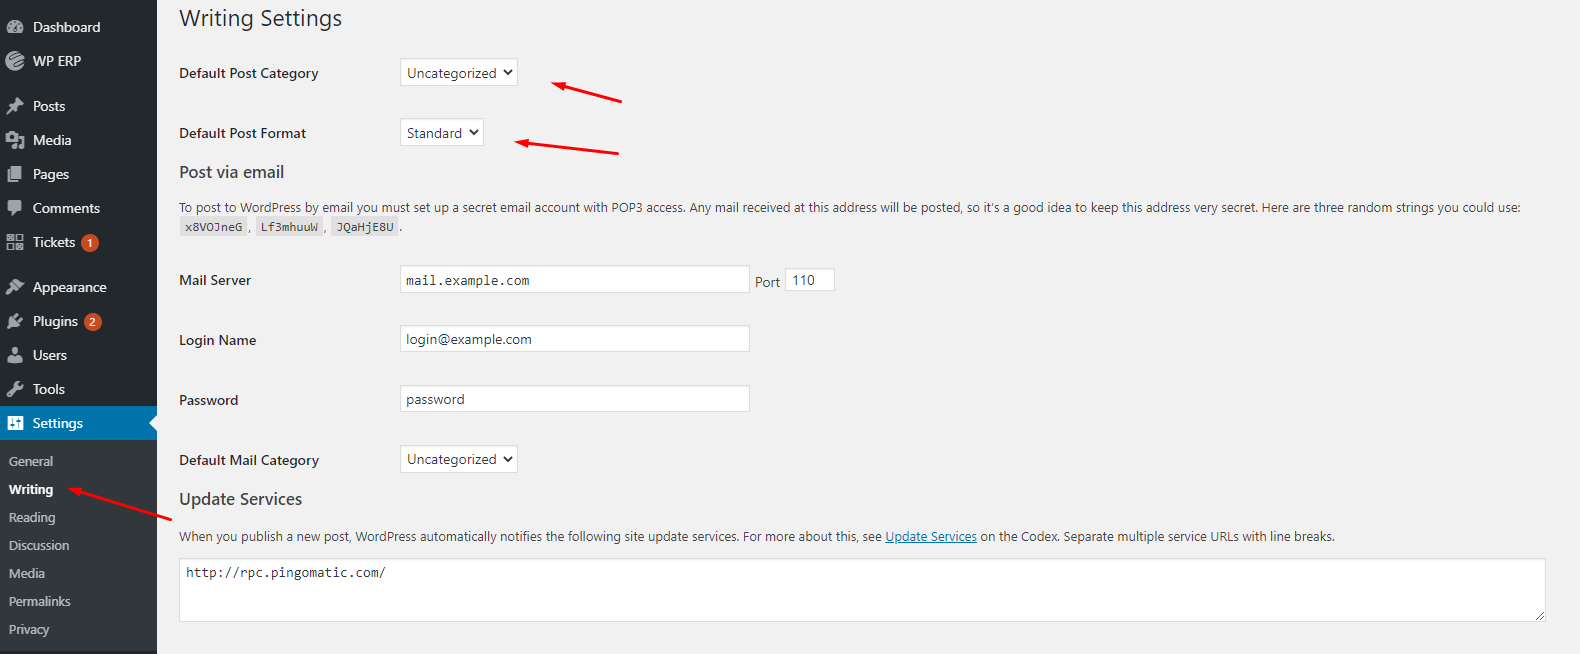
Next, click on the ‘Writing‘ option. Here you just need to select the default post category & post format.
- Default post category
- Post format
- Mail server
- login name
- And mail category
Now in the ‘Reading‘ option, you can customize certain things such as ‘Home Page display‘, the number of blog posts that you want to show, etc. Let’s see them one by one below:
- Homepage and blog page settings
- Blog posts per page
- Post summary
- And search engine visibility
Note: We recommend you disable the search engine option at the initial stage. Without completing the site's customization, it's not wise to do this. So do make sure to follow this tip.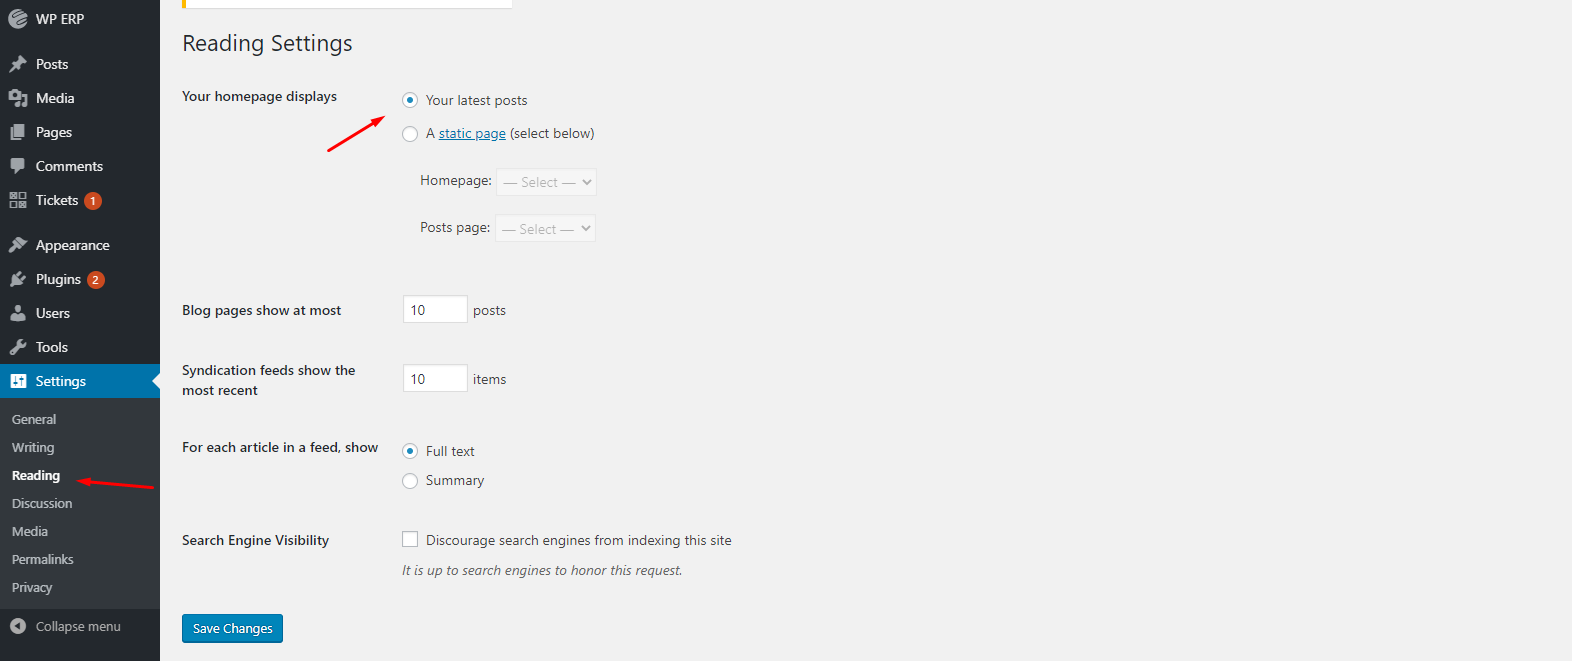
09. Set Permalink Structure
Permalinks are an important part of your site as both search engines and visitors use these URLs to index and visit your site
Yoast
As a part of SEO strategy, site permalink structure is an important part of the SEO ranking factor. An unstructured URL could harm your site’s performance and may not get indexed properly by the search engine.
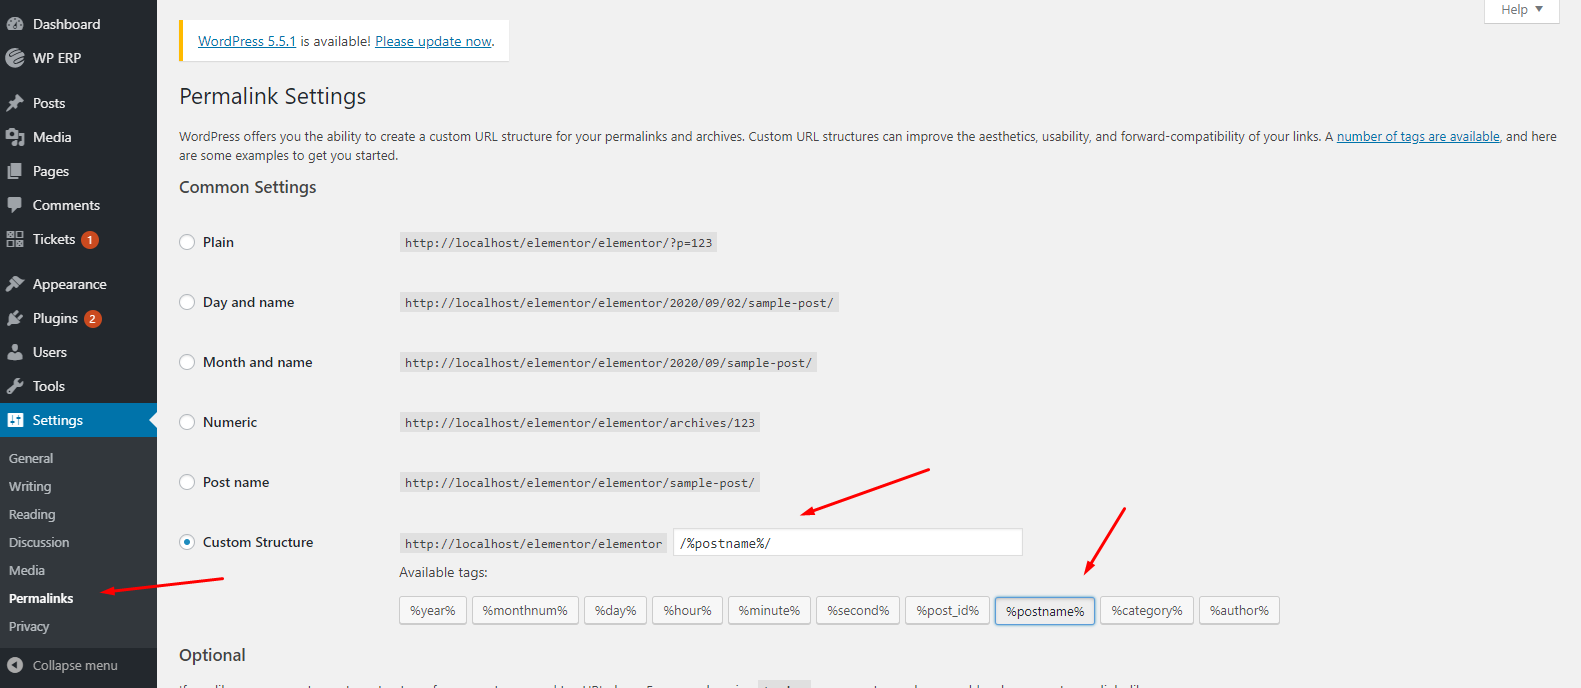
It’s hard to manually customize the site’s permalink. But WordPress gives you the opportunity to do that efficiently. For instance, you need to click on the Permalink option. And then give a custom URL structure just like the screenshot below:
For example, Yoursite/%postname%/.
10. Create a Sitemap and Submit It to Search Console
A sitemap is a blueprint of your website that help search engines find, crawl and index all of your website’s content
Backlinko
Generally, in WordPress, SEO plugins like – Yoast, and RankMath automatically generate the Sitemaps for the website. In case you don’t know the manual process. We’ll show you how to create a sitemap and submit it to the search console.
You can find different tools online to create a sitemap for your website. But we recommend you to use XML Sitemap. It’s easy to use & create.
To create a sitemap, visit their website. And insert your website’s URL in the search box. After that, hit the start button.

Once you started the process, it will automatically crawl your site and will create the file for you.

After completing the process, a Downloadable file will be available for you. Just download it and use it on the Google search console.

After you enter into your Google search console account, navigate to the Sitemap section. And type Sitemap.xml after your main website’s URL. And then hit the submit button.
That’s all! You have successfully submitted the sitemap of your website.
Note: Google will verify that the sitemap. It may take some time before your sitemap is crawled. But in case you already submitted the sitemap before, do make sure to remove the oldest one before submitting a new one.
➔ How to check the website’s sitemap
To check your site’s sitemap, go to the address bar. And then type your website/sitemap.xml. After that, hit the enter button to check.
Finally, search it on the browser address bar – www.yourwebsite.com/sitemap.xml

11. Create and Post First Content on Your Site
To create your first content on your WordPress site, navigate WordPress> All posts> Add a new post.
Once you get in there, you’ll find the option for the title, post body. At the right bottom portion, you will find some important elements like post permalink, category, tag, feature image, and discussion.

After you add the Title, Description, and feature image, the entire post will be like below:

Here is how you can do more with your content. For example, changing heading, adding a link, customizing sentences from bold to italic, and so on.

Let’s how it will look like after you publish your first content on your website.

In case you want to customize more things on your blog post, here is an in-depth guide to writing a first blog post in WordPress.
12. Optimize to Make Your Website Visible in Search Engine
SEO is the most widely used term in the online world. Regardless of the size & purpose of your business, you must need a strong SEO strategy in hand to place your website appearance on search engines like – Google, Bing, and Yahoo. From ranking 1st position to generating thousands of traffic, SEO strategy will come to help you in every possible case.
So what are things that you consider after just creating your website? Here you go:
- Upload & update fresh content regularly
- Audit your site for finding errors
- Keep your site’s URL short and easy
- Optimize your site with On-page & Off-page SEO
- Resize your media file before uploading
- Focus on your site’s UX/UI design
- Provide videos, eBooks, tutorials, or documentations (if needed)
- Include an SSL certificate on your site
- Install SEO plugins like Yoast SEO or Rank Math
- Generate and submit your sitemap to Google Search Console
After a user builds a website, s/he forgets to apply some definite methodologies that could have helped them to grow & develop. Lack of proper knowledge and experience, they even don’t know how to execute it.
You can avoid these mistakes by taking help from these 10 biggest tips discussed in the article below!
Read: 10 Biggest SEO Mistakes Ruining Your Digital Marketing Strategy
Few Suggestions From WordPress Expert To Keep Your Website Always at the Top
WordPress ecosystem is such a community that helped many people to start their start-up business in minutes. All the contributors in the World are supporting each other to grow and develop. That’s why it has a standalone community where experts share their ideas, collaborate with each other, develop features, provide feedback, etc.

Therefore, considering the tips & suggestions from the WordPress experts, we’ve sorted out some points. Hopefully, it will help you to stay in line and your online business to generate better outcomes.
Let’s check out below:
- Consider premium themes
- Keep your site simple
- Optimize for Mobile
- Don’t overuse keywords and use them smartly
- Use relevant plugins
- Optimize the site’s speed
- Choose colors smartly
- Customize URL structure
- Promote your website in the right channel
- A/B test your approaches
Some FAQ About WordPress Website & It’s Functions
Ans: No! you can find more website builders like – WordPress. For example, web.com, Wix, GoDaddy, etc. Amongst them, WordPress is the most convenient platform for users.
Ans: Every plugin has an individual task to perform. From an eCommerce site to a membership website, there are many plugins that can help you to reach your goal. For instance, you need to remove the unnecessary plugins if you don’t want to use them at all. Because plugin will slow down your site speed – which is bad for SEO.
Ans: Well, WordPress itself is a free platform. But you need to spend an amount if you buy a hosting plan. As discussed above, there are different types of hosting service providers in the market. Starting from $1 to more, you can choose a convenient plan for your website.
Ans: Sure, you can do it! You can manually set up a local environment and install WordPress and use it. For that, you need to take help from MAMP, WAMP, or LAMP. This software help users to run WordPress site and set up a local environment.
Ans: No! You don’t need to learn or execute HTML/CSS to build or customize your website. Available plugins like – Elementor, Happy Addons, you can easily build, process color combinations and do other things on your website.
Ans: To update the WordPress version, you just need to follow some steps. Navigate to WordPress> Dashboard> Updates> And check the updates if available> Continue your update procedure.
Ans: Using available plugins and their features, you can add functions to your website.
Some Useful Resources Regarding WordPress Tutorial
Here are some helpful resources related to WordPress. You may follow these guides to brush up on your knowledge about WordPress:
Localhost:
- WordPress in XAMPP- Step by Step Tutorial
- Install WordPress on cPanel the EASIEST WAY
- Best WordPress Hosting Providers in
WordPress Basic:
- Install a WordPress Theme (Three Easy Ways for Beginners)
- How to Install a WordPress Plugin – Step by Step for Beginners
- What is WordPress Widget and How to Add a WordPress Widget
- How to Start an Online Website Design Business
- How to Improve WordPress Speed
Website Development related:
However, if want to learn more about WordPress, you can check out the following link to move forward.
Final Words on Making a WordPress Website
That’s all you need to know & learn about WordPress!
Having a great website actually values. It helps to connect with your genuine customers and leads. Plus, it creates a concrete impression with new users and boosts sales.
Anyways, the process we have shown above is pretty simple and easy to execute. For instance, you need to follow the steps carefully. It just requires your patience and design concept. So, keep exploring your niche, and you’ll be able to build a real fan base that values your opinion or loves your products/service.
Enjoyed our Blog? You can subscribe to our Newsletters for more refreshing and useful content like this.
In case there is anything we have missed to add in this guide, or if you have any feedback then feel free to share them with us in the comments below.




2 thoughts on “How To make a WordPress website from scratch (step-by-step guide)”