")


Running a business isn’t just about making sales, there are many other crucial responsibilities to consider. Unfortunately, sales tax calculation is one aspect that often gets overlooked. While it might not seem like a big issue at first, neglecting it can lead to serious complications down the line.
In the long run, poor sales tax management can create major setbacks for your business, including legal and financial troubles. So, just like any other important task, you should take sales tax calculation seriously right from the beginning.
But if your online store makes lots of sales daily, manually calculating its taxes is almost impossible. Plus, it can increase the chances of making errors. Using an ERP solution could be a lifesaver in this case.
Moreover, with an ERP solution, you cannot only manage sales tax calculation but also manage many other tasks easily. In this article, we’ll cover a step-by-step guide on how to calculate sales tax with WP ERP.
What Is Sales Tax and Why Does It Matter?
Sales tax is a government-imposed fee added to the price of products or services you sell. It’s typically a percentage of the total sales amount set by the national/provincial government. It’s a legal obligation that no business can avoid.
Failing to collect and deposit the tax on time can lead to penalties. Besides, customers don’t love to buy from sellers who aren’t regular in tax clearance. This can damage your brand reputation, trust, and image.
Besides, you must display the tax clearly during checkout, mentioning the correct tax rates. This will build a sense of confidence with buyers and keep your operations running smoothly.
What Is WP ERP?
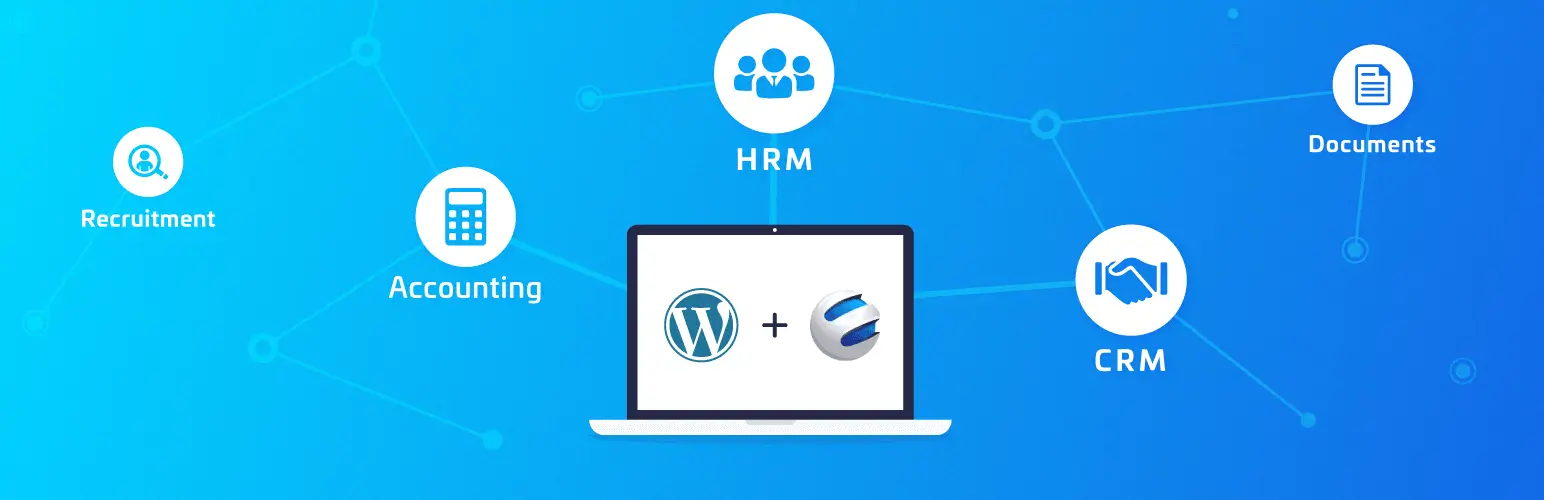
WP ERP is a comprehensive enterprise resource planning software for WordPress. It includes all the essential toolkits your business may need for managing the HR, CRM, and Accounting departments.
You can manage employees, customers, and various finance-related tasks directly from your WordPress dashboard without having to depend on separate platforms. So, you can clearly understand that once you have WP ERP, not just sales tax calculation, but also you can manage many other essential tasks of your business easily.
Things to Complete Before Calculating Sales Tax
WP ERP automatically calculates the sales tax whenever you create an invoice. However, before creating invoices and calculating sales tax, there are a few essential steps you need to complete in your ERP system.
For instance, the products you plan to add to the invoice must be pre-entered into the ERP. You should also categorize them and list their respective vendors.
Additionally, you need to define the type of taxation system you intend to follow and ensure it’s properly set up within the ERP.
So, to summarize, here are the things you need to set up in the ERP beforehand:
- Add all products you plan to include in invoices
- Create categories for those products
- List all vendors associated with those products
- Set up the taxation system you want to follow
- Create customer profiles for whom you want to sell products
Only after that can you create an invoice specifying the tax rate for sales tax calculation. Let’s explore below how this works.
Complete the Pre-Requisites Before Calculating Sales Tax
As said above, you have to complete several steps before calculating the sales tax. Let’s explore how to do them in this section.
# Create Product Categories
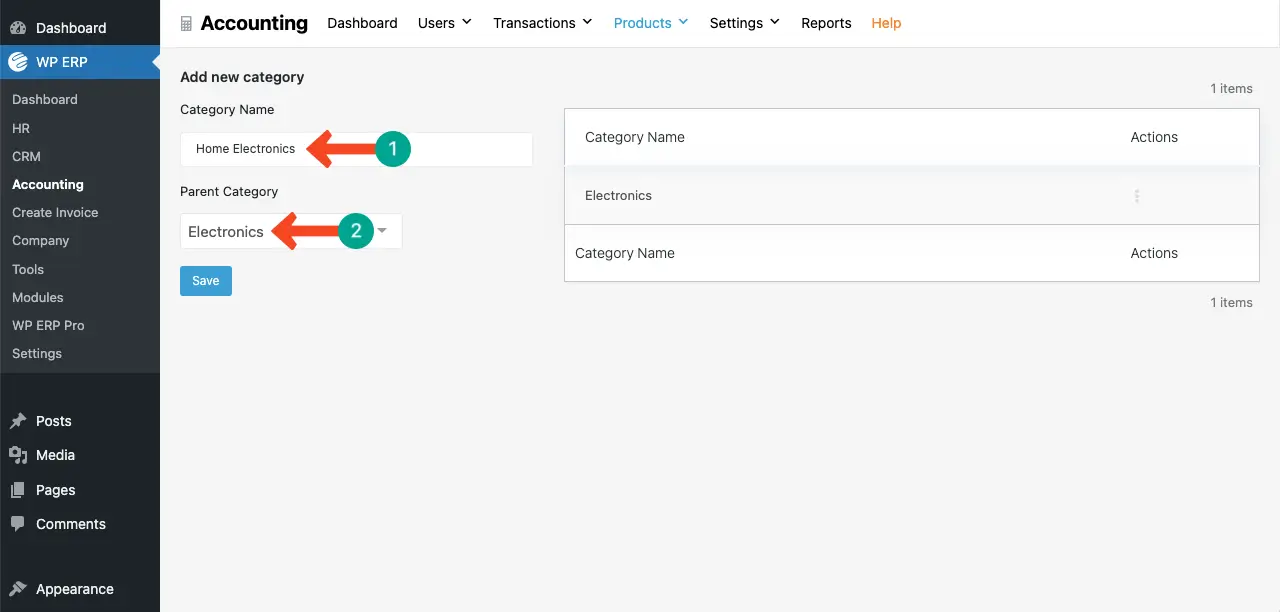
A product category groups similar types of products together, making it easier to manage pricing, inventory, and tax rules. Creating categories is important for sales tax calculation because different product types may be taxed at different rates.
To create product categories, go to Accounting > Products > Product Categories.
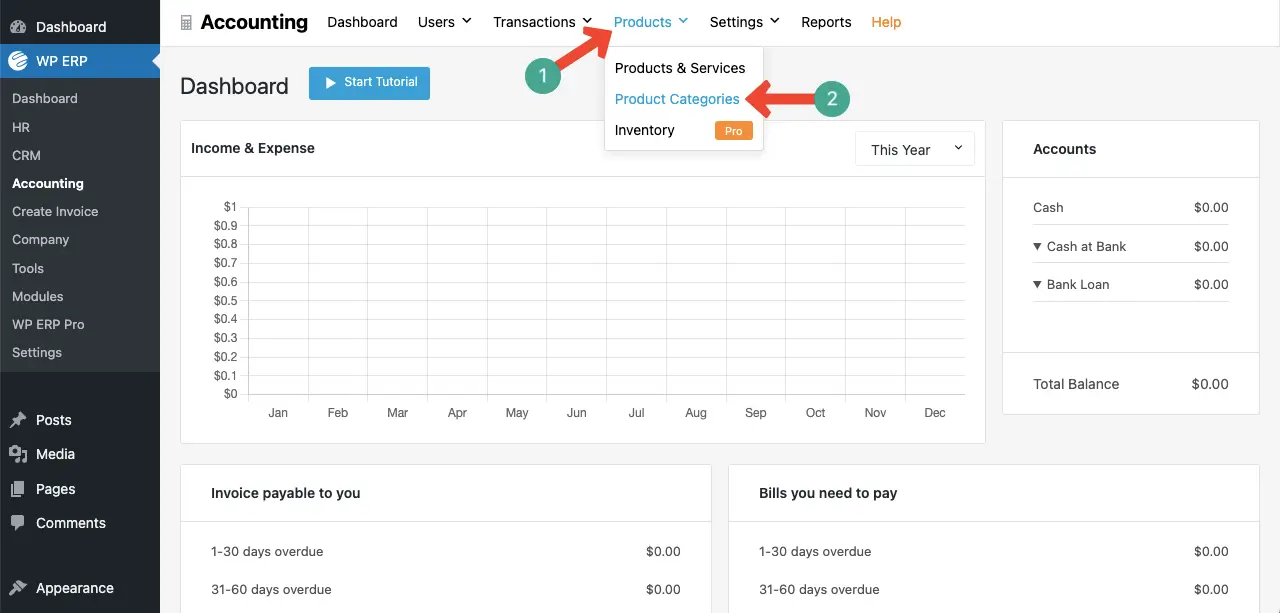
You’ll get two boxes, one for category and the other for parent category. If you don’t want to list any category under a parent category, just save it without selecting any parent category.
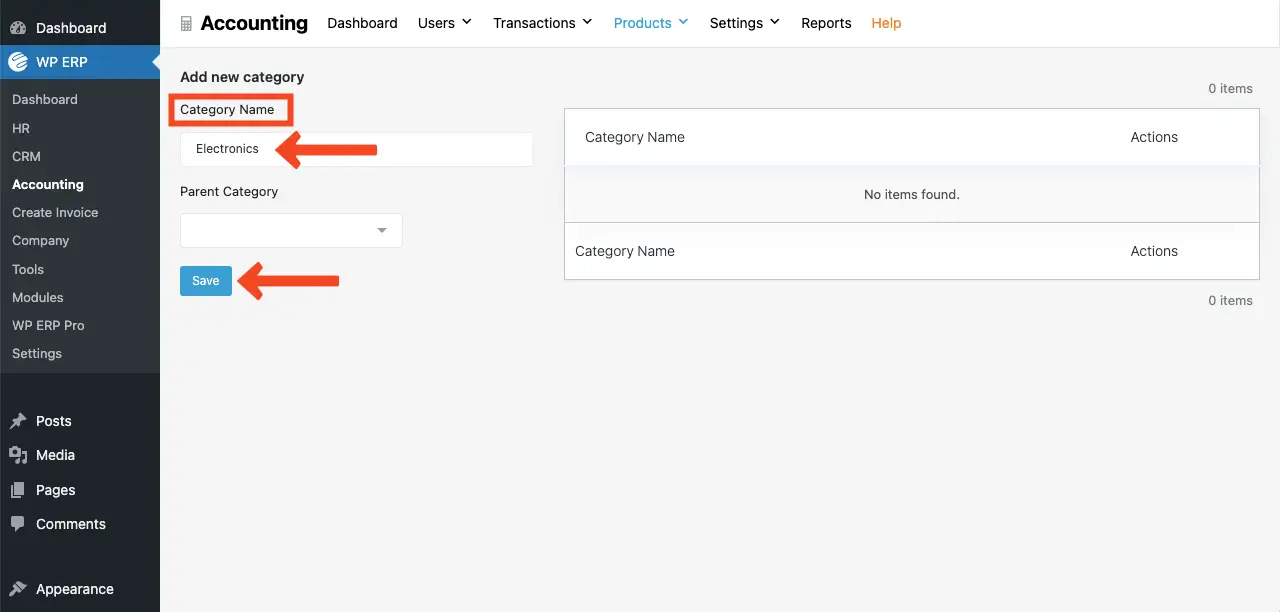
But you want to list your category under a parent category, select one and save it.
# Add Vendors to the ERP (Optional)
If your site is a multi-vendor marketplace or you source products from different sources to get and deliver them to the customers, you may want to display the product vendor’s name. If not, you may avoid this step.
However, to add new vendors to the ERP, go to Accounting> Users > Vendors.
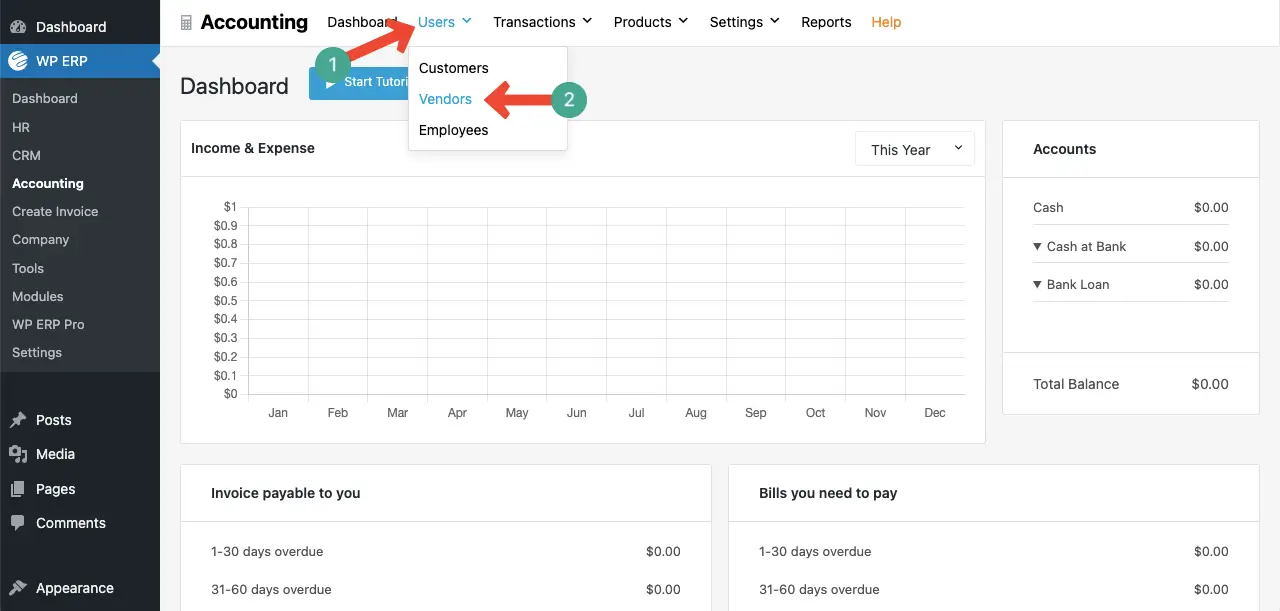
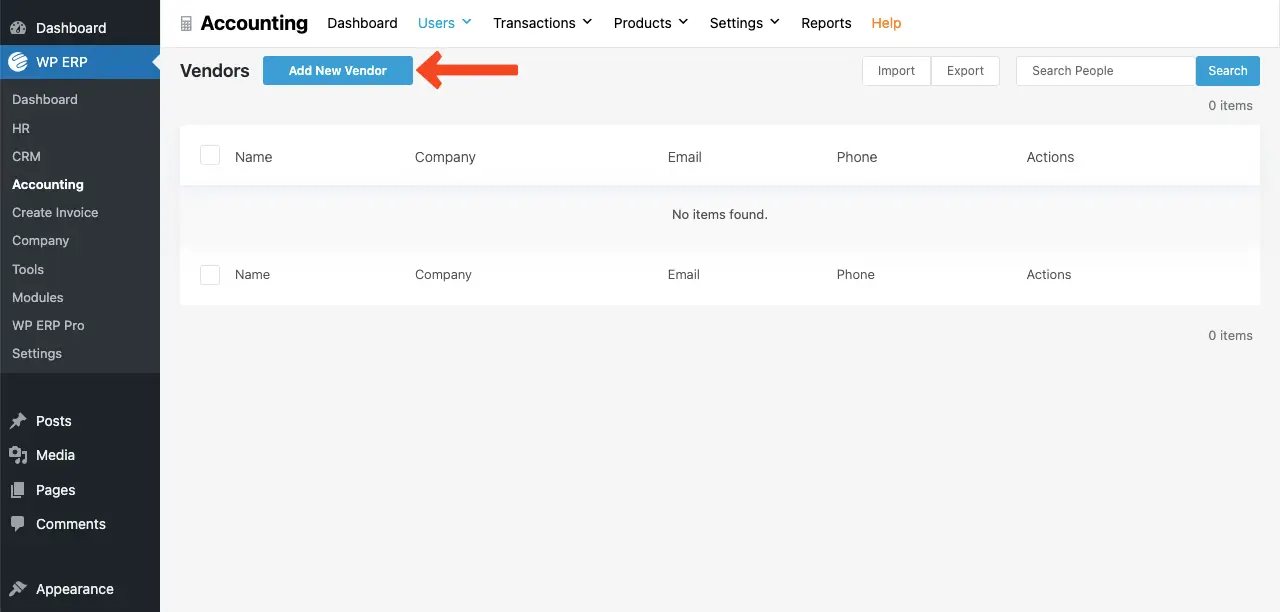
You’ll come to a new page. Click the Add New Vendor button.
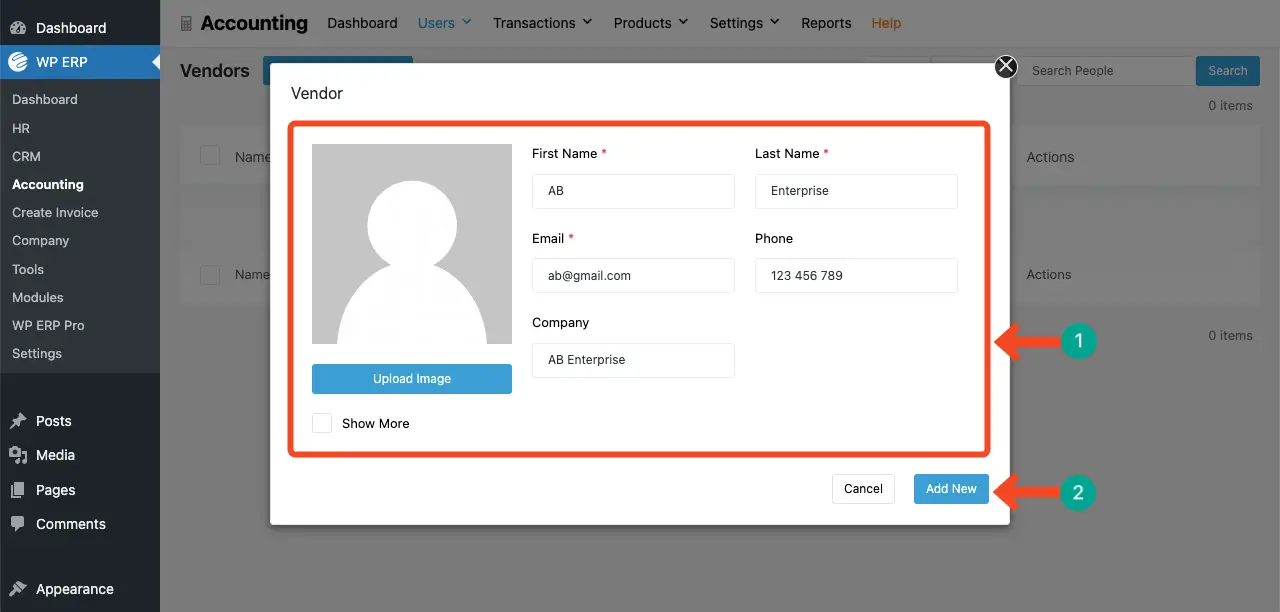
A pop-up will open. In the respective fields, fill in information about your vendor. Then, hit the Add New button.
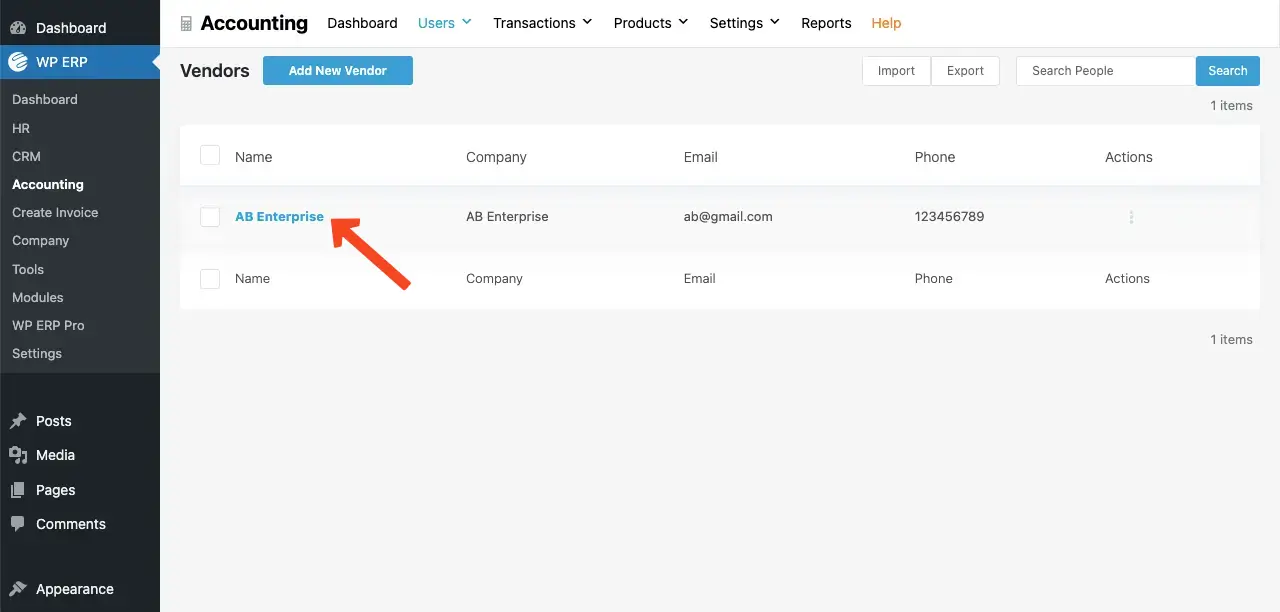
You’ll see the vendor has been added and listed in the WP ERP.
Explore the best WooCommerce accounting plugins.
# Add a Tax Category
There are multiple steps involved in this system. Let’s explore them. To add a taxation system to WP ERP, go to Accounting > Settings > Tax Rates.
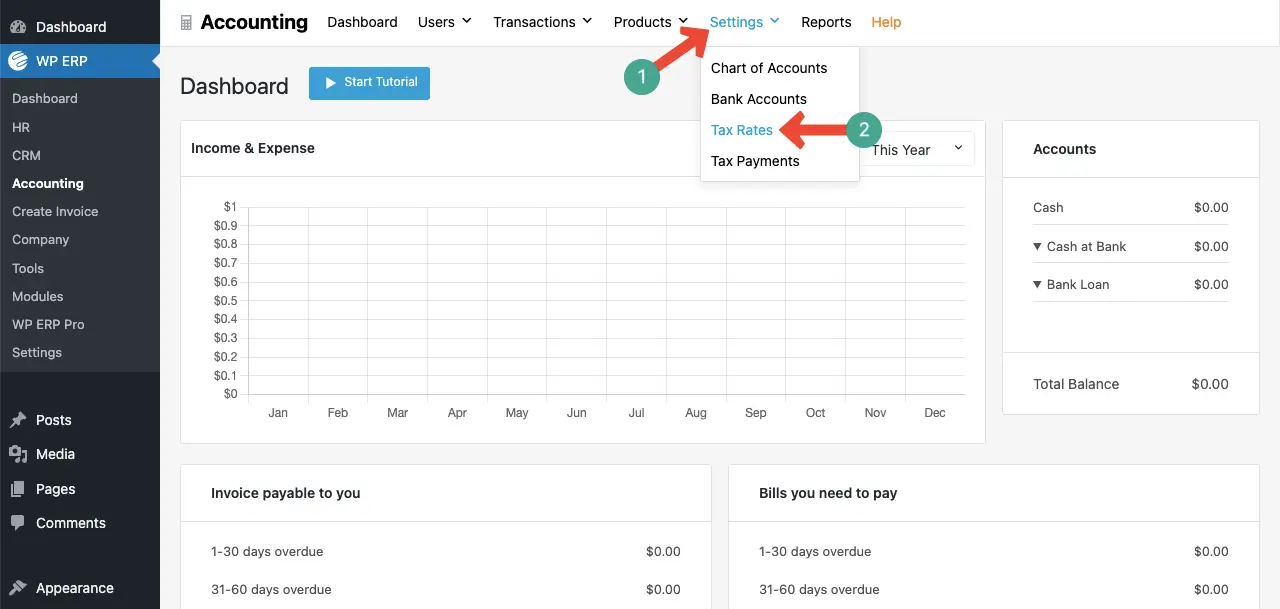
- Create a Tax Zone
Click the View Tax Zones option on the right sidebar.

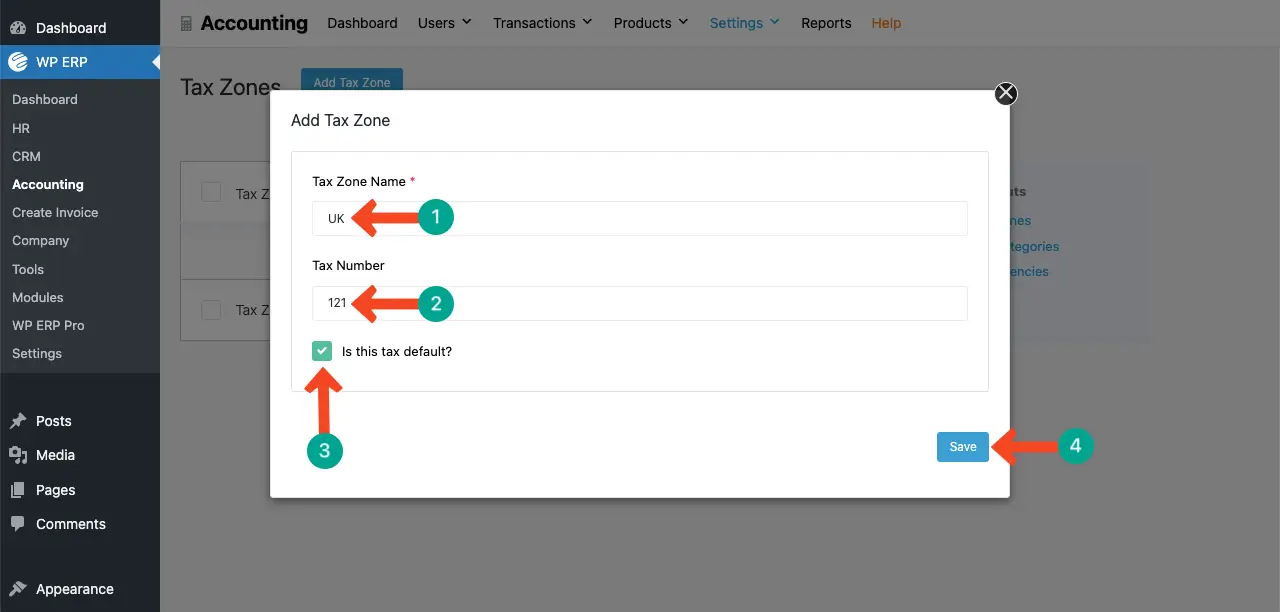
Click the Add Tax Zone button on top.

A pop-up will show up. Add information to the respective boxes – a name for the tax zone and tax number. Make it default by giving it a tick mark. Hit the Save button in the end.
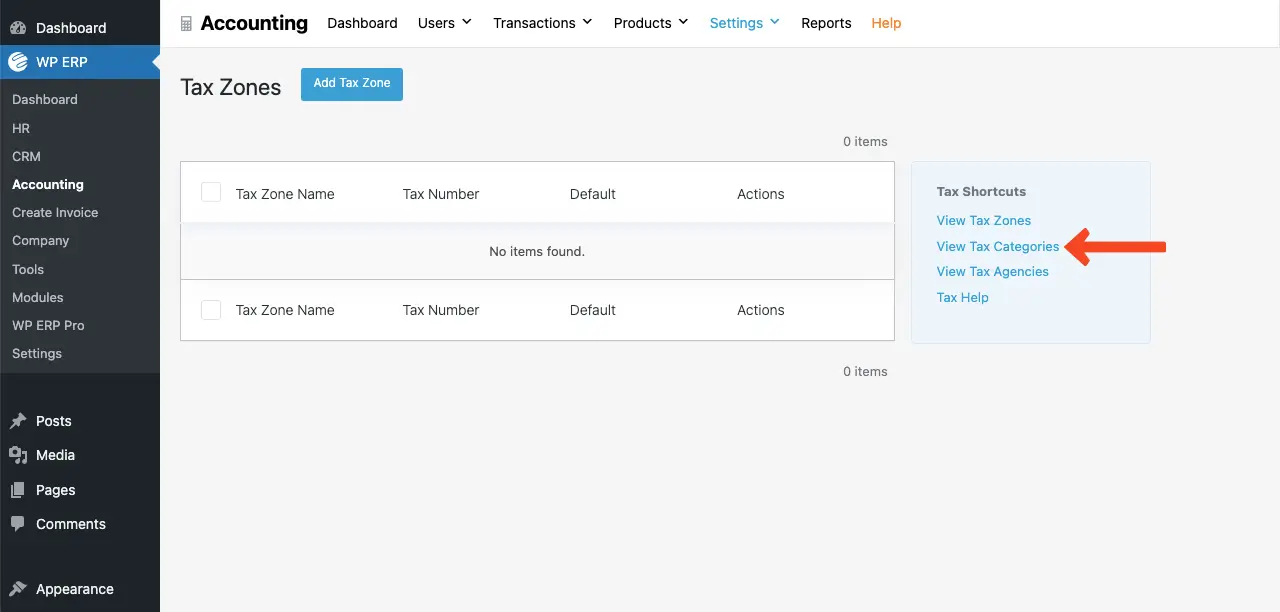
- Create a Tax Category
Click the View Tax Categories option.
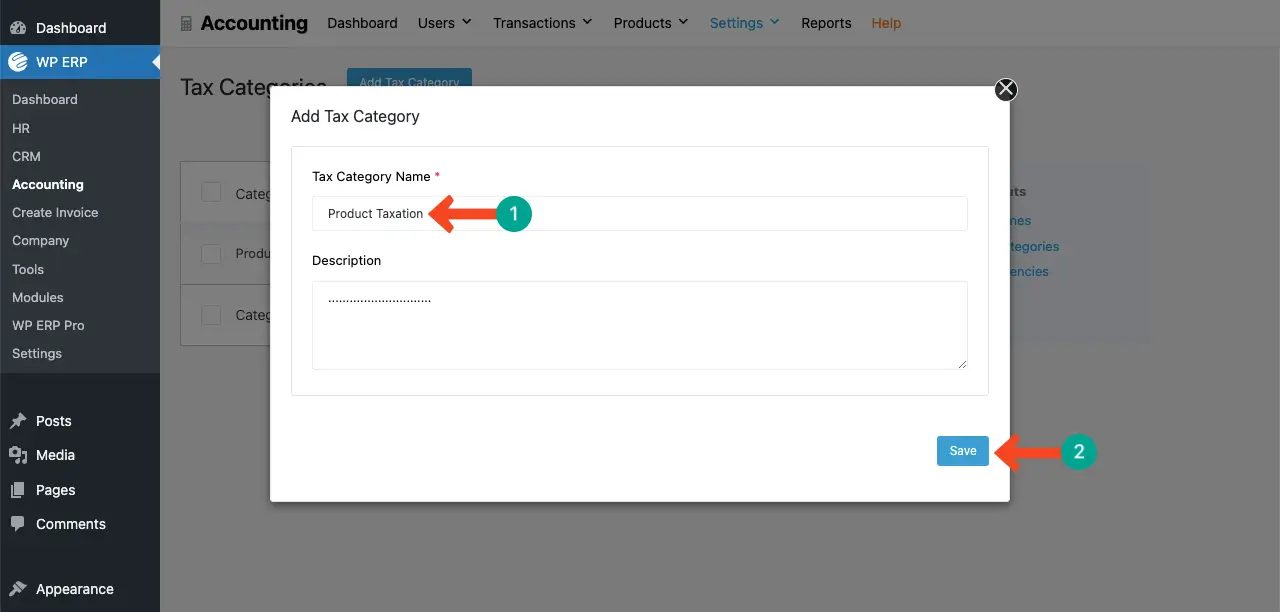
Hit the Add Tax Category button.
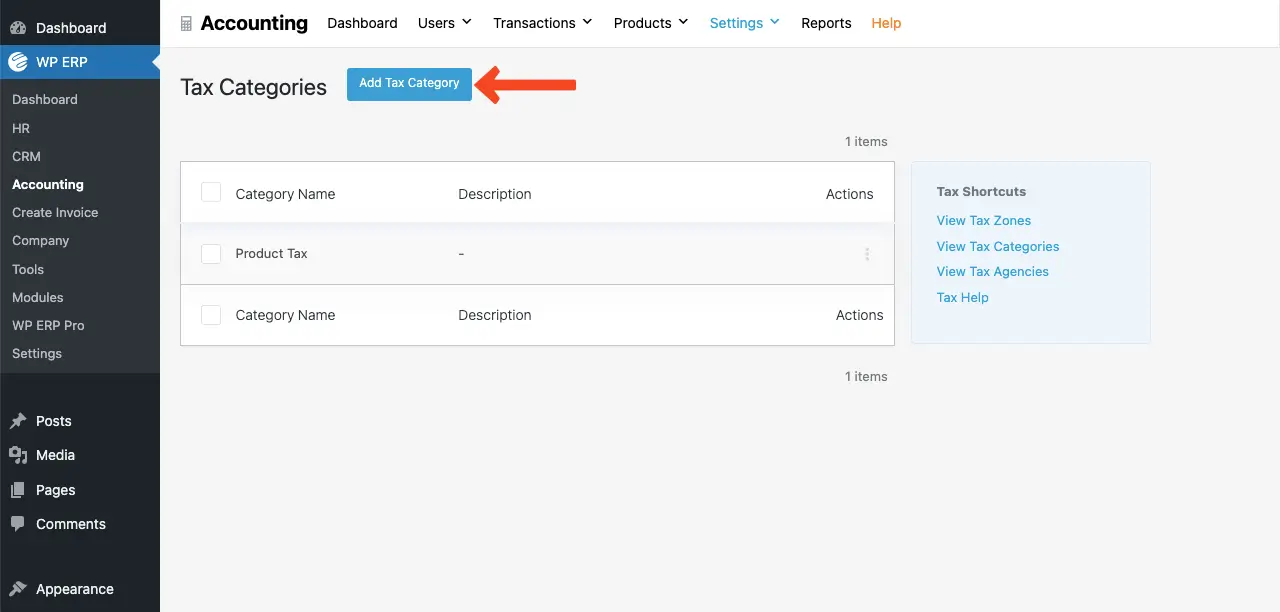
Write a name for the category. You may add a description as well if desired. Finally, click the Save button.
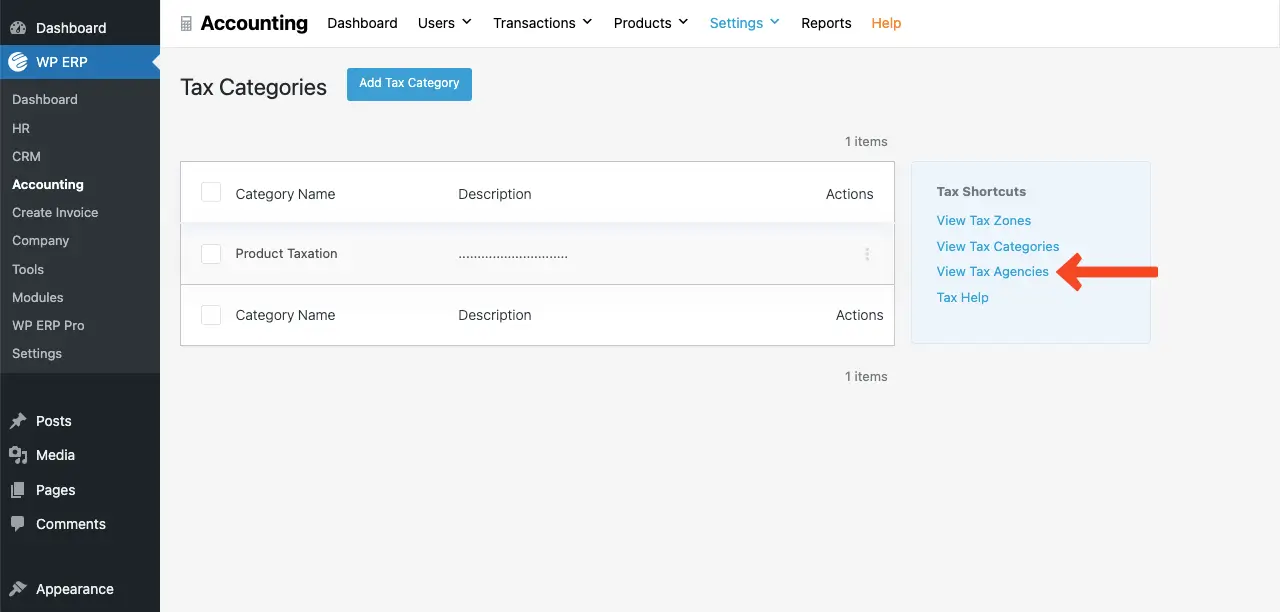
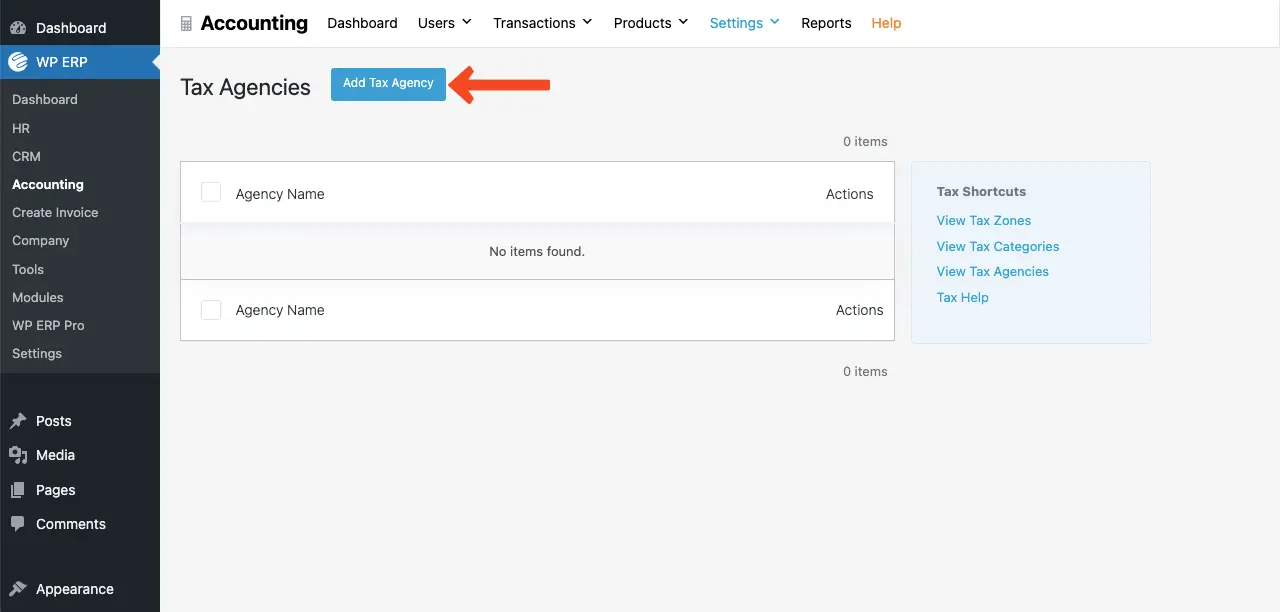
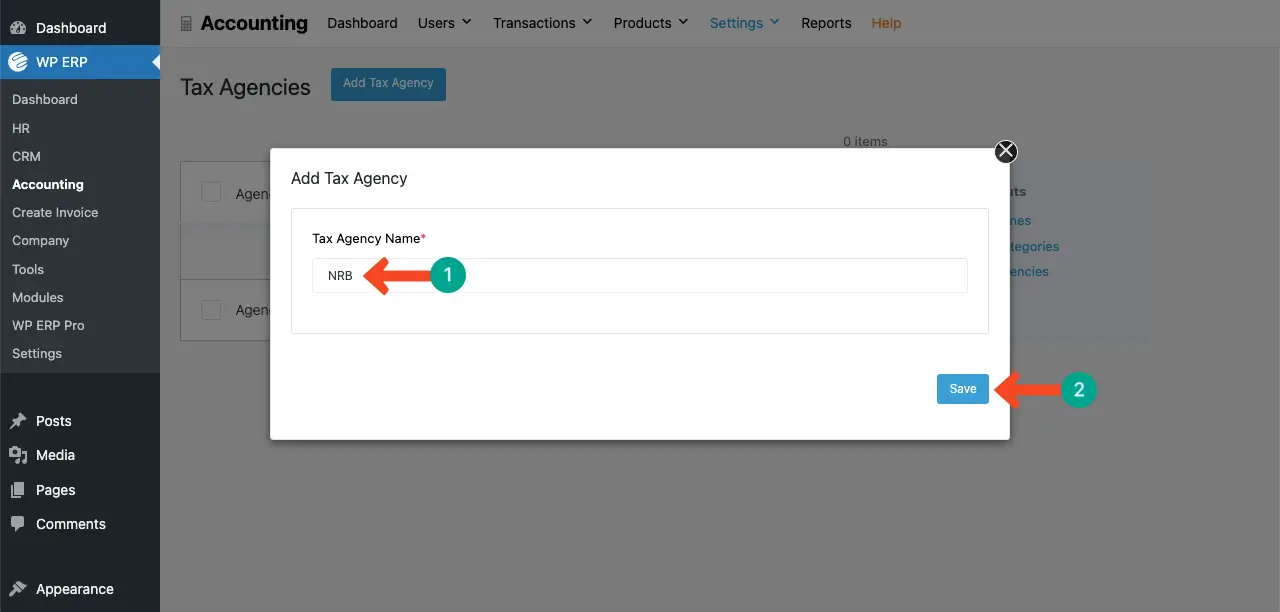
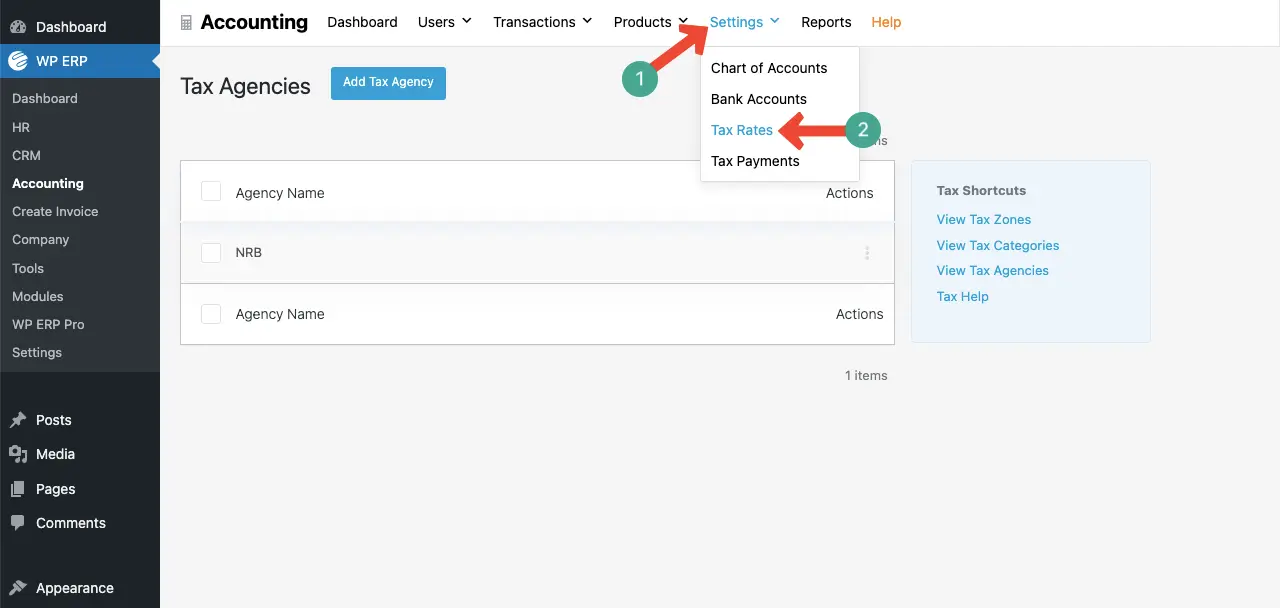
- Create a Tax Agency
In the same, go to the View Tax Agencies option.
Hit the Add Tax Agency button on top.
Finally, name the new agency and click the Save button.
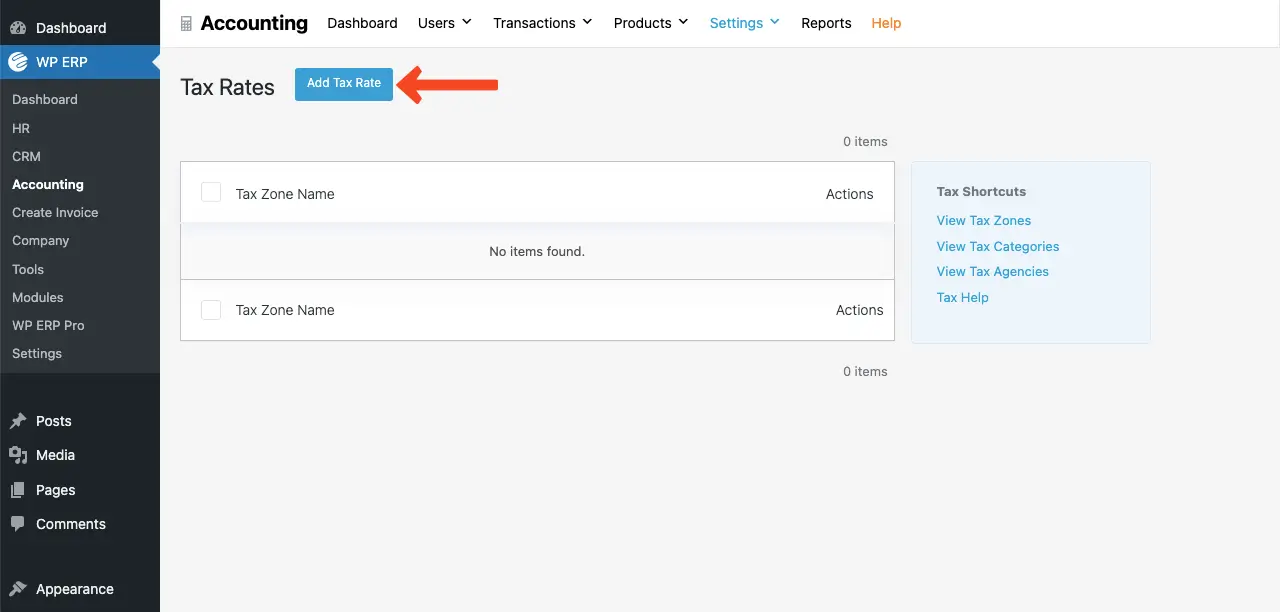
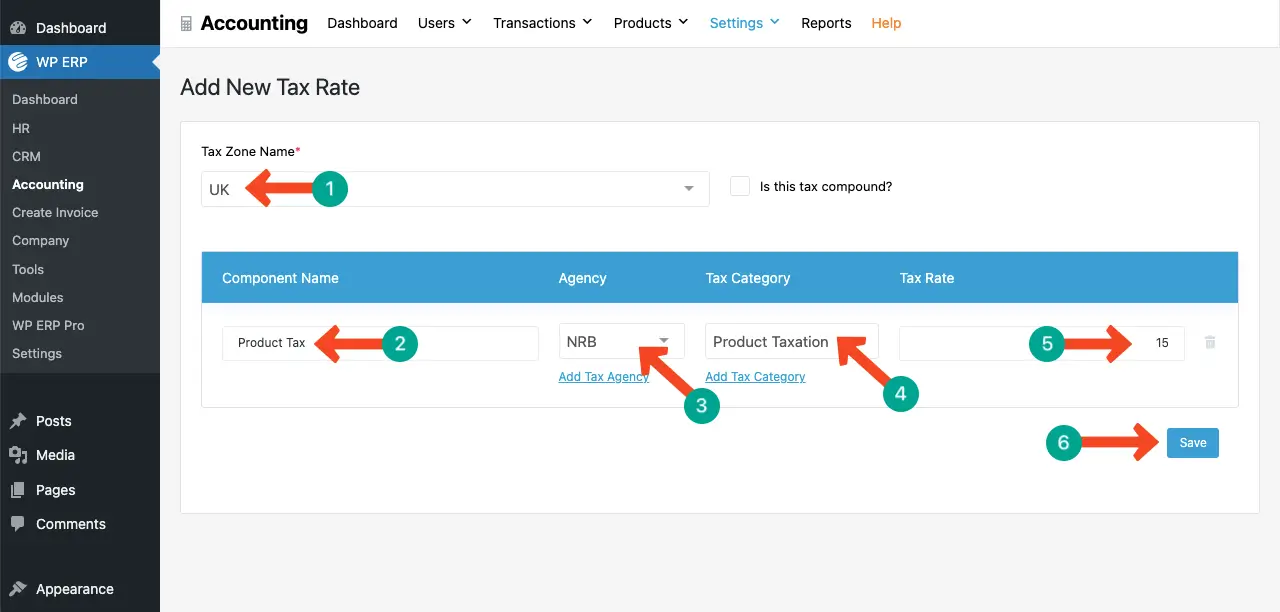
- Create a Tax Rate
Go to Accounting > Settings > Tax Rates.
Click the Add Tax Rate button on top.
Add all the respective information needed to create and specify the tax rate.
# Add New Customers to the ERP System
One of the major advantages of WP ERP is that you can create a separate profile for each customer. This allows you to store all transactions they made with you, which can be extremely helpful when making important business decisions in the future.
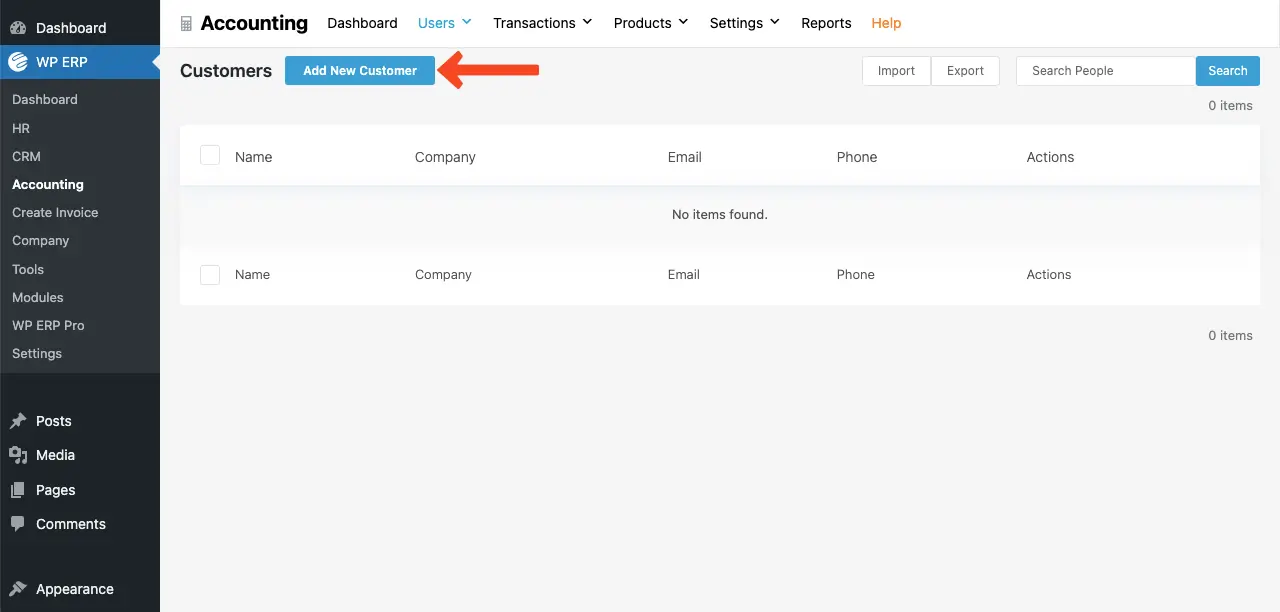
To add a new customer, navigate to Accounting > Users > Customers.
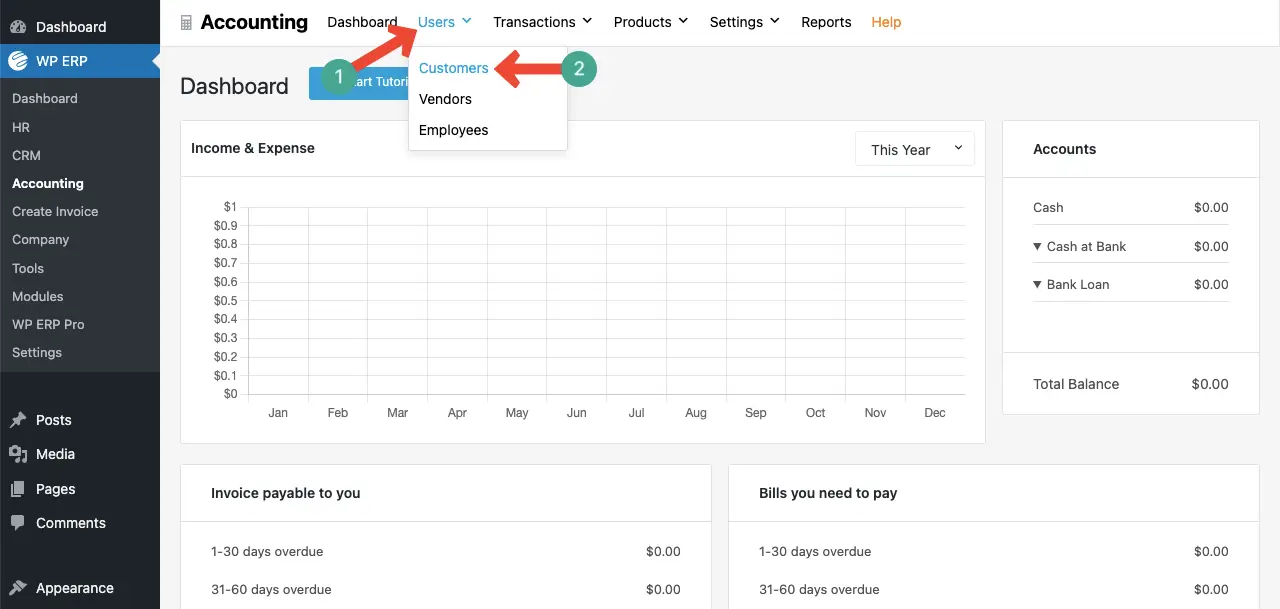
Click the Add New Customer button.
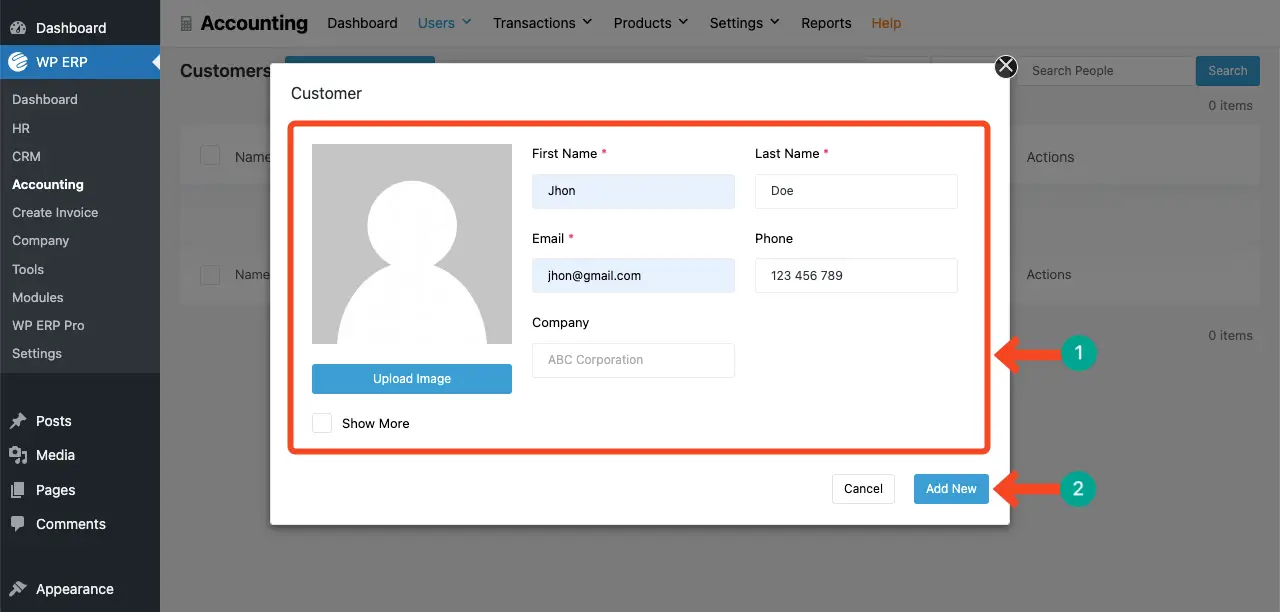
A pop-up will show up. Fill in your customer’s information in its respective boxes. Click the Add New button at the end.
Check how to create an employee profile in WP ERP.
# Add Products to the ERP System
Products need to be added to the ERP to accurately track inventory, manage sales and purchases, generate proper invoices, and calculate sales tax.
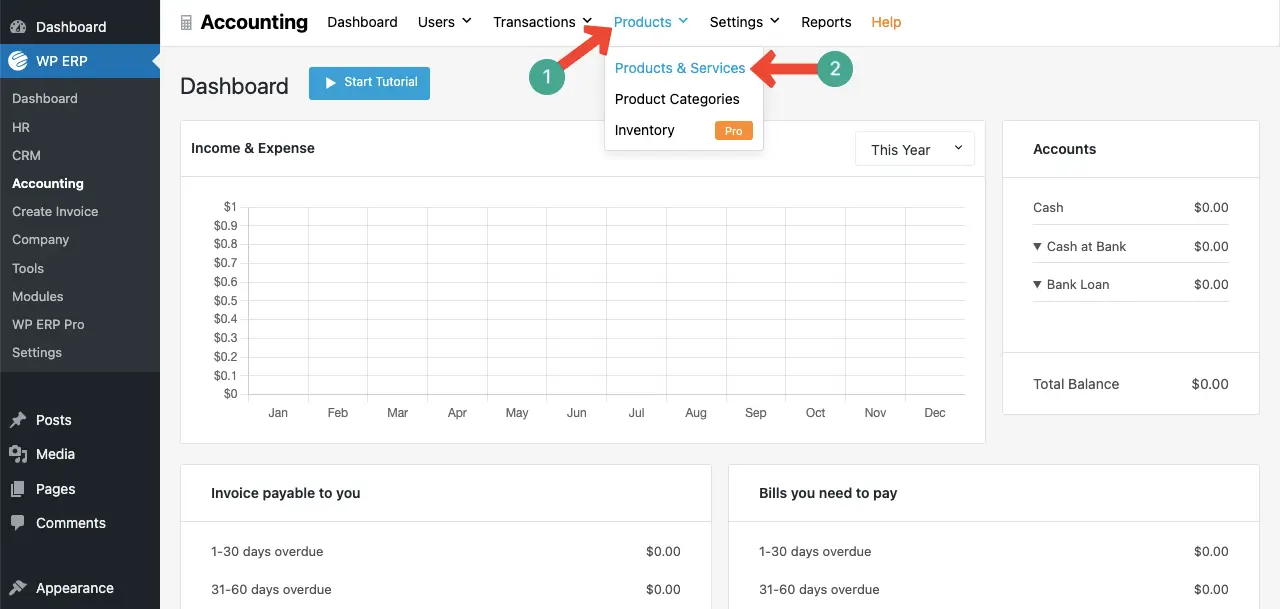
To add new products, navigate to Accounting > Products > Products & Services.
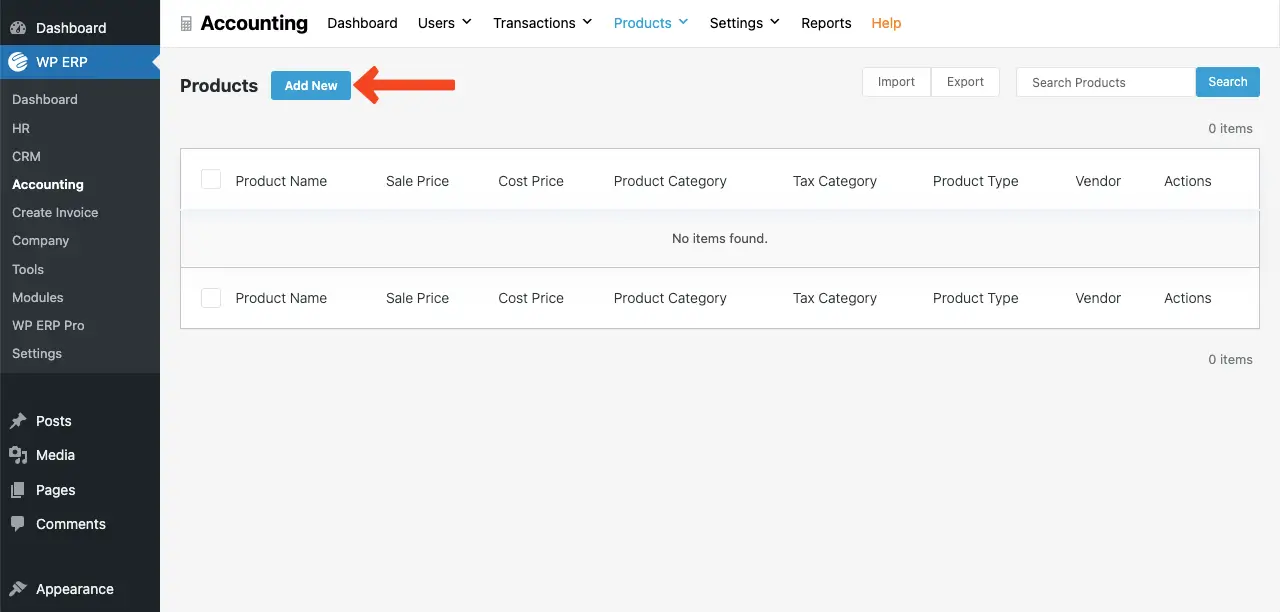
Click the Add New button.
A similar pop-up will open. Type your product’s name and fill in its necessary information in the respective boxes.
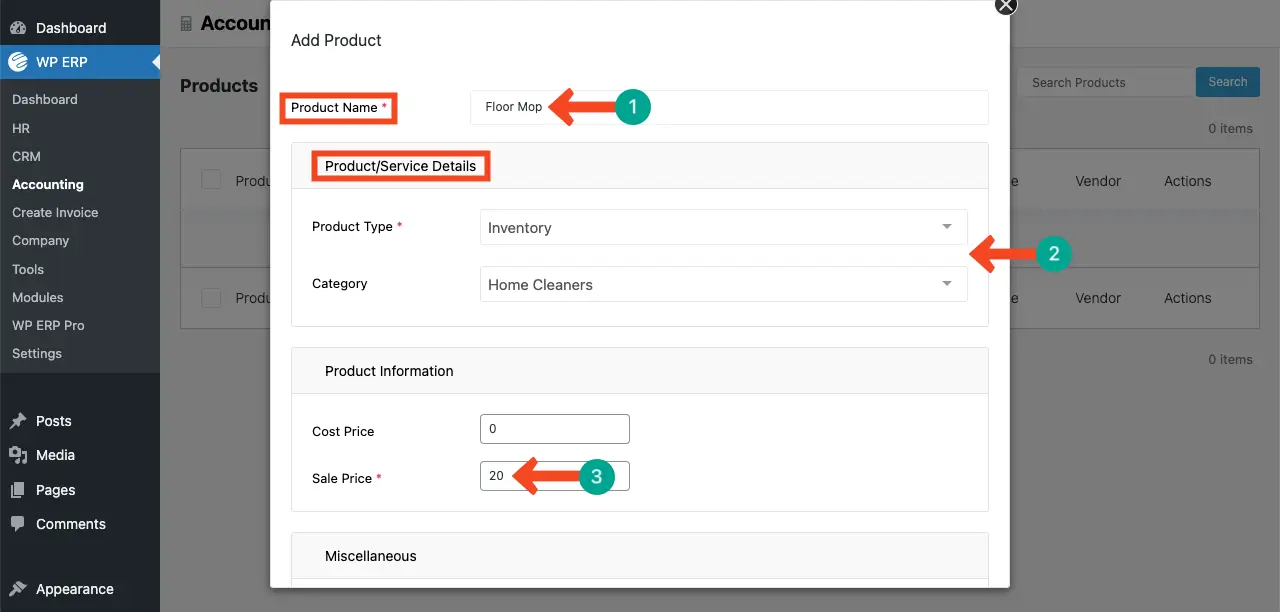
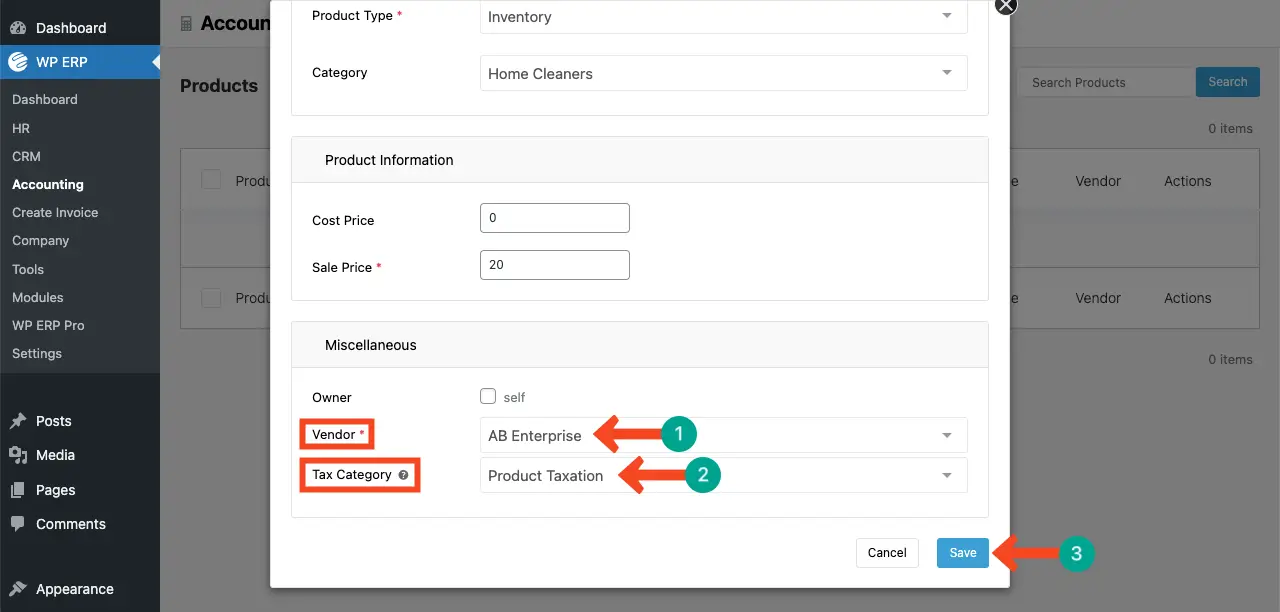
Finally, before saving the product, you can select a vendor who is selling the product. After that, select a tax category for the product. Click the Save button in the end.
How to Calculate Sales Tax While Creating an Invoice
Once all the above steps are done, all the necessary information is stored in your WP ERP system. So, now, you are ready to create an invoice and calculate taxation at the same time.
To create an invoice, go to your WP ERP dashboard. Then, navigate to Account > Transactions > Sales.
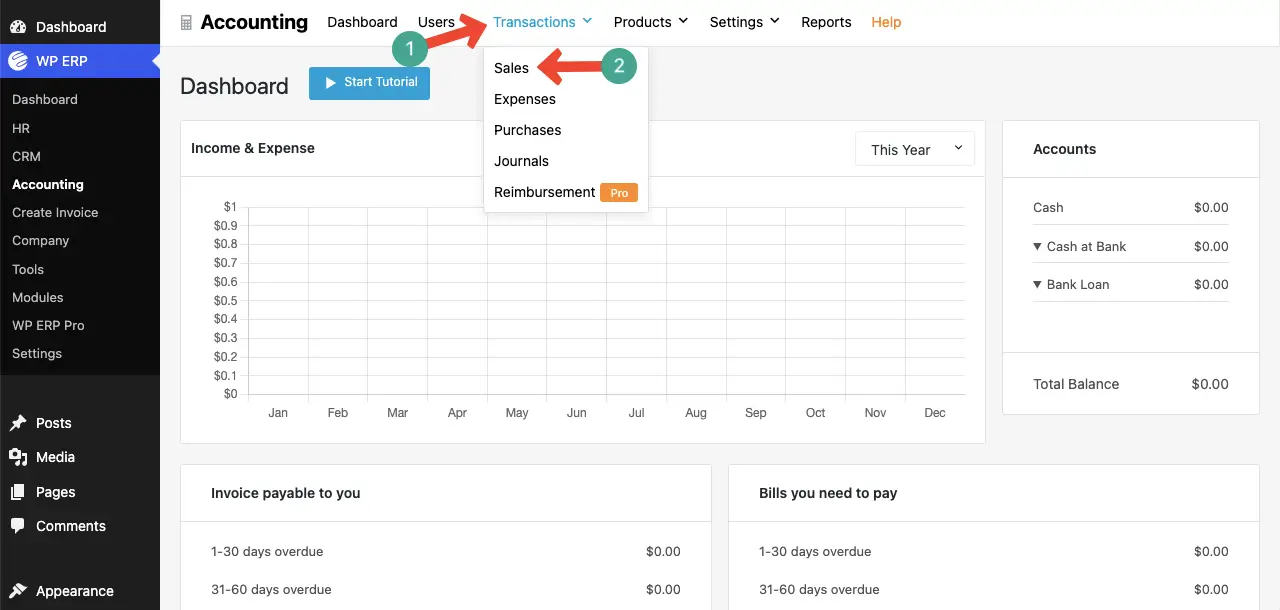
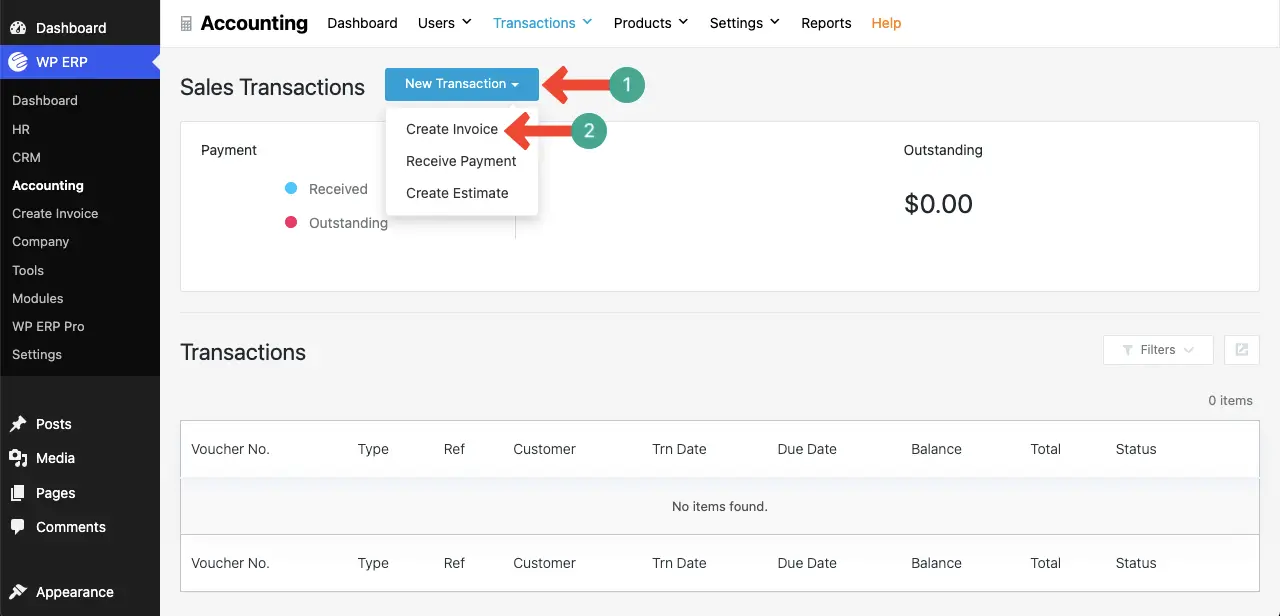
Then, go to New Transaction > Create Invoice.
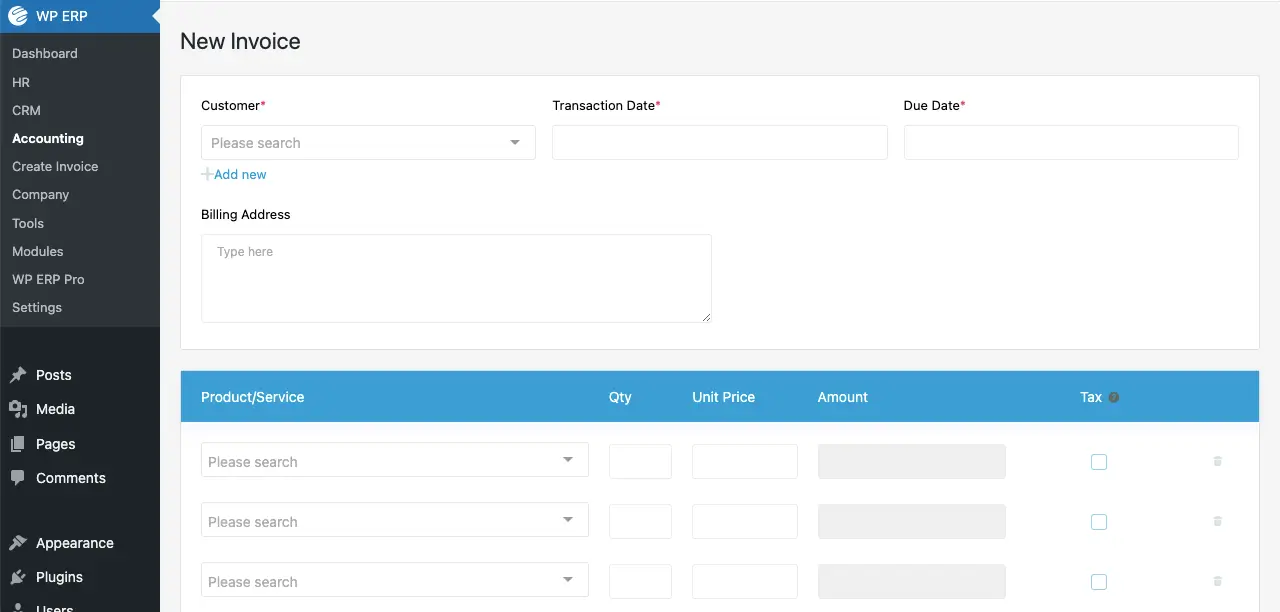
You’ll come to the invoice page. Here, you have to specify all the necessary information you want to create the invoice. You have to fill in the following information on the invoice –
- Customer
- Transaction Date
- Due Date
- Billing Address
- Product Information
- Discount
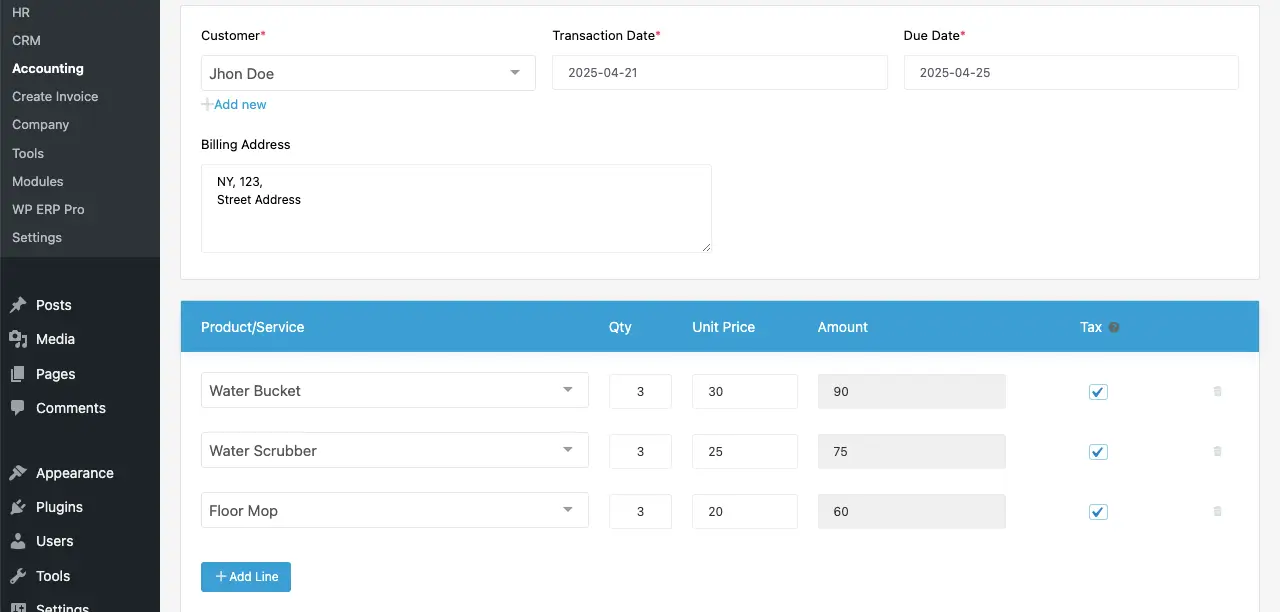
Now, start selecting/adding all the information to the respective boxes on the page.
You can see that we have added information to the respective boxes. Also, we have selected some products. Their prices will automatically be calculated based on their quantity.
Don’t forget to tick the tax option.
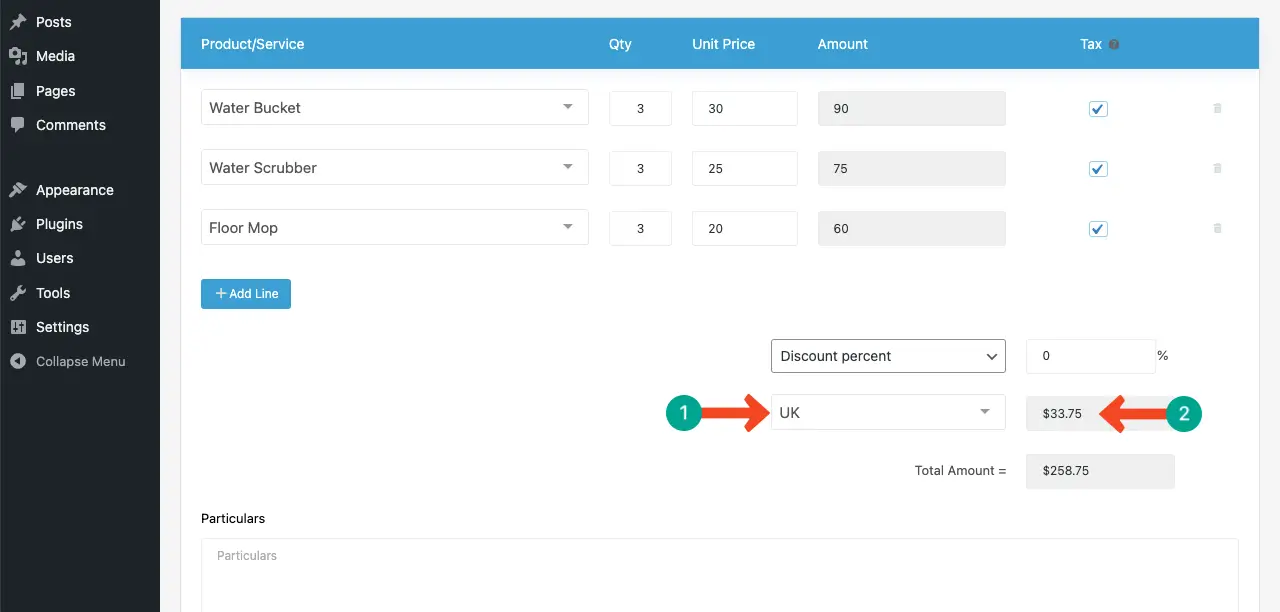
Come down by scrolling the page. Select a sales tax option in the option marked below.

You’ll see that the sales tax has automatically been calculated based on the percentage we have configured just a while ago.
Thus, you can calculate sales tax using the WP ERP plugin. Here’s a guide on how to sync WP ERP with popular CRM tools.
Closing Up: Sales Tax Calculation Isn’t Optional Anymore
Accurate sales tax calculation is no longer something you can take lightly. If you’re not precise from the start, you could face serious consequences, especially if legal issues arise. That’s why having an ERP system is essential for anyone aiming to run a sustainable, long-term business.
Not only can it help you carry out sales tax calculation the right way, but it can also make sure your product listings, categories, customer profiles, and vendor details are all up-to-date and well-organized.
Incorrect or missing information at any stage can lead to calculation errors, delays in invoicing, or even compliance issues with tax authorities. Hope this blog post is enough to open your eyes in this regard.
If you need any further information regarding how to calculate sales tax, mention it in the comment box below. Our team will answer your queries very soon with valid information.