For a long period of time, it was a hassle to maintain employee salaries manually. There weren’t too many reliable Payroll solutions out there. Spreadsheets and papers were the only solutions to track and manage the company’s payroll system. But now things have changed in the WordPress era.
As a modern human resource manager, you can have a smart open-source solution like WP ERP. It has a complete HR plugin module that can turn your WordPress site into a powerful HR management system.
Most of you who are already using WP ERP know that this comprehensive ERP solution comes with three popular business management modules in the form of HR Management, CRM, and Accounting. And all these modules are filled with some unique features that have the capacity to take your business management practice to the next level. But that’s a discussion for some other day. Today we will demonstrate to you a complete user guide of WP ERP’s payroll management system.
In order to reshape and streamline your salary management system with WP ERP, you simply need to integrate the Payroll Extension of your WP ERP HRM module. This extension will fully automate your payroll management process from scratch.
In this step by step payroll user guide today, we will show you how to utilize this feature-rich extension to it’s highest potential. So let’s get started.
WP ERP’s Payroll Management System- Your Automated Salary Manager
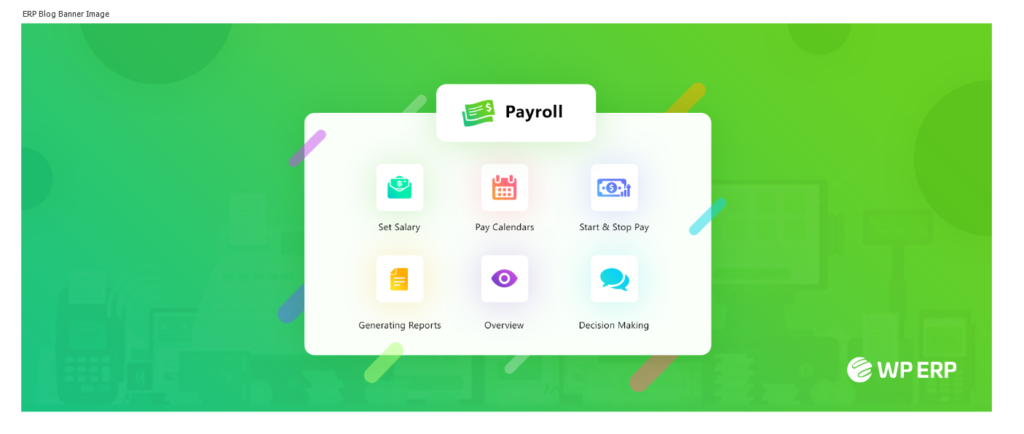
WP ERP HR Management Payroll extension is the all-in-one solution to manage and control your total employee salary management system. It helps you to create employee lists, and control their salaries in a structured way.
Top Features of the HRM Payroll:
Before you begin with this in-depth Payroll user guide of WP ERP, take a look at the top features this HRM plugin has to offer:
- Manage complete employee salaries in an automated way.
- Get a bird’s eye overview of the payroll system from the dashboard.
- Setup bank and tax details for every employee
- Create dynamic pay calendars
- Choose specific payment methods for your employees
- Define employee remuneration and other fixed payments (allowance or deduction)
- Retrieve employee information from the HR module.
- Generate detailed payroll reports
- Create, print, and email individual employee salary invoices
- Integrates with other ERP modules
The idea is simple, WP ERP will turn your WordPress website into a full-fledged ERP system. Now, as an HR manager, you can automate your every human resource activity with the WP ERP HRM module. Then you simply add the Payroll extension to your activated HRM module. And now start using the tool directly from your WordPress dashboard.
So let’s start with the prefatory matters first, then we will proceed with each of the phases in this payroll user guide for you.
Note: If you are already a WP ERP user, you may just skip this step and move on to the Payroll extension integration guide below.
Installing WP ERP HRM into Your WordPress

WP ERP is an absolutely free ERP solution plugin. It will take only a few minutes to install the software on your WordPress site. It is similar to any WP plugin installation. To begin with, do the following-
- Go to your WP Dashboard
- Click on “Plugins”
- Now click on “Add new”
- Search for ‘WP ERP’ on the search bar to the right
- Then click on “Install”
After the installation, you need to activate the plugin in your WP dashboard.
The core ERP plugin is divided into three main business module with an additional PM (project manager) extension. They are
- CRM (Customer Resource Management)
- HRM
- Accounting
Since you are an HR manager, it’s likely you only need the WP ERP’s HR Management module. Also, the Payroll extension is designed to add up to your HR system.
The other modules will be essential for the CRM manager and Accountant of your company. Therefore, when you add the salary amount to an employee account, you can use the HRM and Accounting data simultaneously.
If you need a more detailed process, take a look at our complete WP ERP Installation guide anytime.
How to Integrate the Payroll Extension to Your HR Module of WP ERP

Now that you’ve installed & activated WP ERP and HR module, the Payroll integration is only a step away. But please note that the HRM Payroll extension is a premium tool. So after you purchase it, you will be able to download the extension file onto your computer.
Now follow the process below:
- You need to go to the HRM dashboard from your wp-admin panel.
- Go to the plugin section, and click on add new.
- Upload the extension file from your PC to your WordPress system.
There you are the Payroll extension is automatically installed in your current HR management system now.
Completing the Payroll Setup Wizard
Now it’s time to complete your setup and configuration process before you can actually start using the extension to its full potential. In this process, you will be guided to three basic steps one after another.
Step 1: Account Settings
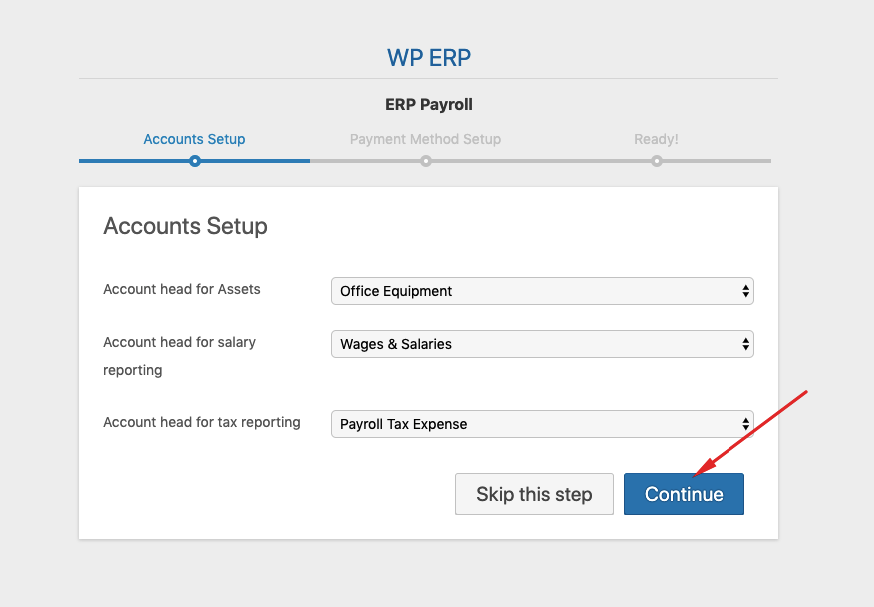
In this step, you would require to set three account heads. They are account head for Assets, Salary, and Tax Reporting.
For the respective sections, select Office Equipment, Wages & Salaries, Payroll Tax Expense. These different sections will lead your Payroll database where all of your selected information will be stored.
After you’ve selected the account heads, click “Continue” for the next step.
Step 2: Set Your Payment Method
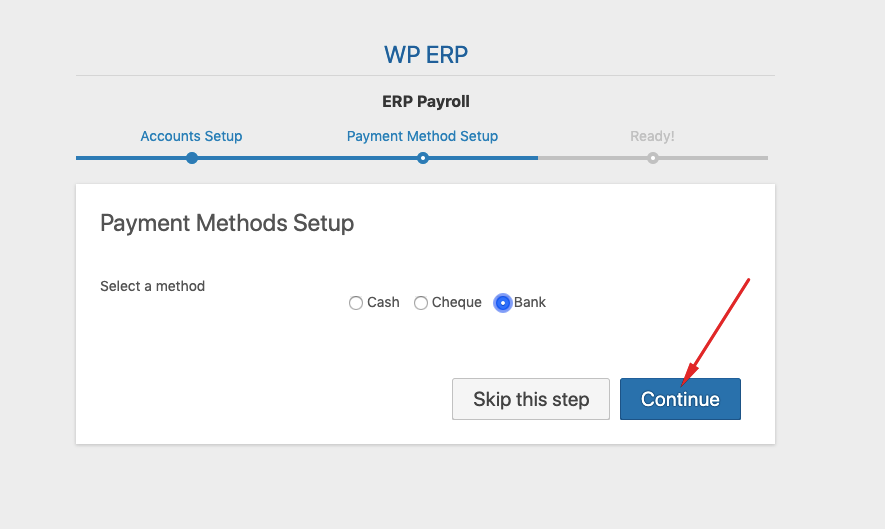
Now select your preferred payment method from three different options. For demonstration purposes, we’ve chosen “Bank” as it is the most convenient way.
Step 3: Add the Pay Callendar to Start Making Payments

Your setup wizard is nearly complete with this step. What you need to do now is add a pay calendar following your financial yearbook.
WP ERP’s Payroll User Guide – A Simpler Yet Effective Way to Manage Employee Salary
So you are ready to get on with your automated salary process? As a kickstart, you are going to add a salary amount to your employee profile. If you have already added the employees to your current ERP system, then it will be a lot easier.
Well, let’s get on with your automated salary process.
Adding Salary Amount to Your Employe Profile
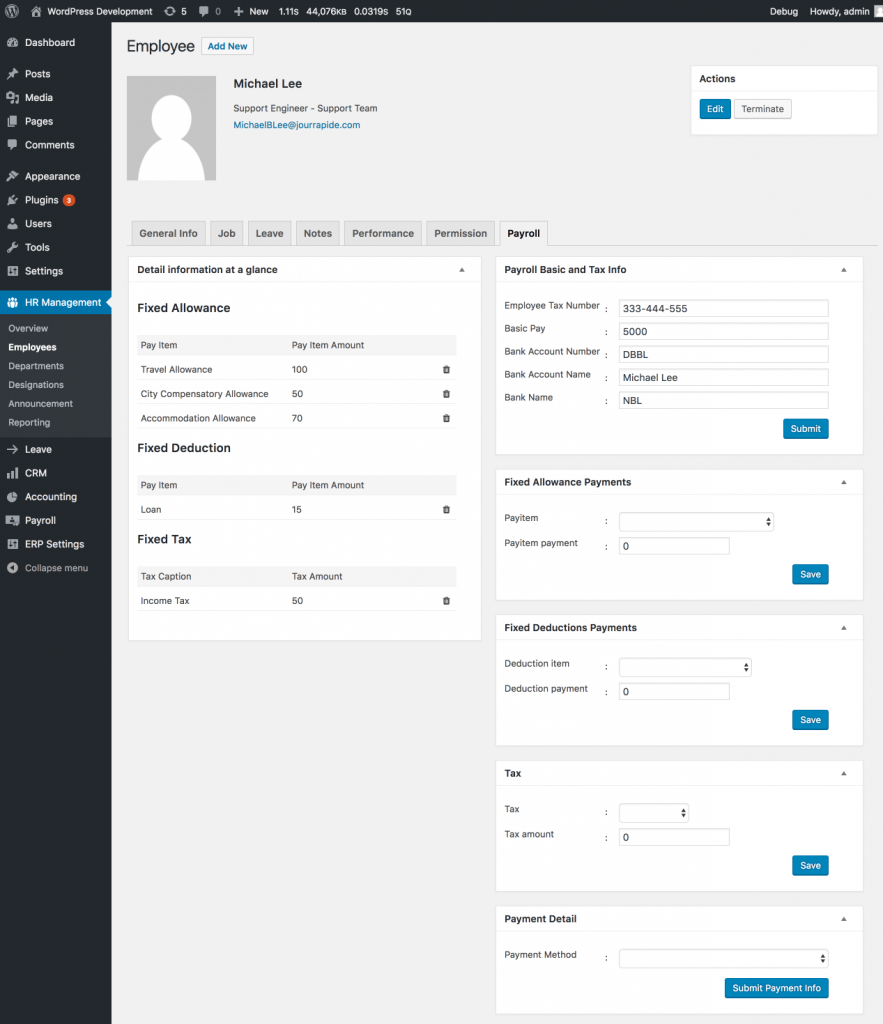
When you install the plugin, then will be an individual Payroll tab option in each of the employee profile.
You can directly go to your employee profile from the HR dashboard. Then click on the “Payroll” tab. Enter all the necessary inputs. It has five different data fields. They are-
- Payroll Basic and Tax Info
- Fixed Allowance Payments
- Fixed Deduction Payments
- Tax
- Payment Detail
Apart from the basic salary, and bank info, you may like to add a fixed allowance and then select the payment method. And then submit all the parts one by one.
Finally, you will see the culmination of your inputs under the “Detail Information At a Glance” section.
Creating a Pay Calendar
Before sending salaries to your employee, you must create a play calendar. Here’s what you should do to create and manage a pay calendar.
- Got to WP Admin Dashboard
- Then click on WP ERP, and then HR
- Go to Payroll, and click on Pay Calendar
- Click on the “Add New Pay Calendar” at the top

Once you click, you will be redirected to the Pay Calendar settings page. On this page, you will need to add a calendar name and type.
Each of your employees may start with your company at a different time. So, you should maintain multiple pay calendar inevitably.
Under the name and calendar types, add employees, set their department, and designation respectively.

After you have added employees to a particular calendar, you will see a list of employees is included in it. Then just click on “Create Pay Calendar”.
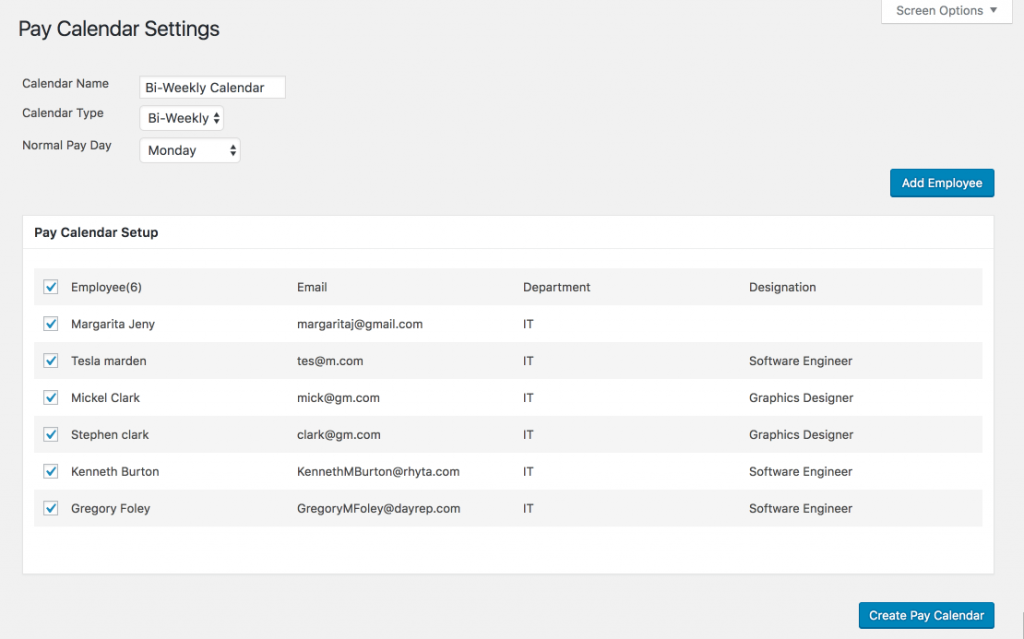
Now, your pay calendar is ready to roll.
Start and Managing Pay Run

In this step, you are going to start the Pay Run option to initiate the payment process. Start with the same page where you began your calendar setup. And click on “Start Pay Run”.
Then you will be redirected to the “Pay Run” Page. On this page, you need to go through four-stage.
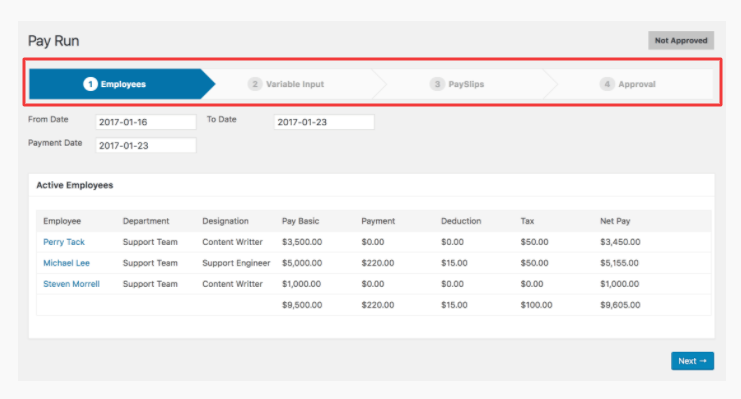
Here, you can see the name of your employees within their departments and designation. Click on “Next”.
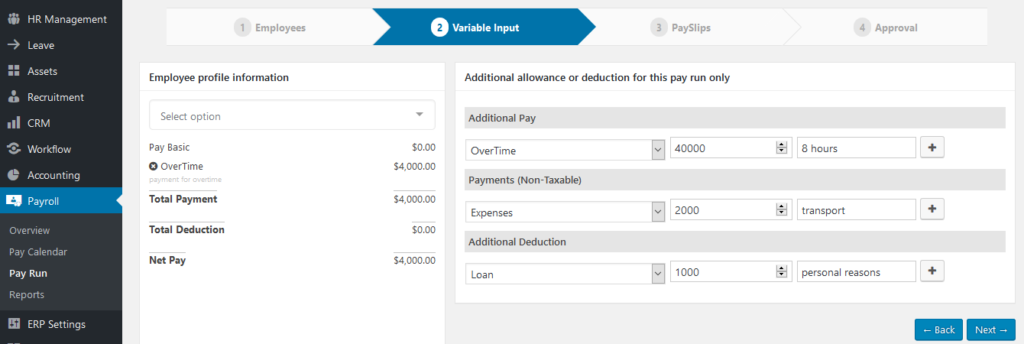
In the variable input, you can specify your allowance and deduction to particular employees. Then carry on with the “Next” button.
The third section is dedicated to “PaySlips”.
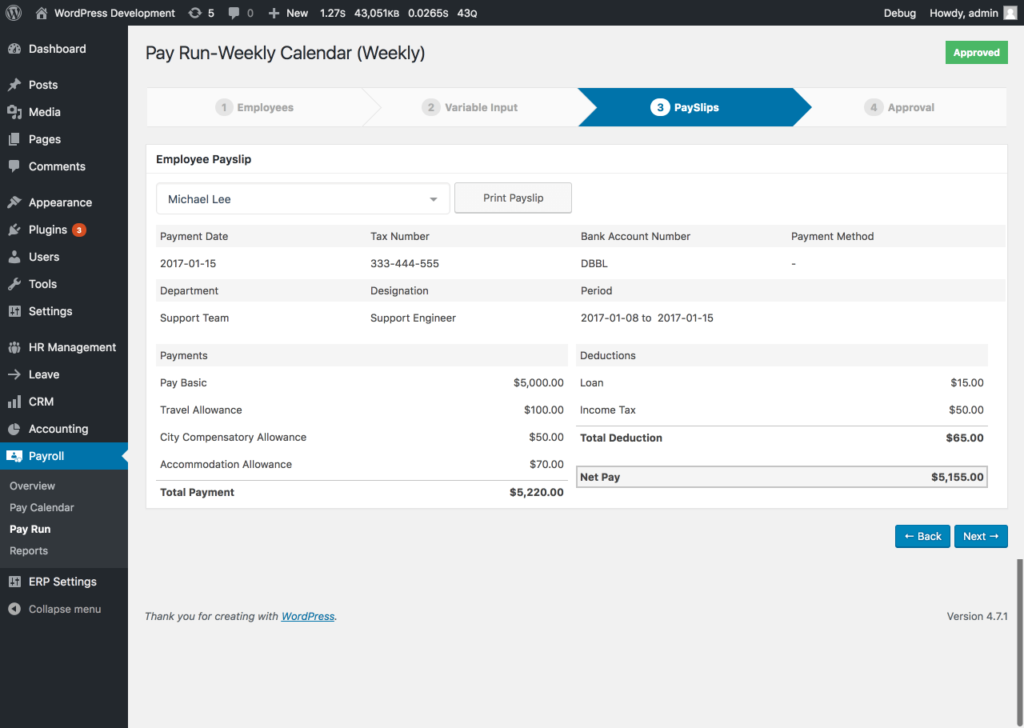
This is the pay statement you can share with your employees after every time you’ve sent a salary. Now click the “Next” button again.

After you approve this Pay Run, you will see that the process gets a greenlit in the next page.

Hence, anytime you need, you can easily monitor all of your Pay Run List. In order to do that, you need to:-
- Go to Payroll from your HRM dashboard
- Then just click on Pay Run
Now, let’s move on to the next step to your Payroll user guide.
Create Employee Payment Reports for Better Decision Making
In an act of necessary decision making, the overall employee payment activities, reports are crucial. Therefore, to evaluate one or several employees, you need to analyze payroll reports too.
So, in this stage, you can easily generate your payroll reports using your HRM database. Hence, you need to do the following to make things updated:-
- Go to WP Dashboard and then click on WP ERP
- Now, go to HR option and then Payroll
- Now, click on Reports

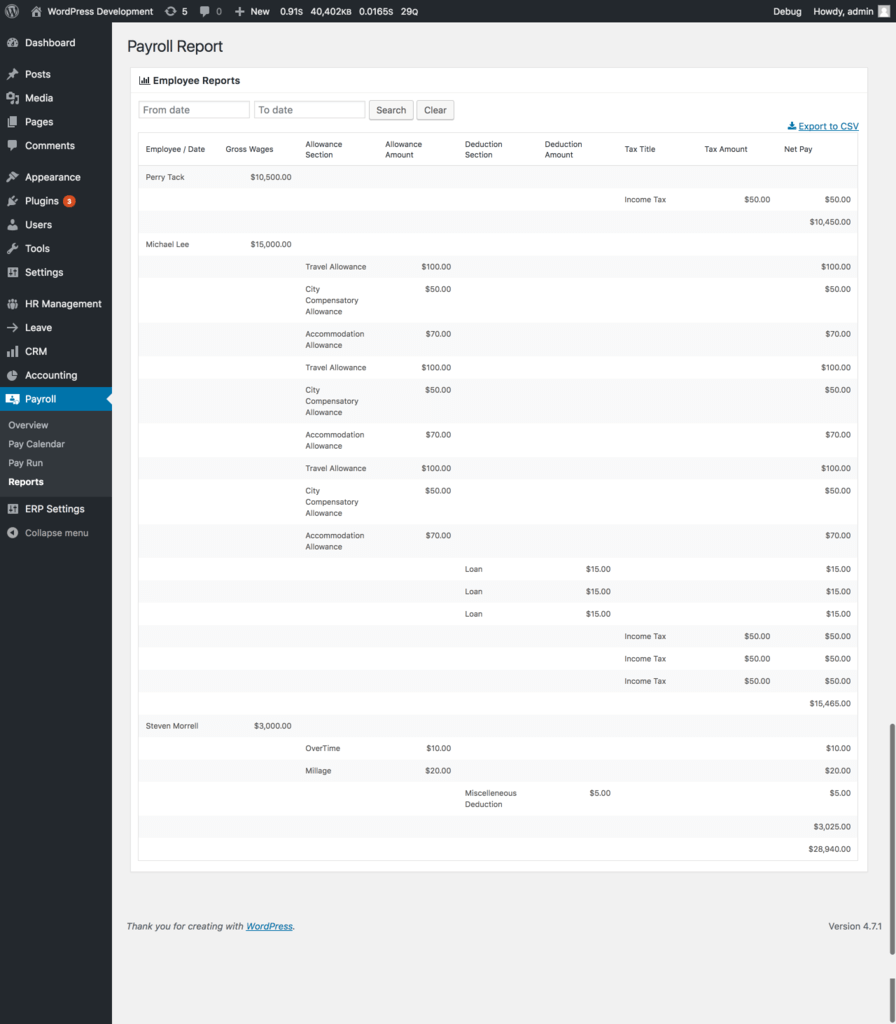
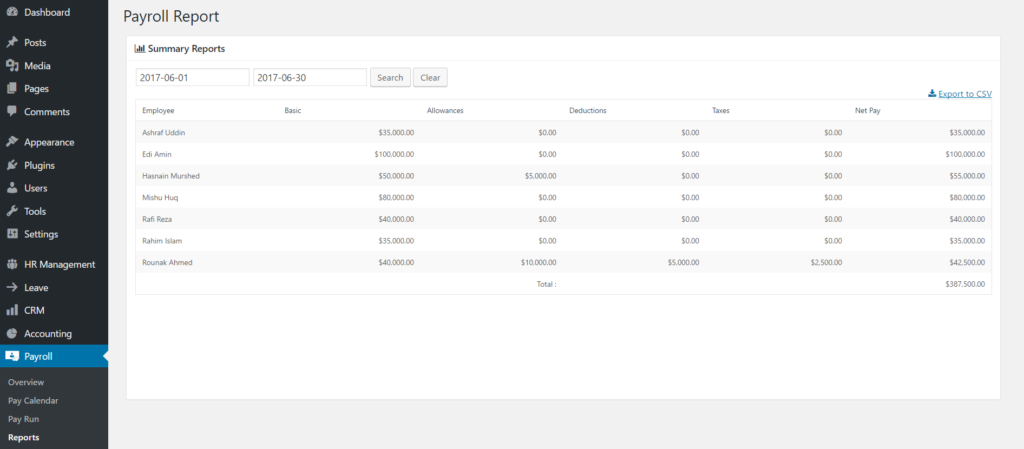
There you will be able to see two options. You can get the Pay Run summary. On the other hand, you can also view the Pay Run report for an individual employee.
Heres how an individual employee report looks like –
Hence, the complete summary report of employees will look like this –
Copy Pay Run at Ease With Copy Approval
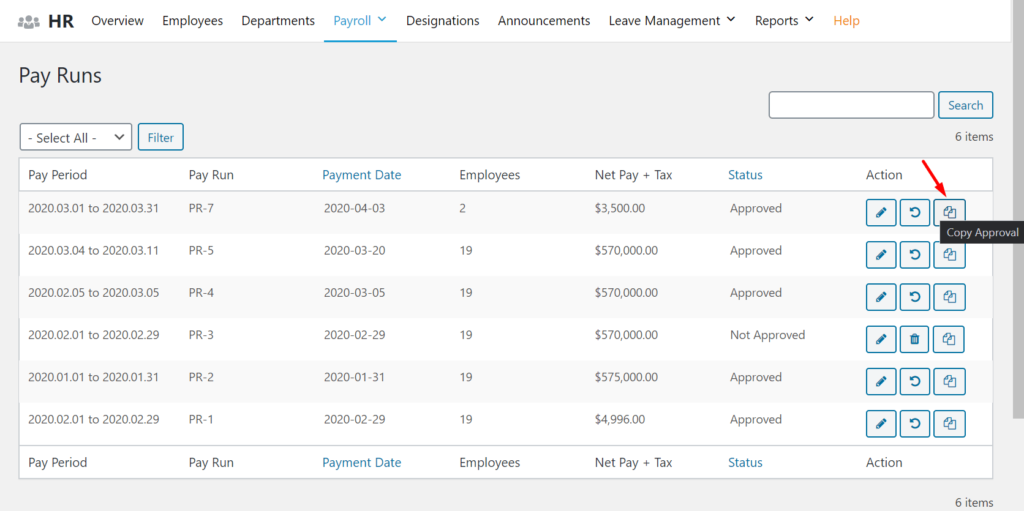
Well, copy pay run is an option that can save you extra labor at the end of every month. Once you set the process, you can restart a new cycle with the same settings by copying the earlier settings with a single click.
So how can you do this?
- Just go to the Payroll tab in your HRM dashboard
- From your Pay Run list, click on the “Copy Approval” button
So now you are all set with this feature.
On a specific note, whenever one of your employees ends the journey with your company, you can click on the “Edit” button to remove him/her from your Payroll list.

Therefore, following the same option, you can add a new employee to your payroll at ease.

After you add a new name, go back to your payroll tab, and click again on Copy Approval. You will see that the information has already been updated to the Pay Run list.
Importing CSV for Bank Report and More
CSV files are crucial for banks to distribute the money to several accounts. As a WP ERP user, you can easily generate a CSV file from your HRM Payroll reports. Therefore, you can deliver the imported file to the bank.
The method is similar to the other option in your payroll tab. After you click on the “Report”, you will be directed to the following page again.

- On this page, you must click on View Report.
- Now, select the date range of the Pay Run
- Click on the “Search Button”
- The results will be created. When you see the results of the employee payroll, click on “Bank to CSV”
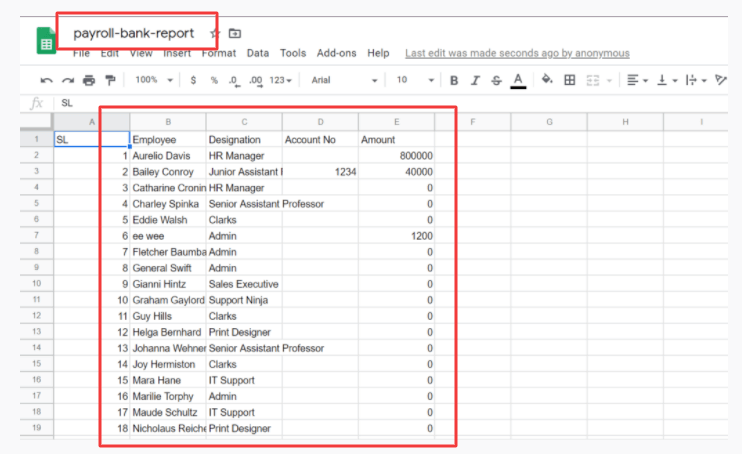
Additionally, you can also generate a detailed CSV report for yourself. To do this, click on the “Detail to CSV” button on the payroll report page.
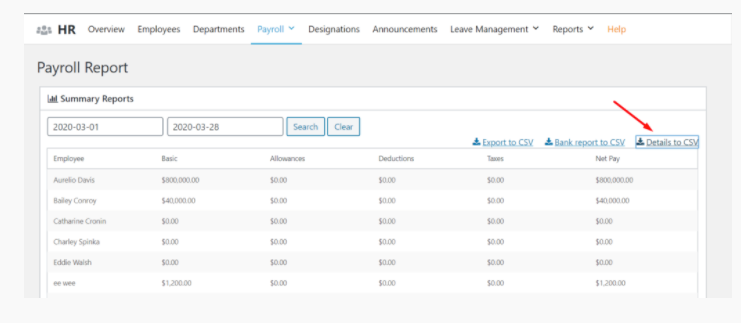
After that, you can monitor the complete report of your pay calendar in a CSV file also.

In this file, you can see the whole report within the tiniest details to make better decisions. You may also utilize it as a data resource too.
Final Thoughts on WP ERP Payroll User Guide

Throughout this guide, we only show you the basic setup and configuration of the WP ERP HRM Payroll extension. You must master them in the first place. Therefore, it will be astonishing for you when you discover more exciting functionalities eventually.
However, we would like you to briefly explore a few key features below.
When you create PaySlip, you can always set options and share them with the individual employees. They can see it from their employee dashboard.
Furthermore, you can also send the payslip directly to your employee by the email automation feature.
So, that’s all you need to know for you to efficiently manage your employee salary using this essential Payroll extension of WP ERP.
If you have already used it then do tell us your first-hand experience with this robust HRM extension.


