With great power comes great responsibility. But most people fail to manage power wisely. That’s why you must limit access and assign roles carefully to keep things running without being exposed to risks.
The same principle applies to businesses. Granting unrestricted access to sensitive areas of your organization can lead to errors, inefficiencies, or even security breaches. This is where role-based access control (RBAC) steps in as a smart, effective solution.
It’s a proven method to protect sensitive information and ensure accountability within organizations. For businesses using WP ERP, implementing RBAC offers more than just security. It ensures every team member has access to exactly what they need – no more, no less.
In this post, we’ll explore the best practices for implementing RBAC with WP ERP. Let’s dive in and discover how WP ERP can make role-based Access Control implementation seamless and effective!
What Is Role Based Access Control in ERP?

Role-based access control is a widely used approach in the ERP system where instead of giving everyone full access to all of your business departments, you can assign specific roles to them based on their job responsibilities. Each role comes with different levels of permissions that allow users to access only the data and tools they need.
For example, an HR manager might have access to employee records but should not be able to see financial reports. On the other hand, an accountant might see financial data but not sensitive HR information. Thus, by role-based access control, you can ensure that everyone in your organization has the proper access to the department and resources they need.
How Role Based Access Control Adds Value to Your ERP
Remember, RBAC isn’t just about restricting access. It’s about organizing your ERP system in a way that makes sense for the business. It keeps things well-organized, secured, and easily manageable.
Take a quick look at how role based access control can add value to your ERP system below:
Better Security: You can limit unauthorized people from seeing sensitive data. It keeps your business information safe and secure.
With growing cybersecurity threats, RBAC adoption is rising, with the market projected to grow from $9.63 billion in 2023 to $17.43 billion by 2028 at a 12.6% CAGR.
According to The Business Research Private Ltd.
Simpler Management: Instead of tweaking permissions for each user, you can just update the roles. It’s faster, less confusing, and time-saving.
Boosted Productivity: Let people see only the tools and data they need. This can help them work more efficiently with no distractions.

Compliance Made Easy: RBAC helps you stay compliant with regulations like GDPR, HIPAA, or SOC 2 without much hassle.
Minimized Errors: You can reduce the risk of accidental changes or data mishandling. It’s a safeguard against human error.
Better Accountability: With RBAC, you can track who did what in your system. This makes it easier to audit actions and hold people accountable when needed.
And the best part? Once you have the right ERP system at your disposal, it becomes very simple to set up and manage everything as discussed.
Role Based Access Control Implementation: A WP ERP Example
Giving access to employees based on their roles with WP ERP is as simple as managing users in the WordPress backend. You can assign important roles such as Employee, Hr Manager, CRM Manager, Accounting Manager, and more within a few clicks using WP ERP’s default role management options.
Let’s get started to learn how to use WP ERP for role-based access control implementation for your small and medium businesses.
Step 1: Install the WP ERP Core Free Plugin
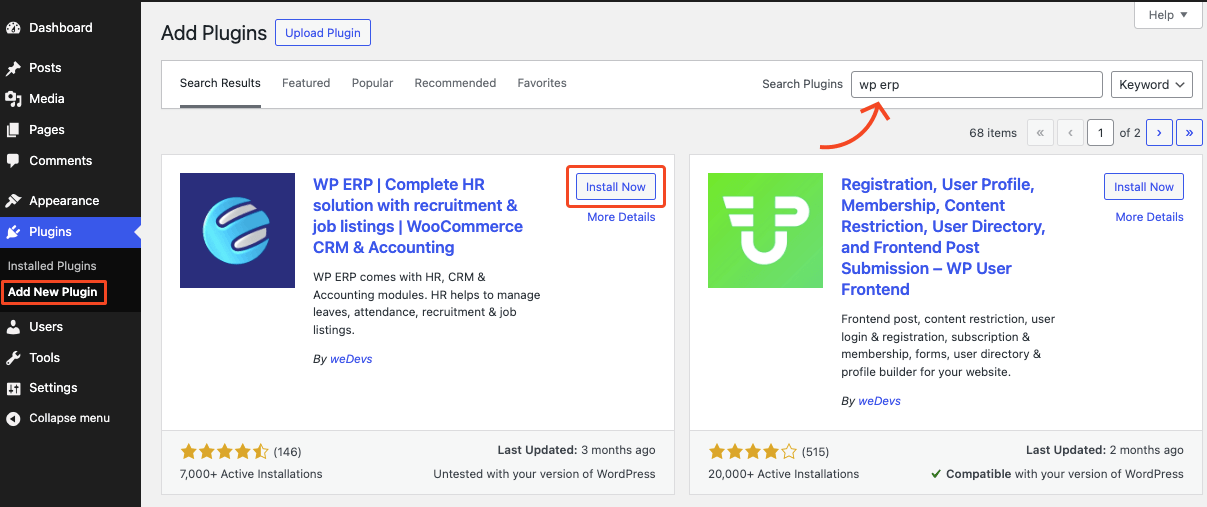
Log in to your WordPress admin panel and navigate to Plugins > Add New Plugin.
You’ll get a search bar on the plugins directory page. Type ‘WP ERP‘, and WordPress will show relevant results for the search queries.
Choose the WP ERP plugin, developed by weDevs. Hit on the Install Now button. Then, activate it.
Upon successful activation, you’ll see a setup wizard with a simple and user-friendly onboarding process. You can complete the setup instantly or come back to the WordPress dashboard to go through the setup wizard later on.

Let’s have a quick tour with us through these steps. For now, configure only the required settings. We recommend you to activate at least the three core modules:
- HR Management
- CR Management
- Accounting
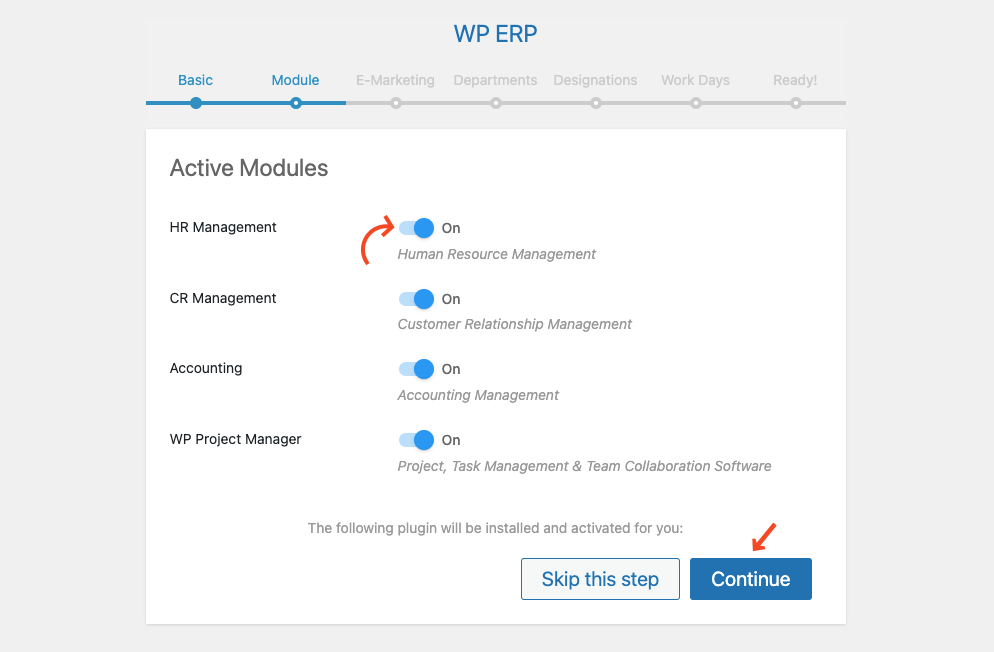
Then, hit the Continue button, and keep going to the last step. Once you complete all the steps, the wizard will notify you about the site being ready to use WP ERP functionalities.
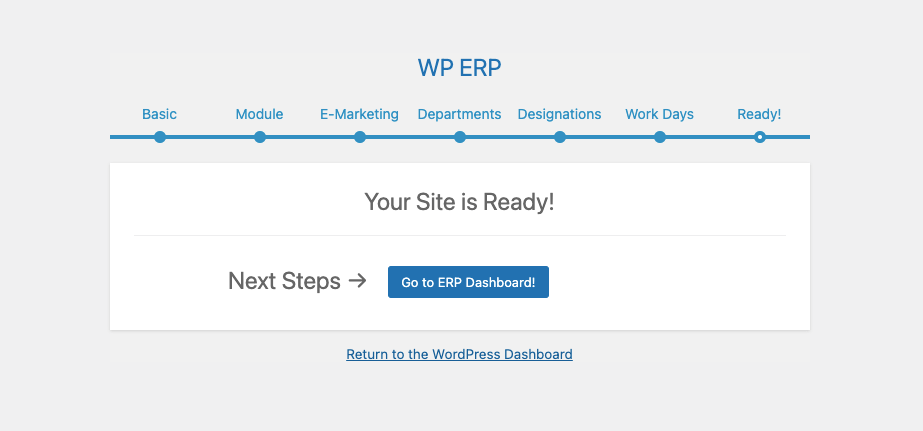
Now that you are ready to use WP ERP. Let’s move forward with role-based access control implementation.
Step 2: Go to WP ERP Role Management Section
Go to Users > All Users to find the already available users on your website. Or, you can create a new user by clicking the Add New User submenu.
Each user has an Edit option under its name. Click on Edit to expand the details about the user and make any required changes.
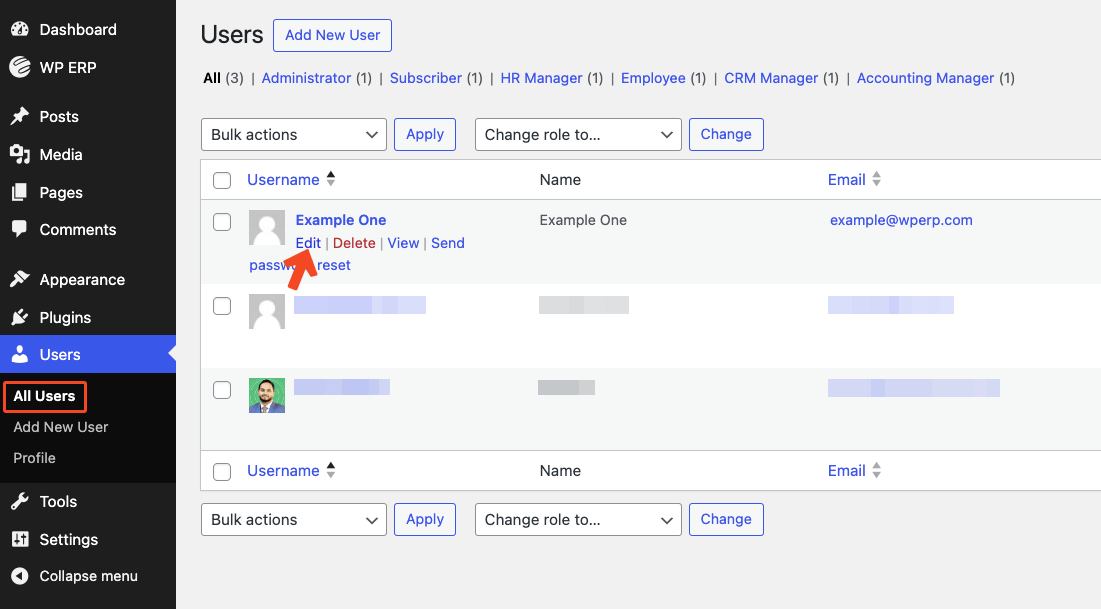
This expanded page has a lot of information about the respective user. But we need to scroll down to find the WP ERP Role section.
Here, you can assign the roles simply by clicking the Checkboxes adjacent to the particular role, e.g., HR Manager, CRM Manager, CRM Agent, and Accounting Manager.
As simple as that. Now, hit the Update User button to save the changes.

Note: The WP ERP free plugin comes with only this set of roles. If you need more roles, you need to customize them on your own. Or contact our support to share your customization needs.
Step 3: Use the HR Module to Manage Permissions
WP ERP’s HR module is one of the best available in the WordPress ecosystem. Among many advanced features, it has a role-based permission management system.
Navigate to the list of all employees available on your website. Go to the HR module from the WordPress admin panel, then visit People > Employees. Click on the name of the employee to which you want to assign a role.
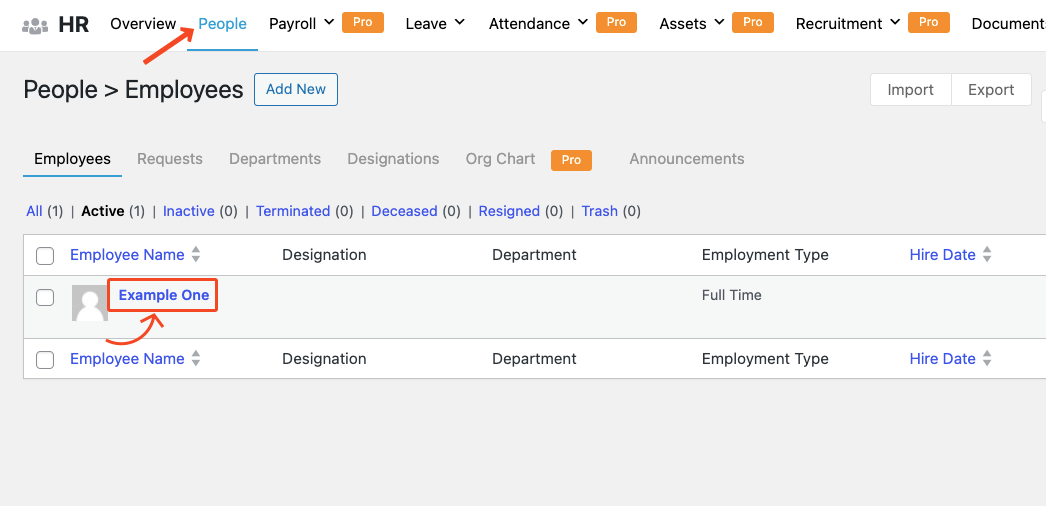
Each employee has six tabs assigned to his profile in WP ERP, such as General Info, Job, Leave, Notes, Performance, and Permission.
We need to go to the Permission tab to manage permissions.
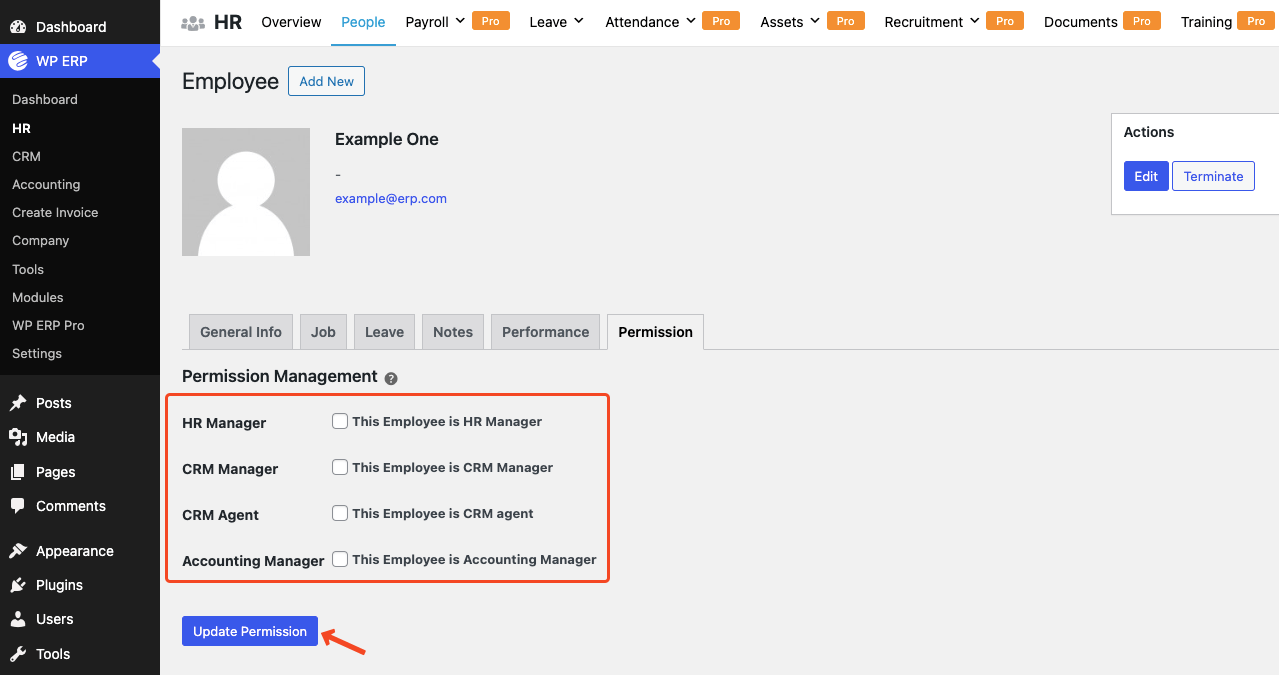
Tick mark the required checkboxes to assign role-based permission for that specific employee. Hit the Update Permission button to complete the process.
There you are! Thus, anyone with low or no technical knowledge can use this feature without any hassle.
5 Best Practices for Role-Based Access Control Implementation
By following role-based access control implementation best practices, you can ensure users have the right access while minimizing risks. Here are five essential steps to help you streamline RBAC implementation and make the most of this powerful system.
1. Audit Current Access Levels and Permissions
This is the first thing you need to do when implementing role-based access control in your business. Start by reviewing the access your users already have. Check if there is any unnecessary permission involving any potential risk. This step can help you establish a clear baseline for improvement.
2. Define Clear Roles and Their Responsibilities
Start by creating roles that make sense to the specific responsibilities in your organization. Understand how these roles and permission management can support your business growth. Do this homework before assigning these roles to anyone
Prepare the guidelines in detail to avoid overlap and ensure each user only has access to what they need. Instead, focus on aligning roles with actual responsibilities. You can also offer training sessions to ensure everyone understands their new roles and how to use them effectively.
3. Apply Permissions Thoughtfully
Assign permissions carefully. It’s always better to prevent than offer a cure afterward. Think about data sensitivity and the level of access required for each role.
So, your understanding of the permission levels and the assignees’ roles is a must. Here’s a table showcasing examples of permissions and roles for better clarity:
| Role | Permissions | Example Use Case |
|---|---|---|
| Administrator | Full access to all system settings, user management, and sensitive data. | Can create, edit, or delete user accounts and configure ERP settings. |
| HR Manager | Access to employee records, leave requests, and payroll data. | Can approve leave requests and process payroll securely. |
| Sales Manager | View and manage leads, client details, and sales reports. | Can track team performance and close deals. |
| Accountant | Access to financial data, invoices, and expense reports. | Can generate reports, approve invoices, and manage budgets. |
| Project Manager | View project timelines, assign tasks, and track progress. | Can oversee team activities and monitor deadlines. |
| Team Member | Limited access to project files, task details, and assigned responsibilities. | Can update task status and upload deliverables. |
| Viewer/Guest | Read-only access to specific non-sensitive data or reports. | Can view a summary report but cannot edit or download. |
This table outlines how permissions are tailored to match each role. The example is suitable for companies that use an ERP system to manage diverse departments such as HR, sales, accounting, and project management. You need to customize the roles and permission details based on your business types.
4. Utilize Built-In Tools for Role Management
All popular ERP tools have features to control access based on roles. Whatever tool you’re using, make the most of your ERP’s built-in features for managing roles. These tools often simplify the process and save you time, so you don’t have to start from scratch.
And, if you use WordPress, WP ERP can be your best choice. This is the best ERP software available across the WordPress ecosystem. Things will get a lot easier if you use it to manage the ERP needs of your small and medium businesses. Additionally, it has a powerful access management feature that can help you achieve granular control over the roles across your organization.
5. Test and Validate Your Setup

Before going live, test your role-based access control implementation. Make sure users can only access what they need and no more. Testing once and forgetting it will not help much.
You need to conduct regular testing to catch errors early. You should run periodic audits and adjust roles as your business evolves. This keeps your system secure and efficient over time.
Alternatives to Role-Based Access Control and When to Use Them
While RBAC is a popular choice for managing access control, it’s not the only option available. Depending on your organization’s structure and needs, other methods like ABAC, PBAC, or ACL might be a better fit. Here’s a closer look:
Attribute-Based Access Control (ABAC)
ABAC grants access based on a combination of user attributes, such as job role, location, device type, and time of access. For example, an employee could access sensitive files only during working hours and from an approved device.
When to Use ABAC
- Your team works in multiple locations or time zones.
- You require micro level over access based on multiple conditions.
- Compliance regulations demand fine-tuned access policies.
Policy-Based Access Control (PBAC)
PBAC uses policies to define who can access what. These policies are more dynamic and condition-driven. For instance, a policy might allow temporary contractors to access only specific systems during their contract period.
When to Use PBAC
- You need dynamic and adaptable access control rules.
- Your organization deals with temporary or evolving user roles.
- You want to centralize access policies across multiple systems.
Access Control Lists (ACL)
ACL assigns access rights directly to individual users or resources. Each resource has a list of who can access it and what actions they can perform (read, write, delete, etc.). ACLs can become unmanageable in larger organizations due to their lack of scalability.
When to Use ACL
- Your organization is small and has straightforward access needs.
- You need quick, resource-specific permissions for a limited number of users.
- Scalability and role hierarchy are not a priority.
Discretionary Access Control (DAC)
In DAC, resource owners have full control over access permissions. While this offers flexibility, it can lead to inconsistent permissions and security risks in larger teams.
When to Use DAC
- Your organization is small, with minimal compliance needs.
- You require flexibility for resource owners to grant access.
- Centralized control isn’t a priority.
Mandatory Access Control (MAC)
MAC enforces strict access based on security classifications. Users can only access resources that match their clearance level. This method is commonly used in highly regulated industries like defense or healthcare.
When to Use MAC
- Your organization handles highly sensitive or classified data.
- Compliance with strict security regulations is required.
- You need non-negotiable access rules.
Choosing the Right Alternative: Access Control Methods Comparison

Here’s a quick comparison of RBAC and its alternatives to help you decide which method fits your organization best:
| Access Control Method | Key Features | Best For |
|---|---|---|
| Role-Based Access Control | Grants access based on predefined roles and permissions. | Medium to large organizations with defined roles. |
| Attribute-Based Access Control | Grants access based on user attributes like location, device, or time of access. | Large organizations with diverse user bases. |
| Policy-Based Access Control | Uses adaptable, rule-driven policies to define access conditions. | Enterprises need centralized, flexible control. |
| Access Control List | Assigns access rights to specific users or resources directly. | Small organizations or individual projects. |
| Discretionary Access Control | Resource owners decide who can access their resources. | Small organizations with minimal compliance needs. |
| Mandatory Access Control | Enforces strict, non-negotiable rules based on security classifications. | Government, healthcare, or defense sectors. |
This table simplifies the decision-making process. We hope this will help you identify the best access control method based on your organization’s size, structure, and security needs.
FAQs About Role-Based Access Control in WP ERP

Got more questions? You’re not alone! In this section, we’ve answered some of the most common queries people usually have. These answers can help you understand RBAC. Let’s dive in!
1. Can I assign customized roles in WP ERP?
Absolutely! WP ERP makes it easy to create roles that match your unique team structure. You can define who sees what at a granular level.
2. Is role-based access control in WP ERP secure?
Yes, WP ERP has the required functionalities to keep your data safe. It limits access based on roles and minimizes the chances of unauthorized access to sensitive information.
3. What happens if I need to change roles later?
No worries! WP ERP allows you to edit roles and permissions anytime. As your business grows or changes, you can adjust access levels to keep up.
4. How often should I review my role-based access control setup?
It’s a good idea to review roles and permissions every quarter. This helps you catch outdated permissions or adjust for new hires, role changes, or evolving business needs.
5. What are the challenges of implementing role-based access control?
Actually, there aren’t too many challenges if you use the ideal tool. But, in general, you may face the following challenges:
- Finding it difficult to make sure the roles are well-defined without overlaps.
- Failing to keep permissions up-to-date as roles may change over time.
- Resource shortage for continuously monitoring access to avoid vulnerabilities.
Final Thoughts on Role-Based Access Control Implementation
Implementing role-based access control isn’t just about managing access. It’s more about empowering your business with security, efficiency, and trust. And, implementing RBAC becomes simpler and more efficient with an effective tool like WP ERP.
Do you have questions or insights to share? Let us know in the comments! If you found this helpful, share it with others.


