The traditional reimbursement system expenses have major problems. It is inefficient both from the perspective of someone who’s in charge of approving the expenses or someone who’s requesting for reimbursement. It involves more time and has more scope for mistakes.
The digital way of doing it, especially with the Reimbursement module from WP ERP makes the reimbursement process much easier, efficient, and almost error-free.
In this article, we will show you how to manage expenses and reimburse your employees with a reimbursement system of WP ERP. It’ll mitigate the errors and make your life as an HR or, Accountant much easier.
What is Reimbursement in WP ERP?

WP ERP Reimbursement is an extension for WP ERP that automates the process of expense made by your employees and reimbursement from your company.
It replaces the conventional way of reimbursing your employees and uses top of the line technology. This makes the whole process faster and efficient.
Unlike the manual expense management and reimbursement system, with WP ERP Reimbursement, you can request, manage, approve expenses from anywhere, anytime.
Why You Need an ERP Based Expense Management System
It is very easy to answer this question. An ERP-based expense management system is far better than the conventional expense management system in many ways. Let’s have a look at some of the reasons why you need an ERP-based Expense Management System.
| Minimizes Error | An ERP-based expense management system minimizes human errors. While approving a reimbursement request, HR or Account personnel can cross-match the receipt and typed amount and make sure the amount is okay. Then once he’ll approve the request, the amount will automatically be adjusted to the account books accordingly. This process mitigates the chance of errors caused by humans. |
| Saves Time | An ERP-based expense management system also saves a lot of time. Each part will just take a couple of clicks, so the whole process takes just minutes to complete. You don’t even need to be physically present to submit the reimbursement request saving even more time. |
| Offers Mobility | ERP-based expense management systems like WP ERP Reimbursement operates online. So you can create or approve requests from anywhere, offering great mobility on expense management. |
| Increases Efficiency | Efficiency is the main reason you should use an ERP solution for your company. WP ERP Reimbursement also shares the same goal. It makes your expense management much more efficient. All the reasons we’ve mentioned above combined make it an efficient expense management system for your company. |
Reimbursement System – Better Expense Management With WP ERP Starts Now

As it is already mentioned Reimbursement is an extension offered by WP ERP. It is an add-on for the “Top ERP Plugin for WordPress“, WP ERP that helps your company with the digital reimbursement process. This comes in handy for managing the expenses made by the employees easily. It fits well with the WP ERP ecosystem.
Now that the short introduction is over, let’s head on to know how to use Reimbursement in WP ERP.
Pre-Requisite to WP ERP Reimbursement System
WP ERP Reimbursement has a couple of pre-requisites before you can start your reimbursement process.
- A WordPress Site
- WP ERP (As Reimbursement is not a stand-alone plugin but an extension to WP ERP)
WP ERP Reimbursement runs on the back-end, just like WP ERP itself does. So once you set up WordPress and install WP ERP, you’ll be ready to use Reimbursement. As reimbursement is a paid extension, you’ll need to buy it before you can use it. You can save money by buying Reimbursement along with a bundle deal.
Getting Used to Reimbursement Dashboard
Once the setup is completed, you’ll be ready to use the Reimbursement feature from WP ERP. Before we go on to the detailed user guide, let’s get an overview of the Reimbursement dashboard first.
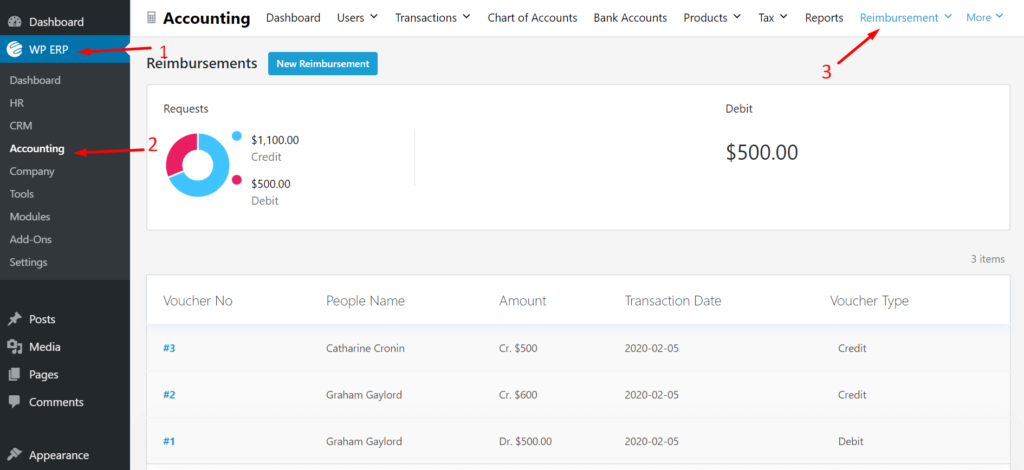
As you can see from the image above, the Reimbursement dashboard can be accessed from WP Admin Dashboard > WP ERP > Accounting > Reimbursement.
There is a doughnut chart on the page that shows the total payments completed against all the reimbursement requests that came in.
Below that, you can find all the vouchers serially, along with the date, employee name, and the amount requested.
Creating Reimbursement
Creating a reimbursement request with Reimbursement extension is fairly easy. There are two ways of doing that.
- Reimbursement Created by Admin
- Reimbursement Request Created by an Employee
So let’s know how we can create reimbursement request in both ways.
Reimbursement Created by an Admin
From the Reimbursement Dashboard, click on the New Reimbursement.
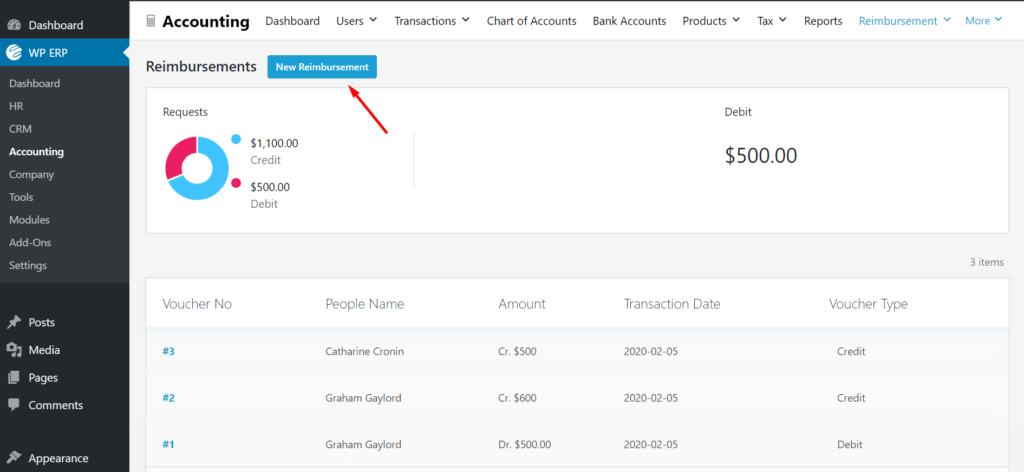
Once you click the button, you will be redirected to the Reimbursement Request Creation page.
You’ll get a list of your employees under the option People Name. This list will be imported from the employee data you have on HRM module of WP ERP.
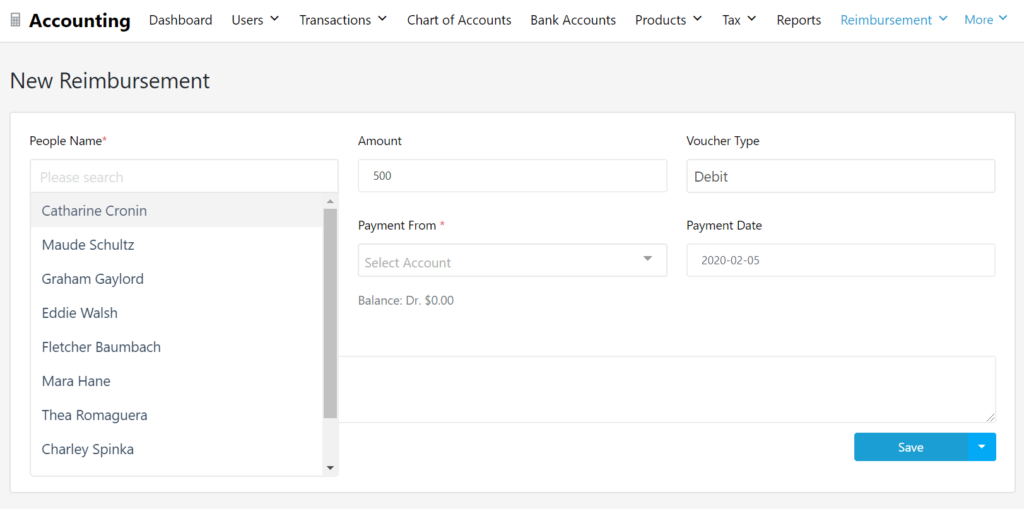
Along with the employee name, you’ll also be able to enter Amount, Voucher Type, Payment Method and Date.
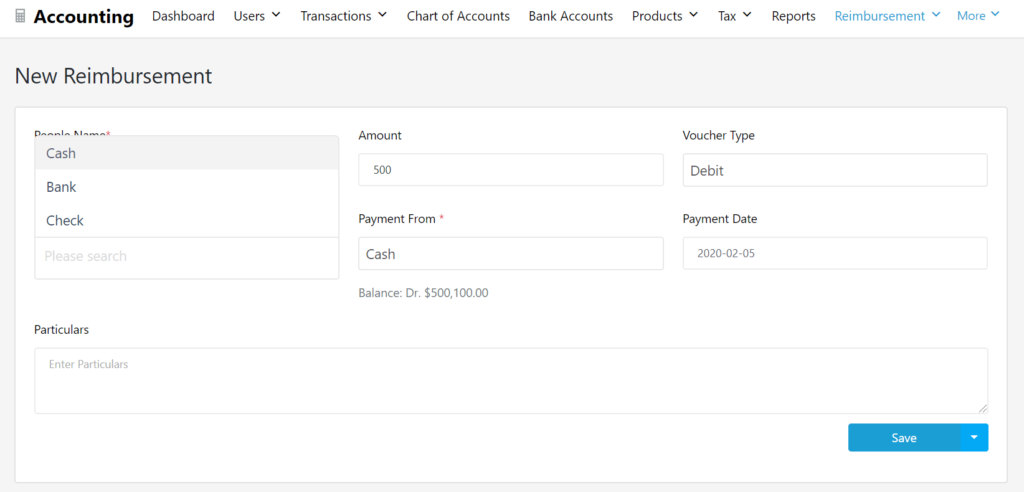
Fill up all the information and click on the Save button.
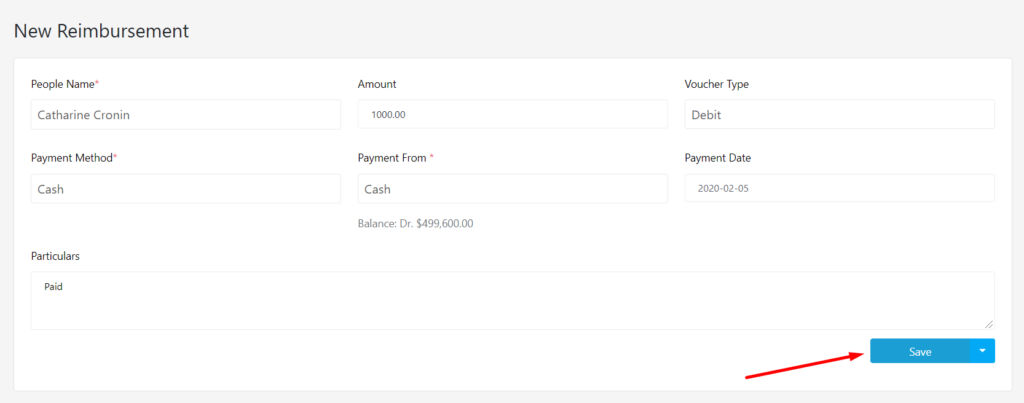
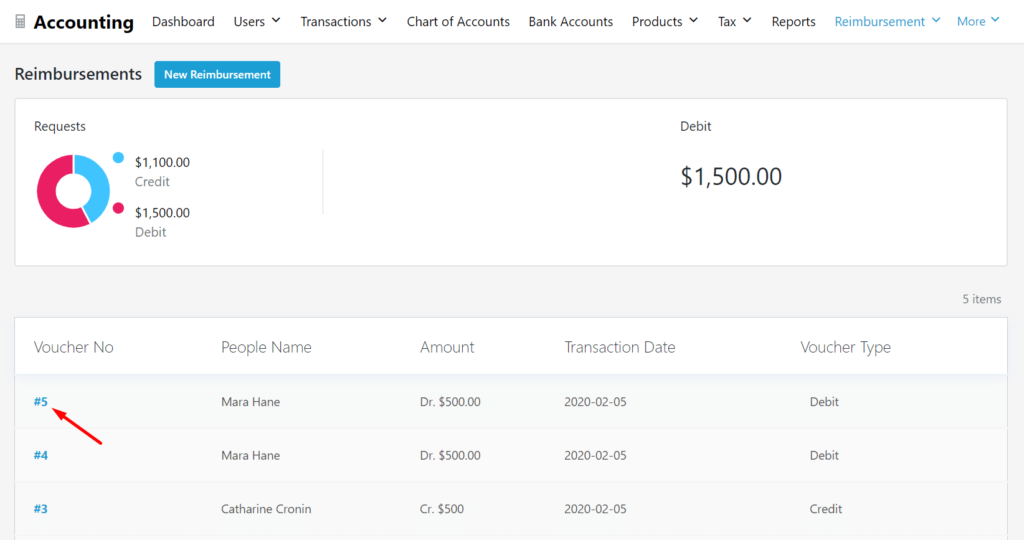
Once you finish creating the reimbursement request, an invoice will be generated for that particular request. It will be available on the Reimbursement dashboard. If you want to see details of a reimbursement request, click on the Voucher No. as shown in the picture below.
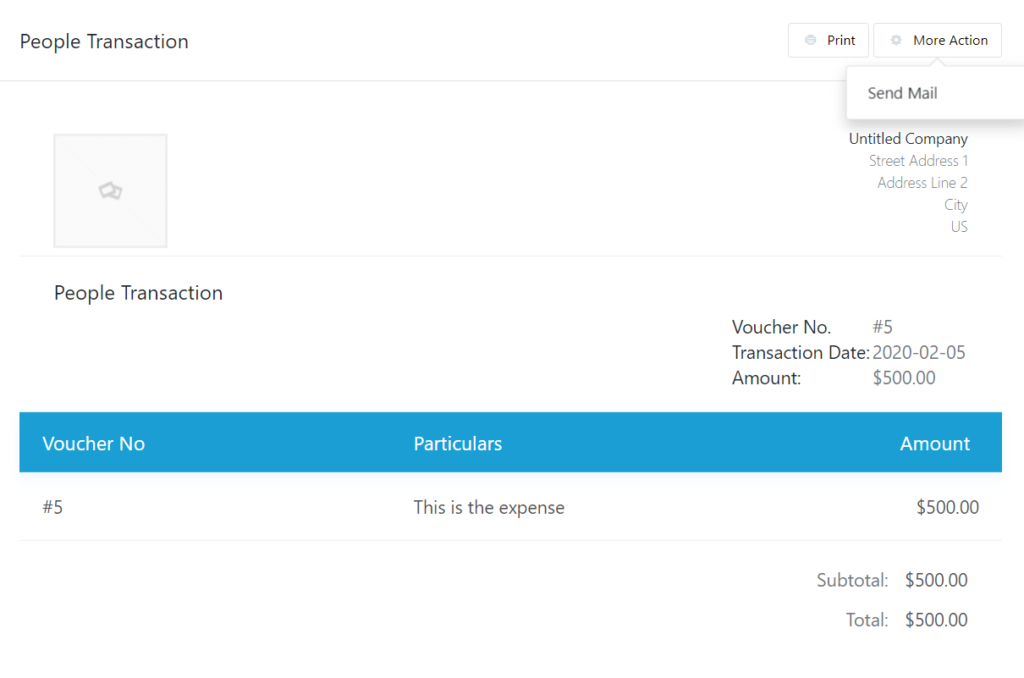
You’ll find an invoice that has been generated against the reimbursement request you just created. Along with viewing the details, you’ll also have an option to mail that invoice to the employee. Click on More Action and you will get an option to Send Mail to the employee.
Reimbursement Request Created by an Employee
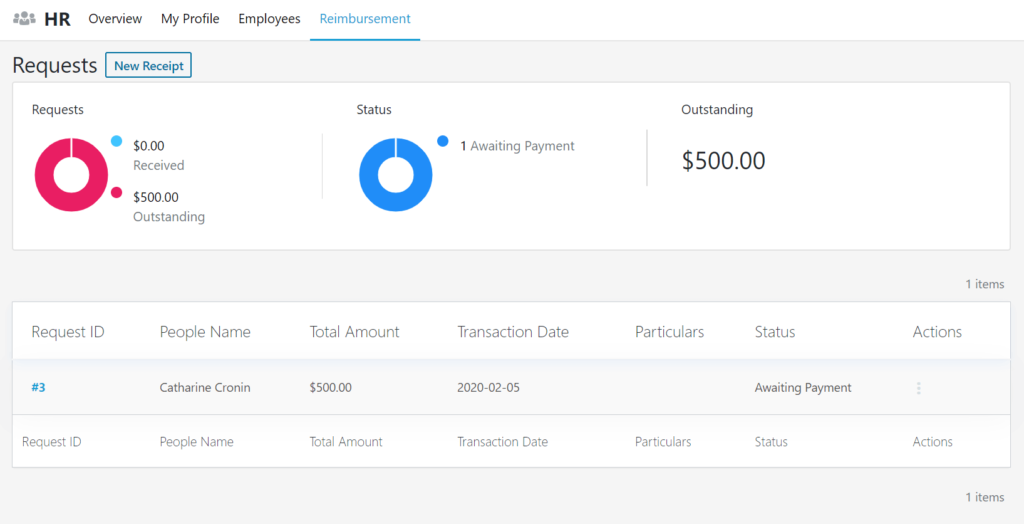
Reimbursement requests can also be created by the employee himself. In order to do that, an employee needs to login to the WordPress Dashboard. Here, the Reimbursement option can be found within the HR module.
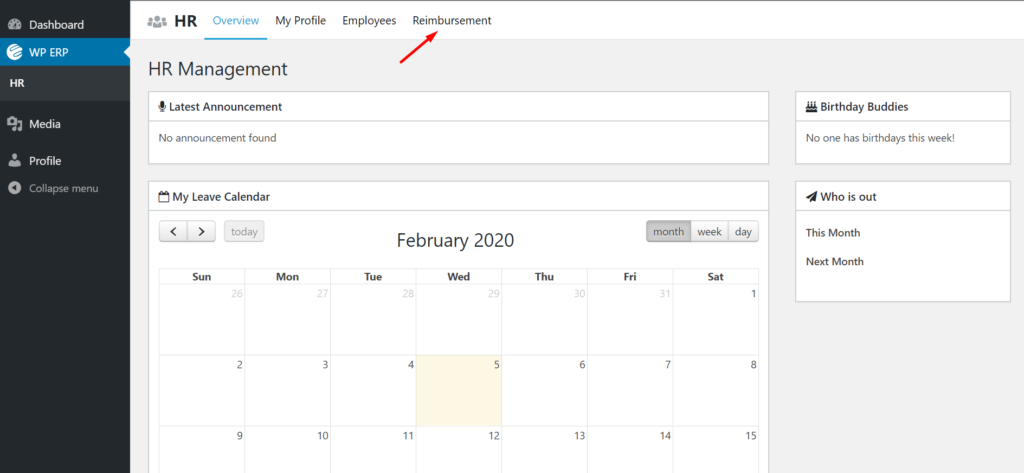
Once an employee clicks on the Reimbursement option, he’ll be redirected to the Reimbursement dashboard. The reimbursement dashboard will look slightly different for the employee. There is a button for New Receipt, which can be used to create a new reimbursement request. There’s also a couple of charts for the completed and outstanding payments of that employee.
Unlike the admin, an employee can only see the vouchers or reimbursement requests created by him.
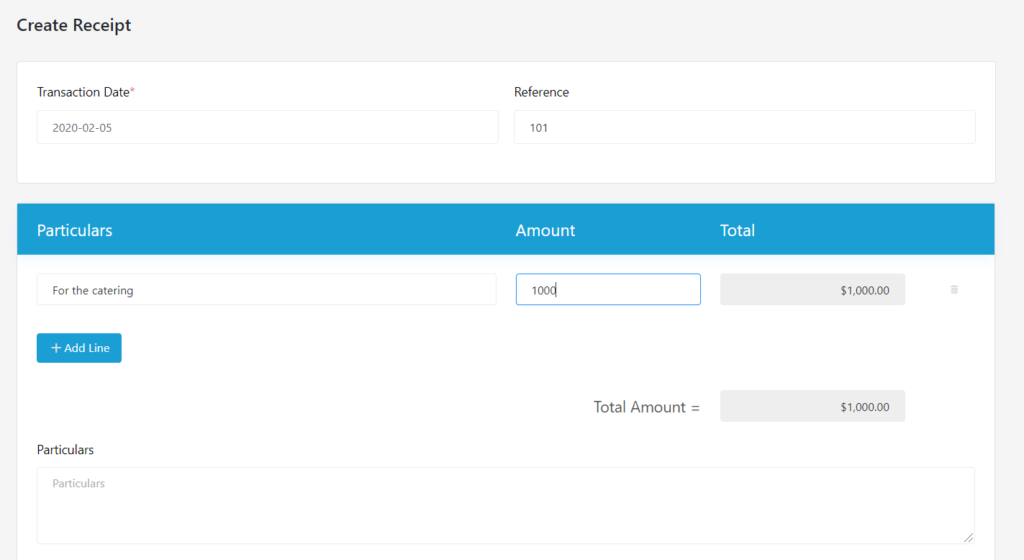
Now to create a new reimbursement request, an employee needs to click on the New Receipt. Once the new receipt page loads, all the information starting from Date, Reference Number, Amount needs to be filled out.
The employee will also get to attach files, which can be used to upload the physical receipt or cash memo.
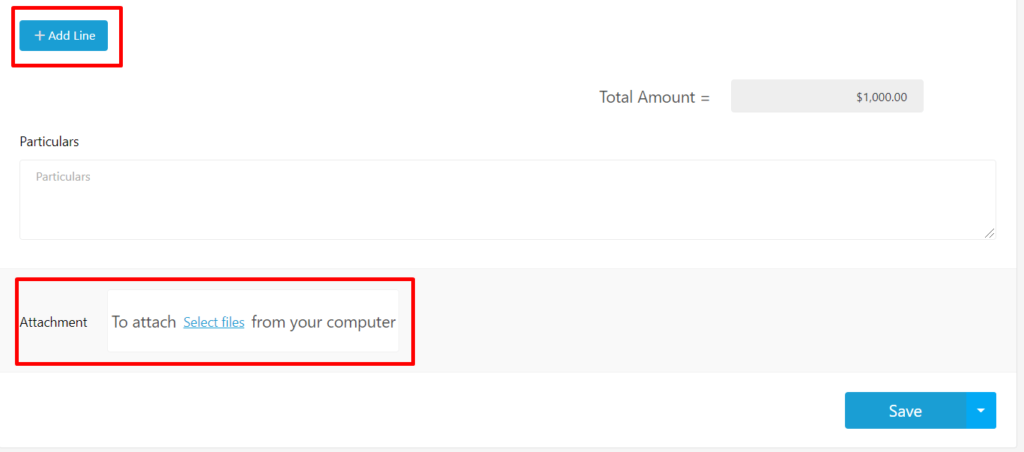
Once all the information has been filled up correctly, click on Save option.
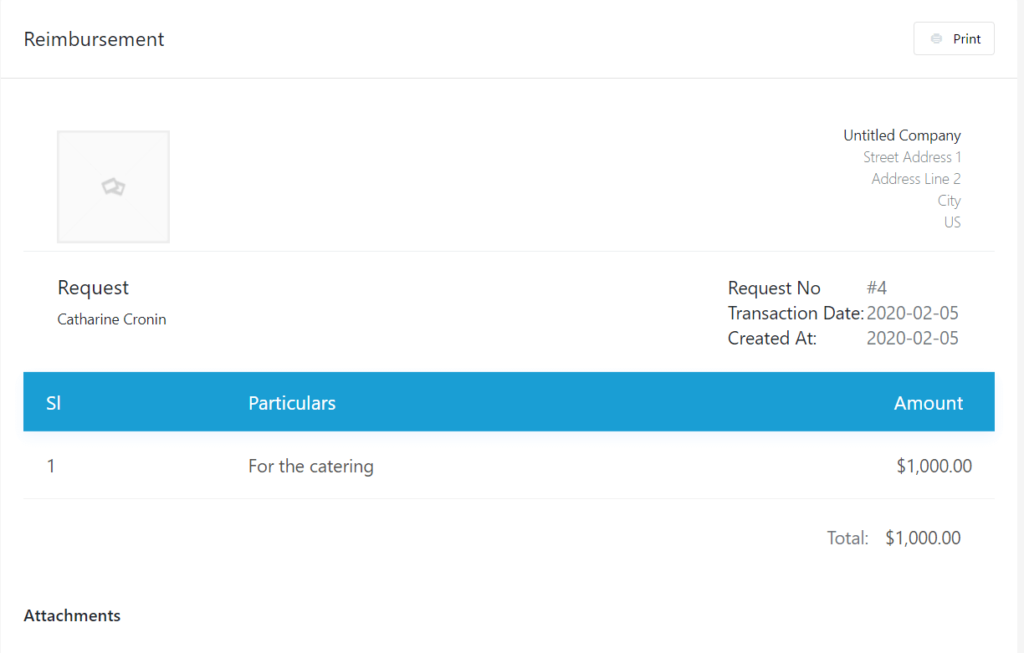
Like the reimbursement request created by the admin, this will also create an invoice. It can be accessed from the Reimbursement dashboard, by clicking on the Request ID.

When the employee clicks on the request ID, he’ll be redirected to the invoice page. Apart from viewing the invoice, he can also print the page for future reference.
Approving Reimbursement & Payment
Approving a receipt is very simple with WP ERP Reimbursement. In order to approve a receipt, first, you have to go to the Accounting module. Then hover over the Reimbursement option, and a Request button will appear. Click on that button.
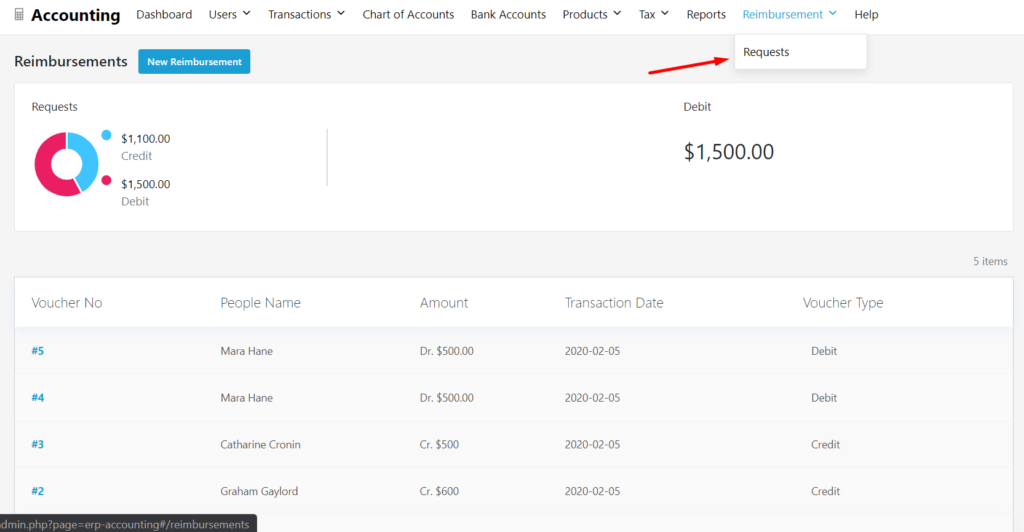
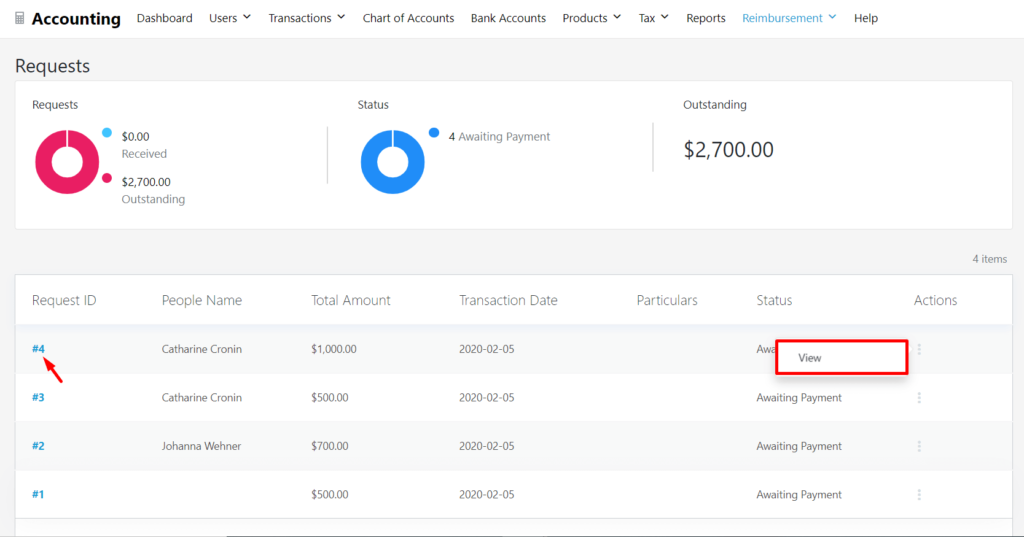
Once you reach the Requests dashboard, you’ll find the vouchers serially sorted by request ID. Click on the voucher you want to approve.
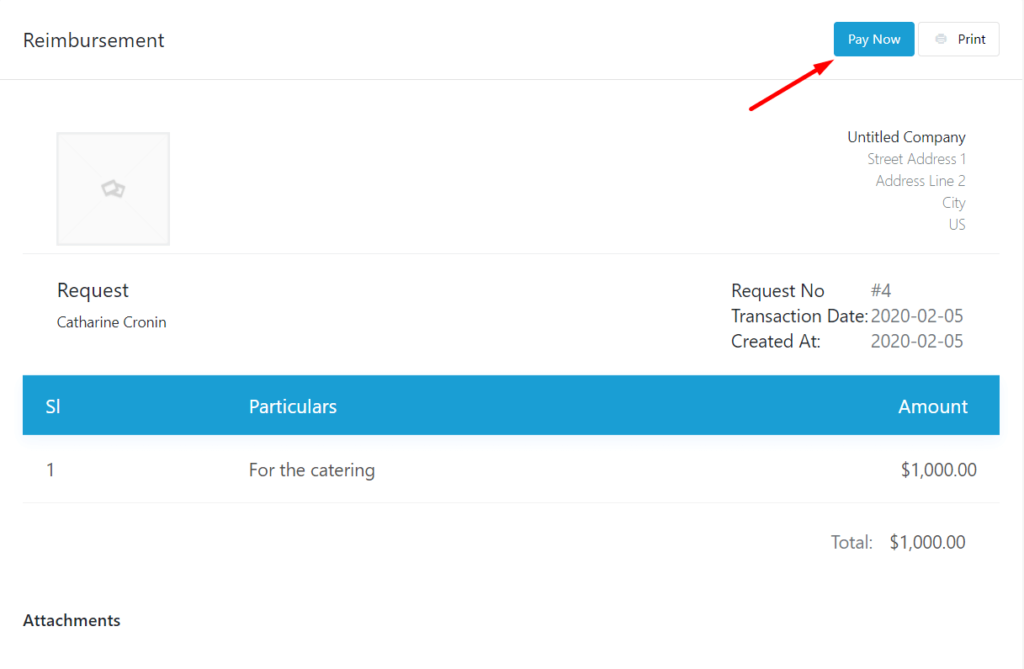
Now you’ll reach the invoice page. From here you can cross-check all the information for that particular request. To complete the payment, you need to click on the Pay Now button.
After clicking on the Pay Now button, you’ll be redirected to the New Reimbursement page. Make sure you fill up all the information and set the voucher type to Debit. And click on Save, once you’re done.

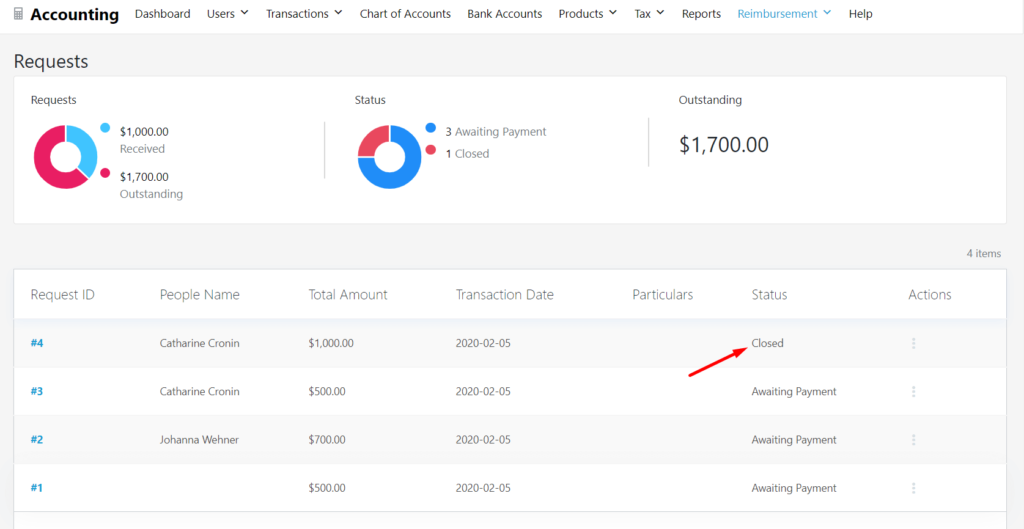
You have successfully completed the payment to the employee. If you want to make sure if the payment is processed successfully, head over to the Requests dashboard again. If you see the status is Closed for a voucher, then it indicates the payment is completed for that particular voucher.
And now you’re all done with creating and approving a reimbursement request with the WP ERP Reimbursement. Easy peasy, right?
WP ERP Reimbursement System- Bring Efficiency in Reimbursement Process
The Reimbursement system is all about getting your expenses streamlined and making the reimbursement process easier. And it does these things super-efficiently. Reimbursement handles your expenses created by your employees and takes a lot of hassle off you.
From creating new reimbursement to managing and processing the payment, it all feels seamless with Reimbursement. This extension works well with likes of WP ERP Payment Gateway and all other WP ERP Extensions.
With the help of reimbursement, you have the chance to foolproof your expense management. So why wait? It costs just $79 for a single website!
Summing Up
Proper expense management is necessary for every company. If you have to do it, do it in the most efficient way. Reimbursement brings innovation, convenience, and helps you manage expenses done by your employees easier.
WP ERP also has many more essential extensions along with Reimbursement, that help to bring efficiency to your entire company management. Here you can find all the WP ERP Extensions.
If you need help to understand any part of the tutorial, comment below and we’ll surely cater to your queries.


