Using ERP software for a business is no longer a luxury. Instead, it’s a dire need to run a business seamlessly, no matter if it’s an enterprise or a small business.
Basically, a perfect ERP solution comes with 3 modules: HRM (Human Resource Manager), CRM (Customer Relationship Manager), and Accounting. So, if you want to automate your whole business procedure, from managing customers to selling products, an ERP is a must.
However, the real question is, do you really know how to use ERP software? Above all, do you know how each of the features of ERP software works? Let’s accept the fact that very few of us know how to get the most out of ERP software for our businesses. And more so, it is really essential for any entrepreneur running a small or large company to know how to use ERP software.
But, no worries! Today, we will be showing you how to use ERP software as a beginner. So, let’s get started!
What should an ERP system be used for

Before anything else, let me show you which features of ERP software we should leverage for our business. In this tutorial, we have chosen WP ERP as our ERP tool to show you how to use ERP software and how it really works.
For those who don’t know what is WP ERP, this para is for them. WP ERP is the first full-fledged ERP solution for WordPress. Over 10,000+ active installations, it has already proved its relevance.
WP ERP comes with a bunch of modern features. Among them, we have chosen a few features to make this tutorial that is primarily needed to run a business.
| HRM | CRM | Accounting |
|---|---|---|
| Employee Management | Contact Management | Users |
| Leave Management | Company Management | Sales |
| Announcement | Schedules | Tax |
| Reports | Journal | |
| Bank Accounts | ||
| Expense | ||
| Reports |
Make the best use of WP ERP HRM to manage your employees

WP ERP HRM helps to evaluate employee performance and keep that record in each employee profile. Apart from this, it creates leave policies and manages the holidays feature that lets you list all the rules to be viewed by everyone.
Let’s start with the Employee Management:
Step 1: Employee management
Adding employees
- To add your employee, go to WP Dashboard > WP ERP > HR > Employee

- A pop up modal like this will appear where you can fill out all the information.

- If you want to add more information, you can use the advanced fields. Simply enable the check-box Show Advanced Fields.

- Finally, the form gives you the option to send a Welcome Mail to the employee’s email.

Don’t forget to click on the “Create Employee” button to save the changes.
You can also set individual employee profile from Employee Management.
Creating and managing departments
Create separate departments for your office so that you can manage large groups and different types of employees easily.
- To create a department log in to the WP Admin Dashboard > WP ERP > HR > Departments > Add New

- Clicking the “Add New” button will take you to this modal window.

Fill up the information to create a department.
Creating and managing designations
Creating designations for your employees allow you to differentiate between roles and responsibilities. One designation can be appointed to many employees. Adding Designations and Departments to your employees allows the admin to easily sort out people related to their respective fields.
- Go to WP Admin Dashboard > WP ERP > HR > Designations(tab) > Add New
- Now add Designation Title and Description.

This is how you can create designations.
A company functions with active employees. But at some point in time, some employees become inactive or resigned. With this Employee Management feature, you can add status to the employees.
Step 2: Leave management

One of the biggest challenges small business owners face is to manage their hourly paid employees. However, having automated leave management can help them to get out of this stress. Follow this tutorial to make an automated leave management system for your business.
Creating leave policy
Without leave policies, there will be no limit in the HR system for the number of leaves one can apply. So, create a leave policy first to set how many leaves one can apply for.
- To create a leave year, go to WP ERP> Settings > HR

- Next, click on Leave Year. There, set your leave years and hit Save Changes to finish.

- Go to WP Admin Dashboard > WP ERP > HRM > Leave Management > Policies > Add New

Next, you will get a form like this. Fill it up and save the changes to get your job done.

Creating leave requests
The WP ERP Leave Management tool lets you create and manage leave requests as an admin.
To view all approved, pending and rejected requests, visit WP Admin Dashboard > WP ERP > HR > Leave Management > Requests

- As an admin, you can create a leave request from this section. Click on “New Request” to create a new leave request.

- Complete the form as required and click on Submit Request.
- You can add documents if it’s needed.

- Once submitted, a request cannot be edited anymore and they are set to pending status.
You can view all the requests and their details under the Leave Requests manager. If the request is pending, it can be Deleted, Rejected, or Approved. If the status has been approved, then you can change it back to pending, or delete or reject it.
Step 3: Announcement
WP ERP has a built-in announcement system for your employees. You can create and share announcements to either all your employees or specific ones.
- To create announcement, go to WP Dashboard > WP ERP > HR > Announcement

Now, you will see a list of all the announcements you have created or will create in the future. This list contains the title, receivers, type, and date of created announcements.
- Simply click on the Add Announcement button and you will be redirected to the announcement creation page.
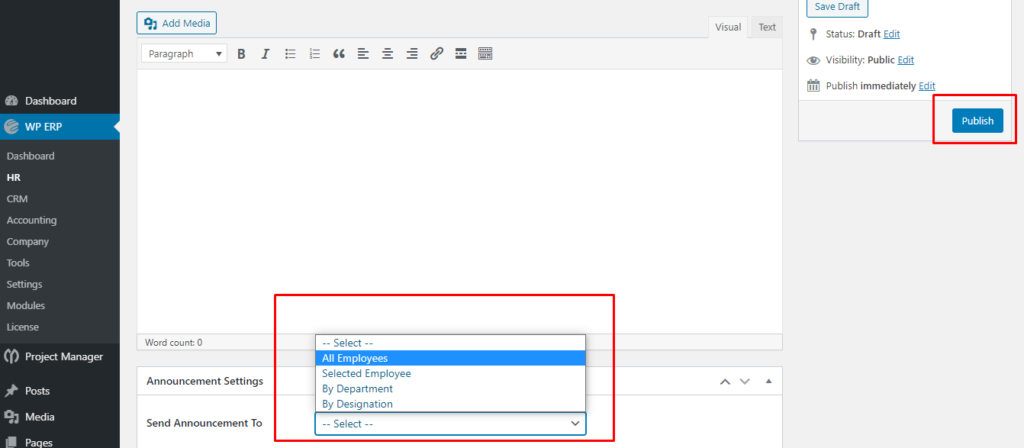
Create an announcement like the way you create a blog post using Gutenberg editor and then select whom you want to send the announcement to.
You can choose either
- All Employees
- Selected Employee
- By Department
- By Designation
If you choose selected employees, you will get a field where all your employee name will be available for selection.
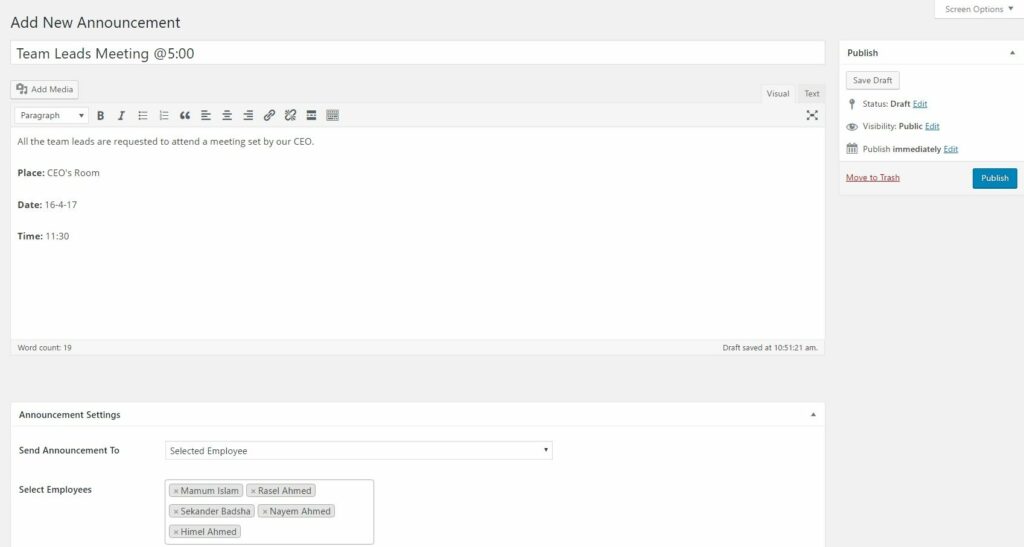
Select the ones you require. Finally, Click on the publish button.
Make the best use of WP ERP CRM to manage your customers

A CRM is an online-based Customer Relationship Management system that lets you understand and respond timely to the needs of your customers.
We’re going to breakdown some of the key points of a CRM system below:
Step 1: Contact management
Contact management lets you perform the below-mentioned actions.
- View all contacts in list format with all required details (name, email, phone, life stage, owner, date of creation)
- Create new contact
- Edit, view and delete a contact
- Filter contacts as Customer, Lead, Opportunity, and Subscriber
- Add search segments using several different fields
- Filter contacts using search segments
- Save search segments
- Delete multiple contacts together
- Assign groups to multiple contacts together
- Search for specific contacts by name
- Filter contacts by name of an owner
Adding a new contact
- To create a new contact navigate to WP Admin Dashboard > WP ERP > CRM > Contacts
- Next, click on the “Add New Contact” button located above on the left, as shown below:

You will get a popup form to fill up.

- Click on the “Show Advanced Fields” to set more information for your contact.
After filling up all the required information, click the “Add New” button to get your job done.
Setting up a meeting
You can set a schedule or meeting for your important tasks. Schedules appear directly on the event calendar and you can receive notifications in SMS or Email. You can also access it from the contact’s profile. Also, a notification time can be chosen.
- Go to WP Admin Dashboard → WP ERP → CRM → Contacts.
- Click on the contact you want to create a meeting with.
- Click on the Schedules tab.
- Create a new schedule by filling out the necessary fields. Before saving, select the schedule type as ‘meeting’.

CRM task management
Using CRM Task Management, you can assign tasks to agents from your sales or marketing team when you need a person to attend for a customer and also track the task activities of each contact by regulating your work seamlessly.
For Task creation,
- First, navigate to WP Admin Dashboard > WP ERP > CRM > Contacts.
- Next, click on the desired client or contact’s name. And click on the Tasks tab
- Create a task, select the name of the Agent from the drop-down, and add a description.

Press “Create Task” to create the task.
Now after creating a task by the admin, CRM Agents can see all the tasks from the dashboard.
For task management,
- To get access to all your task, navigate to WP ERP > CRM > Tasks.

- Thereafter, as an admin, you can see both My Task & All tasks from here.
- And also, you can mark it as complete after your task is being finished

So this is how you can manage your CRM contact’s task.
Step 2: Company management
The Company dashboard is a single page dashboard for all your business client management activities. It allows you to;
- View all companies in list format with all required details (name, email, phone, life stage, owner, date of creation)
- Create a new company on your CRM
- Edit, view and delete a company
- Assign multiple contacts to the companies you create
- Assign the companies you create to different groups
- Add a new search segment to filter your searches
- Filter companies by the name of an owner.
- To create or update a new company, go to WP Admin Dashboard > WP ERP > CRM > Companies > Add New Company

You will get a popup like this form that you need to fill up to add a new company.

Finally, click to the “Add New” button to complete the procedure.
Adding a company to a contact group
Now, you can add a company to a specific contant group.
- To do so, navigate to WP Admin Dashboard > WP ERP > CRM > Companies > Select a company > Assign Contact Groups

If you click on the “Assign Contact Groups” button then you will get this popup window to assign groups.

Check the group that you want to assign to a company and hit the ‘Update‘ button. That’s how you can add a company to a contact group.
Step 3: Setting-up schedules
This feature lets you seamlessly plan your future calls, meetings, and emails with your desired contact and company. It’s an in-built calendar that is intuitive, easy to edit, track, and view.
Navigate to WP Admin Dashboard > WP ERP > CRM > Schedules to access your CR calendar. Here you will find two tabs:
- My Schedules, where you can see and edit only your logs and schedules.
- All Schedules, where you can view and edit all logs and schedules concerning all CRM agents and managers.

When you click on the current day or any past day, a log modal window will be opened. Here in this screen, you can log a call, SMS, meeting, or email that have already taken place with a contact or company.

- If you need to create an event [meeting or call] from the calendar, just click on a future date, and a modal window will appear.
- Fill out the form with necessary details and select a Contact or Company.
- After entry, click on the Create Schedule to complete.

Step 4: Reports
You can generate reports using WP ERP report feature.
- Navigate to WP Admin Dashboard > WP ERP > CRM
- Hover your mouse on ‘Reports’.

You will find 3 types of ready-made reports:
- Activity Report
- Customer Report
- Growth Report
Click on View Report to see each report.
Activity report
Under Activity Report, you can view the total number of schedules, emails, tasks, and notes that all your agents or you have created for all your contacts and companies.

Customer report
The Customer Report shows the total number of Subscriber, Opportunity, Leads, and Customers.
You can filter this report in 4 ways to get a more detailed picture.

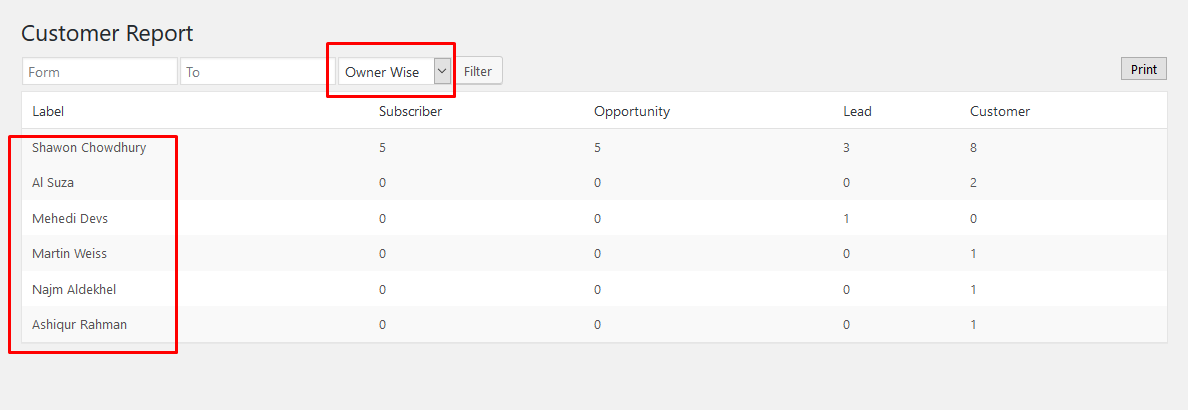
Owner Wise
The owner-wise customer report divides your contacts and companies by the contact owners (agents who created them and who are assigned to them).
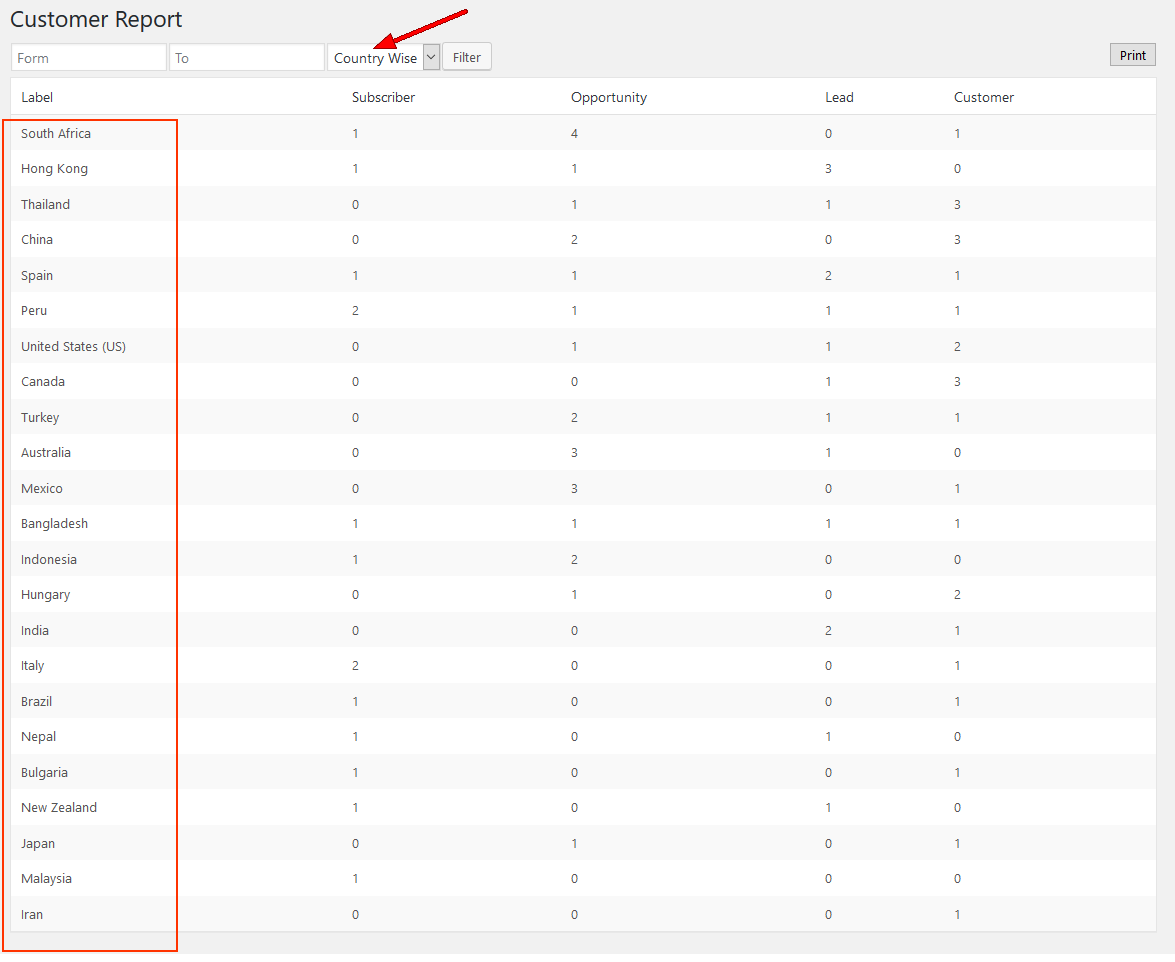
Country Wise
The country-wise customer report divides the contacts and companies by the countries they are from.
Source Wise
The source-wise customer report divides the contacts and companies by the different ways they came in touch with your business and company e.g. advertisement, contact forms, opt-in forms, email, phone calls, conferences, etc.

Group Wise
The group-wise customer report divides all your contacts and companies by the different contact groups they are added to.

Growth report
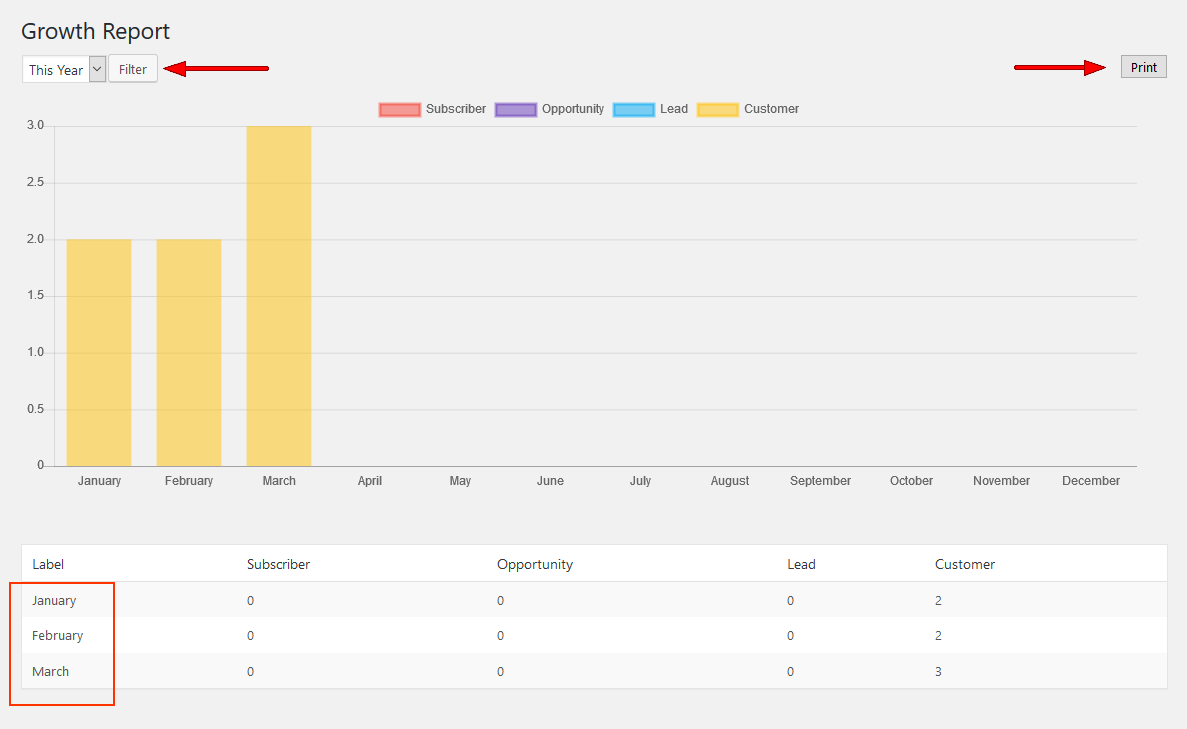
The Growth Report shows the total number of Subscribers, Opportunity, Leads, and Customers that you created for each month.
This report shows both a bar chart and a list of the totals.
That’s all about WP ERP CRM reports.
Make the best use of WP ERP Accounting to manage your accounts

The WP ERP Accounting lets you manage all the accounting tasks from a single dashboard. For doing that job you don’t need to be a pro on balance sheet, debit, credit, income statement, or statement of cash flow.
First of all, we will learn how we can add users on our Accounts.
Step 1: Users
In this section, you will be able to create customers, vendors, employees for your enterprise. Just navigate to WPERP > Accounting > Users and you will find the required options to create customers, vendors, and employees.
- To create a customer go to WP Admin Dashboard > WP ERP > Accounting > Users.

This page will let you create customers for your enterprise.
- Click “Add New Customer” to create a new customer.

- Next up, a form will appear which is quite easy to go through. You can upload an image of the vendor as well.

- If you click “Show More”, more options will appear for creating a customer.
Finally, add to the “Add New” button to complete the procedure.
- To create a vendor for your enterprise, navigate to WP Admin Dashboard > WP ERP > Accounting > Users > Vendors

Now click on “Add New Vendor”.

You will get a form to create a vendor. Fill the form out like the way you have just created a new customer.
Step 2: Sales
If you are going to sell your inventories, you have to use this section of the system.
- To record an inventory sales transaction, navigate to the WP Admin Dashboard > WP ERP > Accounting > Sales

- Now, click on “Create Invoice“

You will get the following options to Create Invoice:

Now, hit the Save button to record the transaction.
Receive payments
If you want to receive money from your customers, use Receive Payments features. This means when you create an invoice, you can receive payment for that invoice using this option.
- To receive payment from your customers navigate to the WP Admin Dashboard > WP ERP > Transactions > Sales.

- Now go to New Transaction > Receive Payment.

Select the customer for whom you have created an invoice. The invoice will be shown automatically for the vendor if you have created an invoice for him/her.
You will need to enter the payment method, payment date, deposit to account, particulars, and attachments.
You can also edit the transaction amount with a view to receiving payments partially.

Finally, hit the “Save” button to complete the payment process.
Step 3: Tax payment
- To pay the tax, navigate to WP Admin Dashboard > WP ERP > Accounting > Tax > Tax Payment

Click on “New Tax Payment”. Select ‘Payment Method'(Cash, Bank, Check), ‘Payment from’, ‘Payment To’, ‘Amount’.
Hit “Save” to complete the transaction.

There is a voucher number on the left-hand side of the transaction. It will show the history of the transaction.

You will see a page like this.

There are three vertically aligned dots on the right-hand side of the transaction.

By clicking it, you will be given options such as “Edit” and “Delete”. You can edit or delete your transactions by these two options.

That’s it!.
Step 4: Accounting journal

Simply, Journal is an analysis of the transactions based on the debtor-creditor characteristics which determine whether a particular business event has an economic effect on the assets, liabilities, or equity of your business.
To learn how WP ERP Accounting Journal works, follow this article – Importance of Accounting Journal & How to Use It in WordPress
Step 5: Bank accounts
You can transfer money between your petty cash and savings accounts.
- To do so, go to the WP Admin Dashboard > WP ERP > Accounting > Bank Accounts and click on the button Transfer Money.

Now, you will have to specify your bank accounts, transfer amounts, etc.

Finally, hit the “Transfer Money” button to to complete the transfer.
Step 6: Expense

For learning;
- Creating an Expense
- Creating a Check
- Paying Bill
- How to make payments partially or in installments
- Creating Bill
- How to reverse or neutralize a credited vendor
- How to approve or void an expense
Step 7: Reports
Using WP ERP Accounting Reports feature, you can generate the following reports;
- Trial Balance
- Income Statement
- Sales Tax
- Balance Sheet
- Closing Balance
- Ledger Report
Trial balance
The trial balance is the book-keeping or accounting report that lists the balances in each of the general ledger accounts.
To view your trial balance go to the WP Admin Dashboard > WP ERP > Accounting > Reports and select View Report from the Trial Balance section.

You can see the entire accounting status from this page.
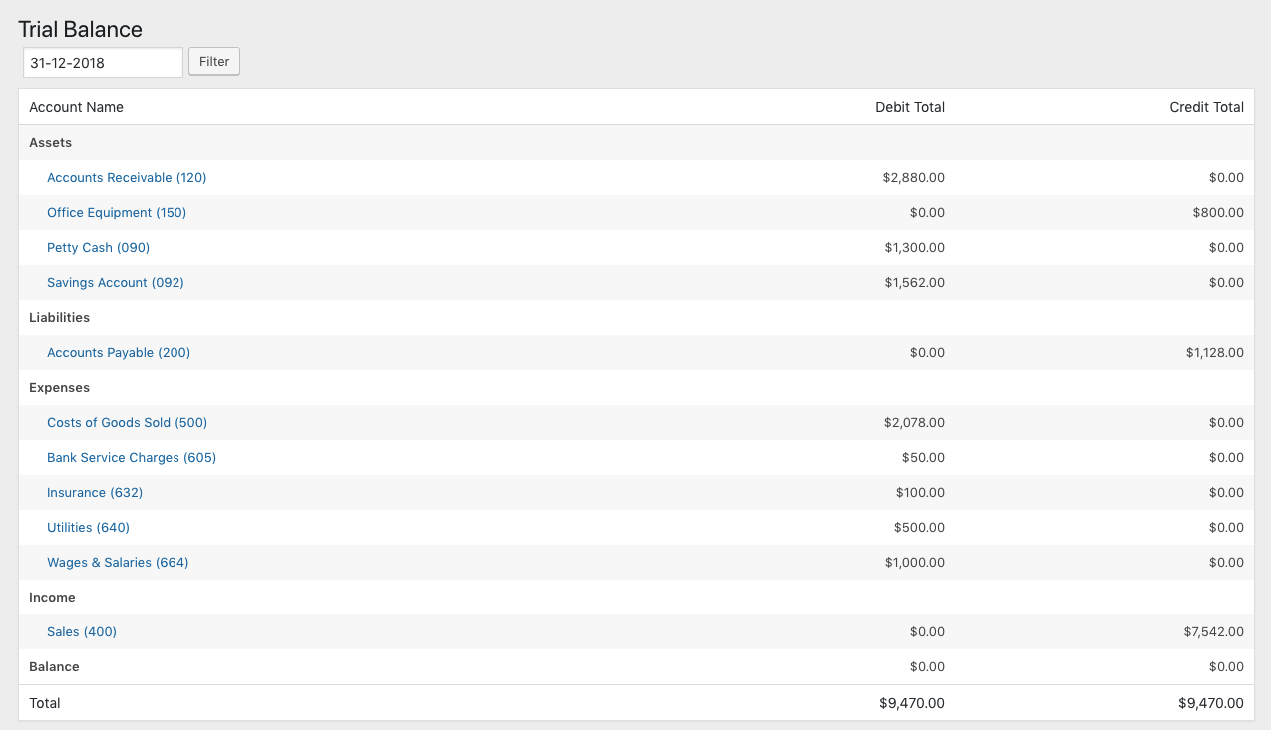
The debit and credit sides of the trial balance will always result in the same amount. If not, there must be an error in your book-keeping process.
You can also generate Income Statement, Sales Tax, Balance Sheet, Closing Balance, and Ledger Report using this feature.
So, delay no more, learn how to use ERP software now to grow your business fast

Now, you know how to use ERP software for your business. So, no more delay. Choose an ERP software to apply these features and see the changes.
If you face any problem while using WP ERP, let us know through the comment box below to get the solution. Good luck!




Many many many thanks for such a complete and wonderful explanation and information.
Thanks for the appreciation.
Good explanation, pls how can i get the software
You can buy WP ERP from here: https://wperp.com/pricing/?nocache