Inventory Management
Introduce stock management capability into your WP ERP system by adding the Inventory Management extension.
In this documentation, we will cover –
- Basic idea or workflow of stock management in WP ERP
- Creating product categories
- Creating products
- Adding stock to the inventory / Creating an invoice for the stock purchase
- Selling stocks as products to customers
- Generating reports on the stock
- WooCommerce integration
Inventory Workflow
Create product → Purchase product stock from vendor → Edit stock product details (optional) → Sell your stock → Re-stock
Installation and Menus
Install and activate the extension like any other WP plugin.
Please note that WP ERP must be installed and activated in order to use this extension.
Only Accounting Managers will be able to view and use Inventory Menus. Navigate to the WP Admin Dashboard → WP ERP → Accounting → Inventory.

Here you will be able to view your inventories provided that you have created products from all along.
How to Use the Inventory Feature
Firstly, we should create Categories for our Products
Maintaining a category list will help you in the future to manage a large inventory.
Go to WP Dashboard → WP ERP → Accounting → Product → Product Categories.

In order to create a Product Category, you have to enter the following information-
- Name: The name of the category you want to create
- Parent: You can also select a parent category that you have already created if required.
After entering all these data, hit the Add new category button to create the product category.
Adding Products
To add a product, navigate to – WP Dashboard → WP ERP → Accounting Products → Products & Services.

You will be able to view the list of products (if there is any).
Now, follow these steps to add a product:
1. Click on Add New Product. Now, you will get this popup:

2. Add your product name, product type, category, cost price, sale price, vendor name, tax category, etc.
3. Hit the Save button to complete the product.

Adding stock to the inventory
You can either buy the stock from the vendor on credit or payment.
To buy on Credit,
1. Go to WP Dashboard → WP ERP → Accounting → Transactions → Purchases → New Transactions → Click on Create Purchase.
2. Pick a vendor (Billing address will be auto-added), Due and Issue date.
3. Add reference number
4. Select the product you created from the inventory. The tax rates, descriptions, and other details will be added automatically.
5. Enter the number of products you want to stock in the Quantity field (Qty).
6. Now Save the invoice.
7. Now, navigate to WP Admin Dashboard → WP ERP → Accounting → Transactions → Purchase → New Transactions → Pay Purchase.

8. Now select the vendor for whom you created the invoice and pay him.
Checking Inventory Stocks
To view if the stock has been added to the products, navigate to – WP Dashboard → WP ERP → Accounting → Inventory.

You will notice all the products now has stock as you have added from vendor credit or payment.
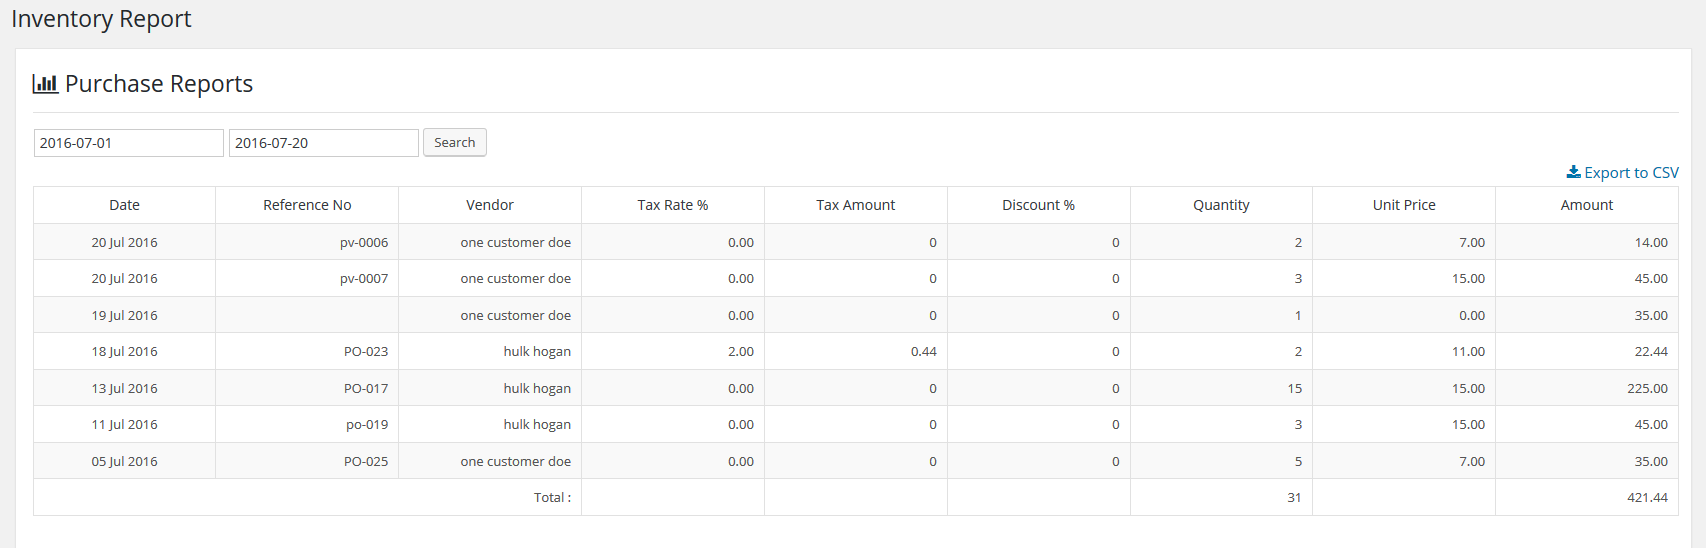
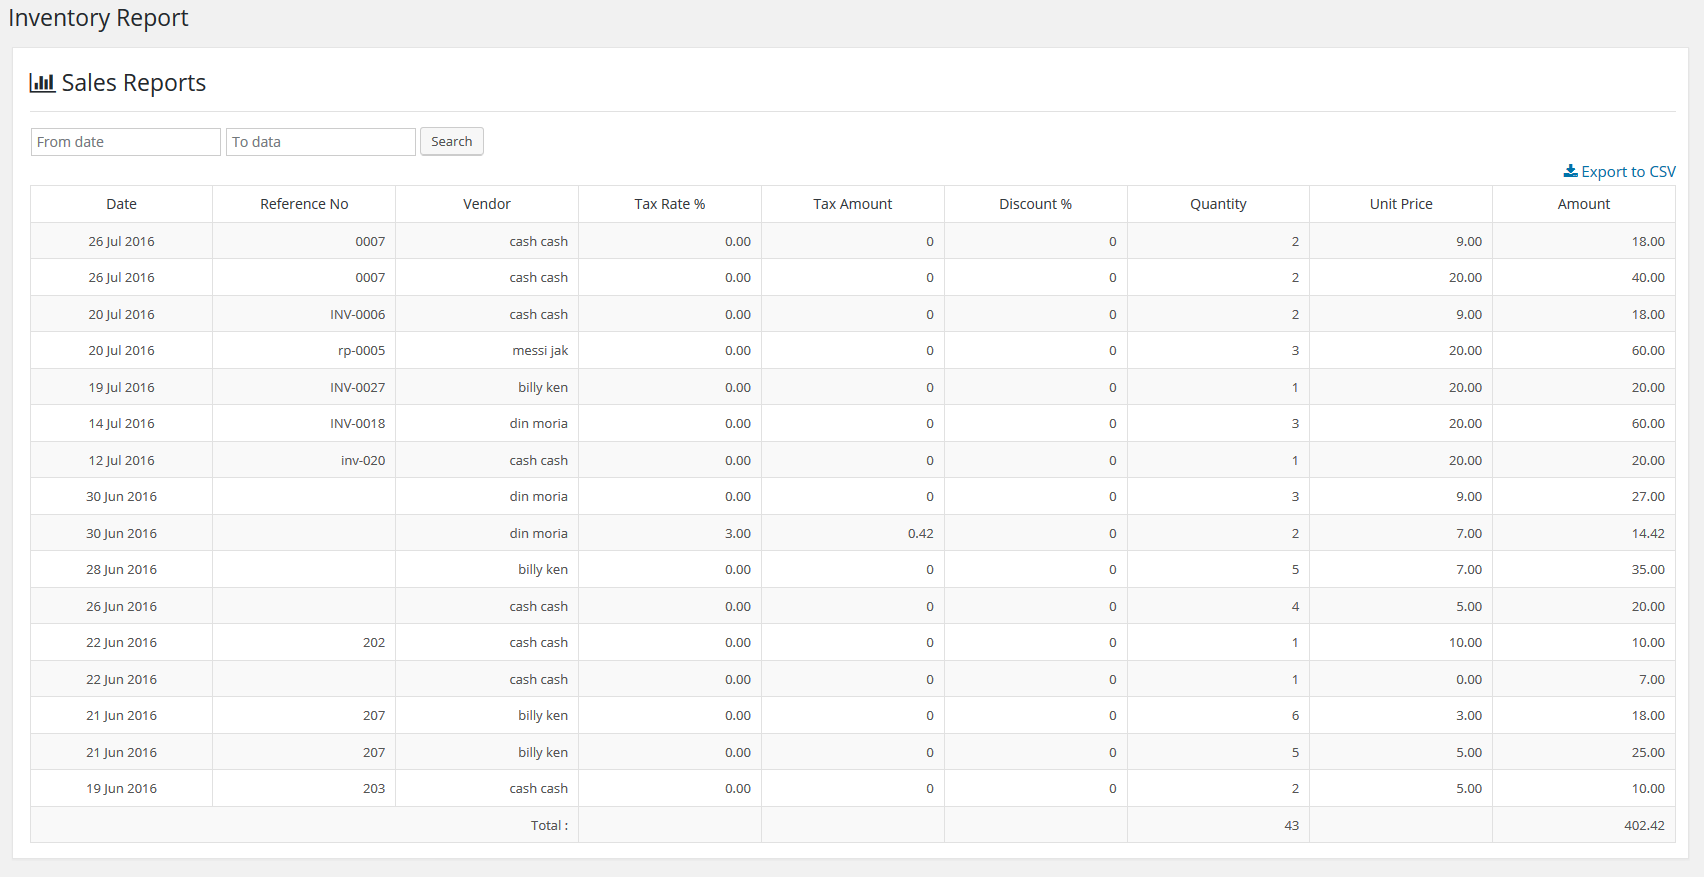
Generating reports
Go to WP Dashboard → WP ERP → Accounting → Reports
You can export most of the reports to CSV files.
Pick any of these three report types associated with the inventory add-on

The product purchase report gives you a list of purchased products with details about the purchase and vendor’s name.
The product sales report gives you a list of sold products with details about the sale and customer’s name.
WooCommerce Integration
We are working on this integration and have plans to add them very soon!
