
Upgrade or Downgrade Your WP ERP Pro Plan
You can add or remove extensions and users in your WP ERP Pro plan at any time. You do this from your account on wperp.com.
The prices in the screenshots are examples. Your prices can be different.
Upgrade your plan
- Log in to your account on wperp.com.
- Open the My Licenses tab.

- Find your license and click View Upgrades.

The page shows your current plan: the extensions that you have and the number of users.


- Select the extensions that you want to add.
- To add users, increase the number of users.
- Click Upgrade.

- On the checkout page, make sure that the new items are correct, then complete the payment.

You pay only for the new items. The checkout page shows the amount for the new items and any discount.

Downgrade your plan
- In your wperp.com account, go to My Licenses → View Upgrades.
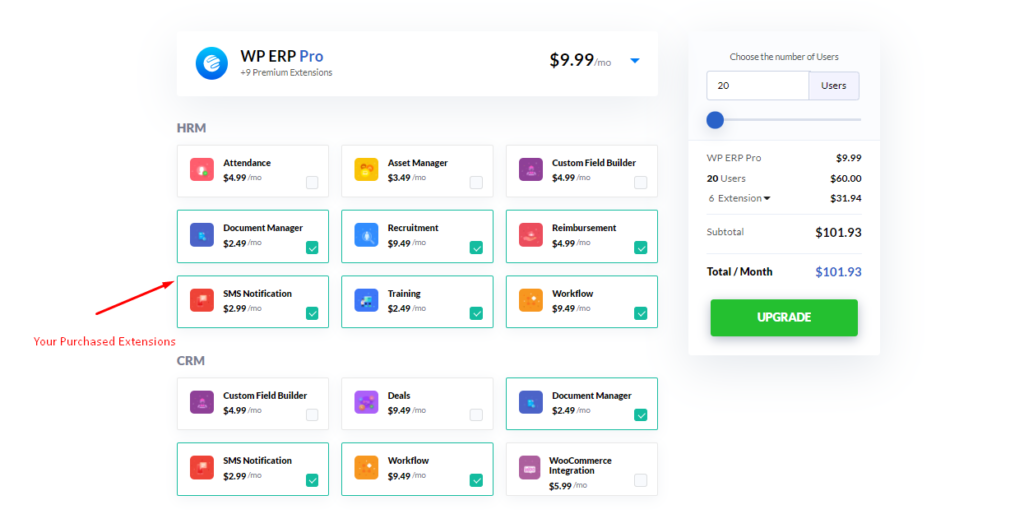
- Clear the extensions that you do not need.
- To remove users, decrease the number of users.
- Click Upgrade.

- On the checkout page, look at the removed users, the removed extensions, and the new price. Then complete the checkout.


We do not refund the difference after a downgrade. The new price starts at the next billing date.

Before you remove users, make sure that your site does not have more users than the new plan allows. See Which users count below.
Change from monthly to yearly
- In your wperp.com account, open your license.
- Click Monthly to Yearly.

- Click Upgrade. The checkout page shows the yearly price.
- Complete the checkout.

You can also start an upgrade from your WP ERP site. Click an extension that you do not have, and WP ERP opens the pricing page.
Which users count
Your plan sets the number of users that WP ERP Pro allows. WP ERP Pro counts each user who has one of these roles:
- HR Manager
- Employee
- CRM Manager
- CRM Agent
- Accounting Manager
WP ERP Pro does not count:
- WordPress administrators.
- Employees with a status other than Active, for example Inactive or Terminated.
- Your contacts and customers. You can have as many as you need.
When all the users of your plan are in use, WP ERP Pro does not let you add more active employees or give these roles to more users. The roles do not show in the role list on the WordPress user pages, and WP ERP Pro shows a message. If your site has more users than the plan allows, the Pro extensions stop working until you upgrade the plan or remove users.
Questions
Where do I get the new version after I change my plan?
Your plan changes on your license. You do not have to install a new file in most cases.
- Go to Dashboard → Updates in WordPress. If an update for WP ERP Pro shows, install it.
- Or, go to My Account → Orders on wperp.com and download the zip file. Remove the old WP ERP Pro plugin, then upload and activate the new one.
WordPress looks for license updates every two hours.
Do I pay for my clients?
No. You pay only for the users with the roles in Which users count. Clients and contacts are not counted.
Do you give refunds?
Yes. We refund 100% of the payment within 14 days of the purchase. We do not refund a product that you bought at a discount.