
Attendance Management
Track the work hours of your employees and balance them with their leaves with the Attendance extension of WP ERP PRO. We have introduced
- Multiple check ins and check outs
- Flexible Shift Assigning
These are some of the many features in the new version of the Attendance extension.
Shift creating is now mandatory. You can create classified shifts for your employees.
Installation & Overview
After purchasing, download the plugin from the link given on your My Account page.
The installation of this add-on is the same as any regular WordPress plugin. Navigate to WP Admin Dashboard → Plugins → Add New → Upload the add-on file → Install and Activate.
The new Attendance overview page looks like the following:

1. Attendance Settings
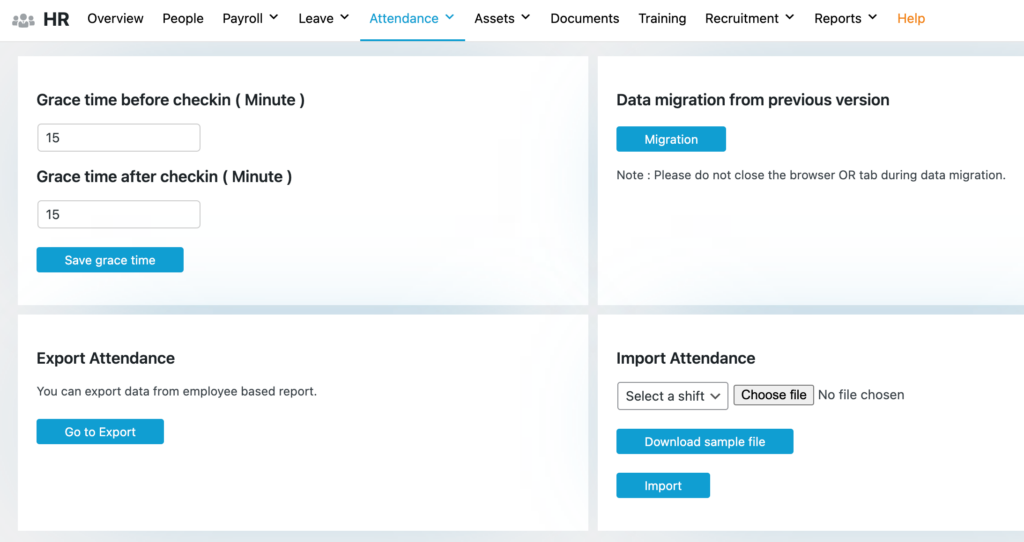
Navigate to WP Admin Dashboard → WP ERP → Settings → HR → More → Attendance.
You will find the following settings:
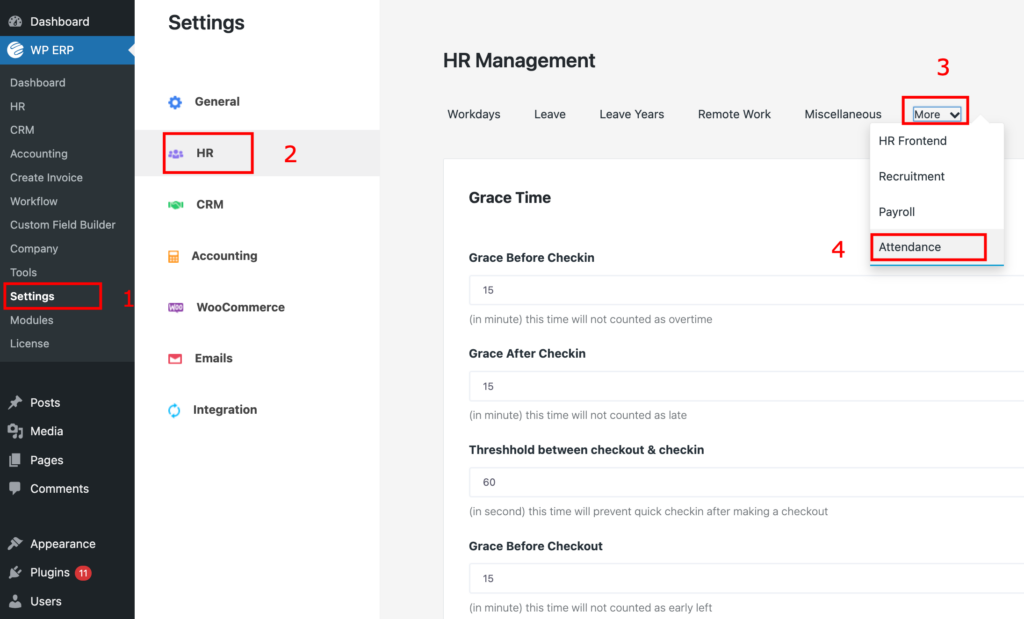
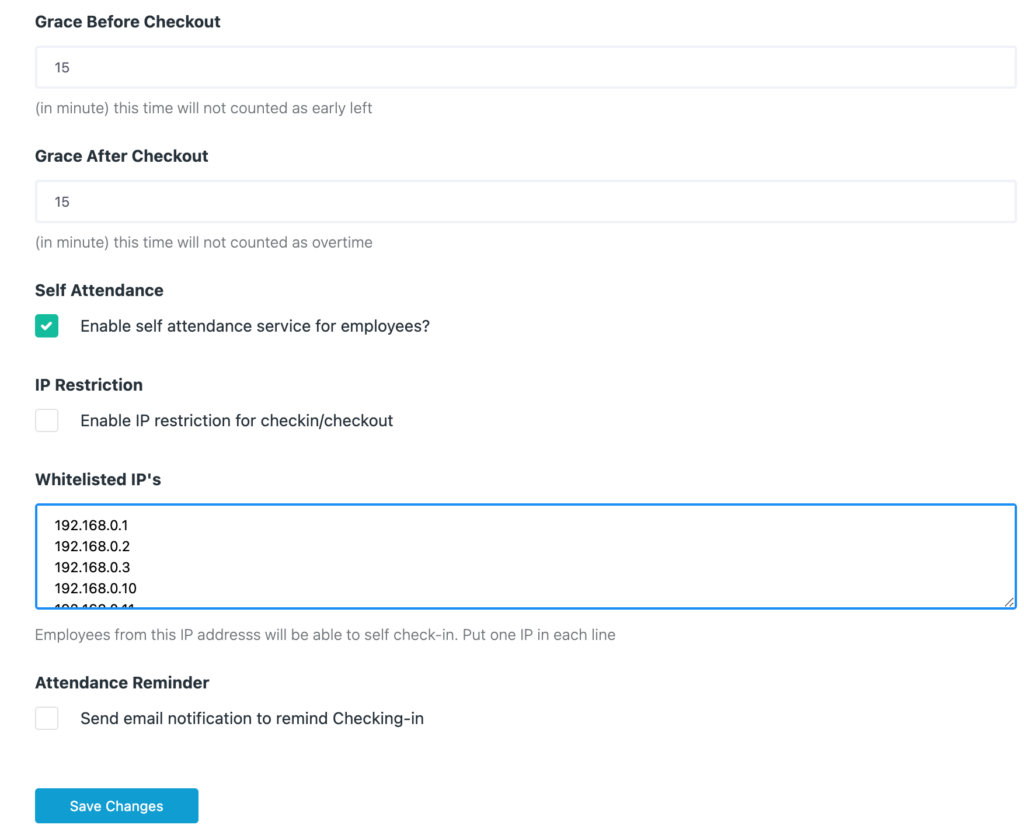
From these settings, you can configure grace time (grace before check in, grace before check out, grace after check in, grace after check out) in minutes.
There is an option called the Threshold between checkout and check in. This option is given so that when an employee checks in, he/she has to wait for the time you set for example 60 seconds before check out. Otherwise, if he/she checks out before 60 seconds that check out will not be counted.
WP ERP has an option called “Self-Attendance” for the employees, and IP Restriction so that none can abuse the self-attendance service.
IP Restriction for Self-Attendance Service
You can enable the IP Restriction feature if you want from the settings page. Just click on the IP Restriction checkbox.
There is another field for White-listed IP addresses. Just type the IP addresses one in each line.
For Example:
192.168.0.1
192.168.0.2
192.168.0.3
192.168.0.10
192.168.0.11
2. Creating Shift
Shift creating is now mandatory. If your office hour is 9-5 pm, still you have to create a shift for that.
First, you have to create a shift, assign employees, and then generate it. If you create a shift, and assign employees but do not generate it, then that shift will not work and your employees will not be able to check in or check out.
So creating a shift is necessary to specify and assign the office hours for the employees of your office.
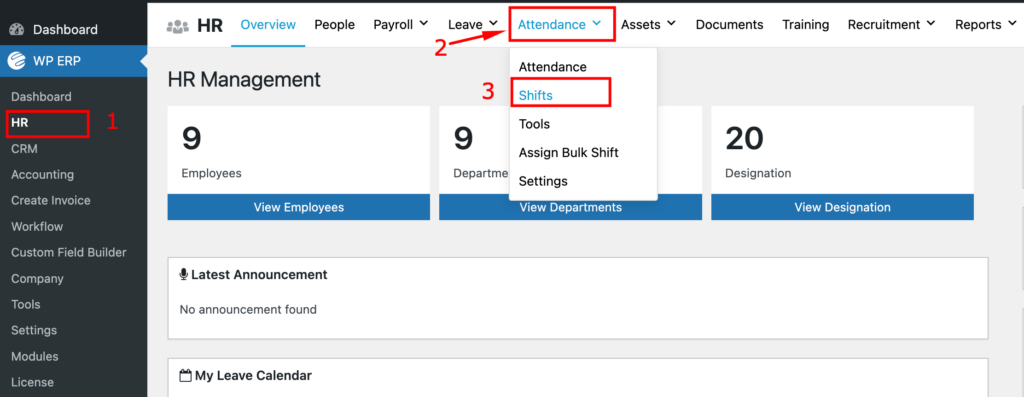
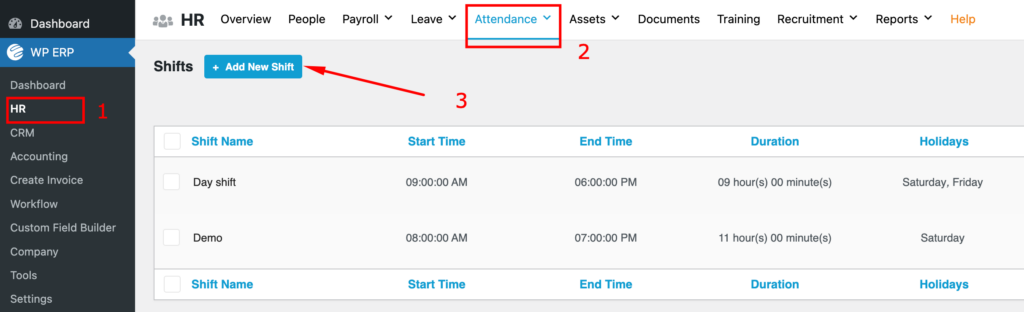
To create a shift, navigate to WP Admin Dashboard → WP ERP → HR → Attendance → Shifts.
Click on “Shifts”.
Now click on the button “Add New Shift”
You will get a pop-up like this.
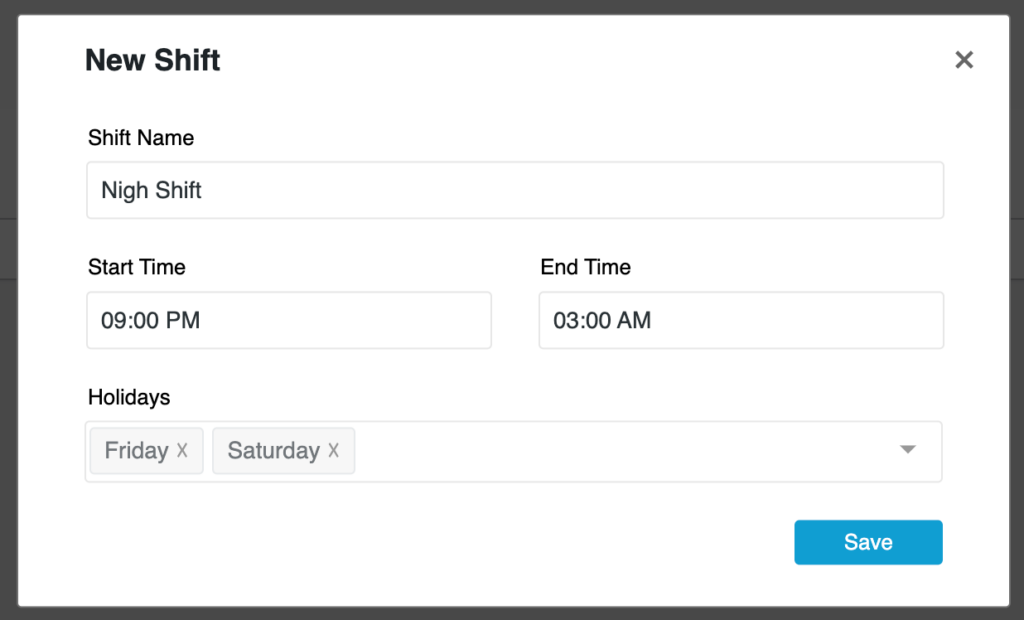
Set Shift Name, Start Time, End Time, and Holidays for the current shift.
Click on “Save” to create a new shift.
You can create as many shifts as per your needs.
There could be a scenario where the HR of the company doesn’t have access to the Settings option. Therefore HR can not set the grace period. To suppress that binding we introduced an alternative way.
Navigate to WP Admin Dashboard → WP ERP → HR → Attendance → Tools.

Now the HR Manager can set the grace period with ease.
3. Assign and Manage Shifts
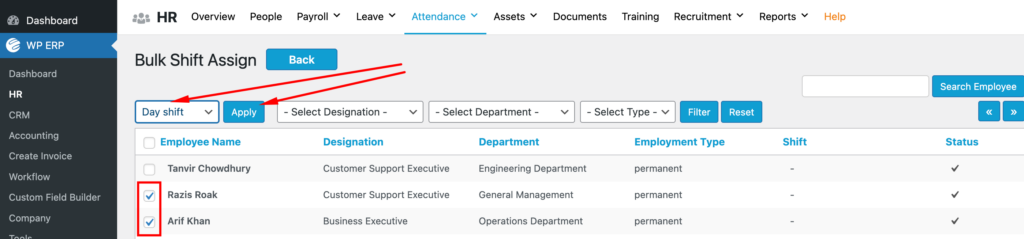
To assign a shift to employees, navigate to the WP Admin Dashboard → WP ERP → HR → Attendance → Assign Bulk Shift.

Here you can assign employees by choosing the Day shift or Night shift from the
drop-down box.

You can select a particular employee for each shift or select every employee for that shift as well. Click on the box beside the employee names to select them or select
Employee Name to choose all the employees. Then click “Apply” to finish assigning.
Suppose you have hired 5 employees in May. 3 of them will join from June and 2 of them will join from September. So you can create a shift for the 3 new employees who will join from June to August. Then create the same shift for 5 of them from August to any forwarding month. If you assign all 5 employees in the shift from June, then the 2 employees who will not join until September, will remain absent from June to August, which will be shown on their profile.
You have to keep that in mind, after the duration of the shift, the employees assigned to that shift will not be able to check in. So, you have to generate that shift again.
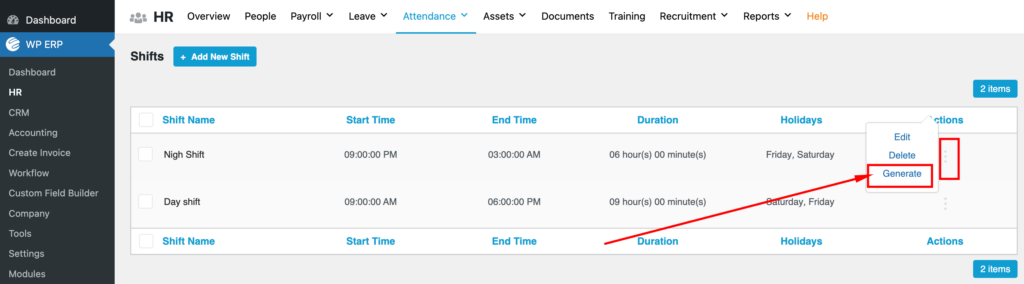
So to do that go to WP Admin Dashboard → WP ERP → HR → Attendance → Shifts → Click on the three vertically aligned dots under the Actions column.
You have to click on “Generate” as shown in the image, which is under the Action section.
Now, set Start Date and End Date.
There is an option “Generate this Shift for” in this section. You can assign any particular employee for that shift by choosing “Selected Employees of this shift”. Or, you can assign all the employees by choosing “All the Employees of this shift”.
Generating shift is mandatory. Shifts will not be effective unless you generate the shift for a specific time period.
Please note that you first need to assign employees to the shift. Only then you can use this feature.
Click “Generate” to finish.
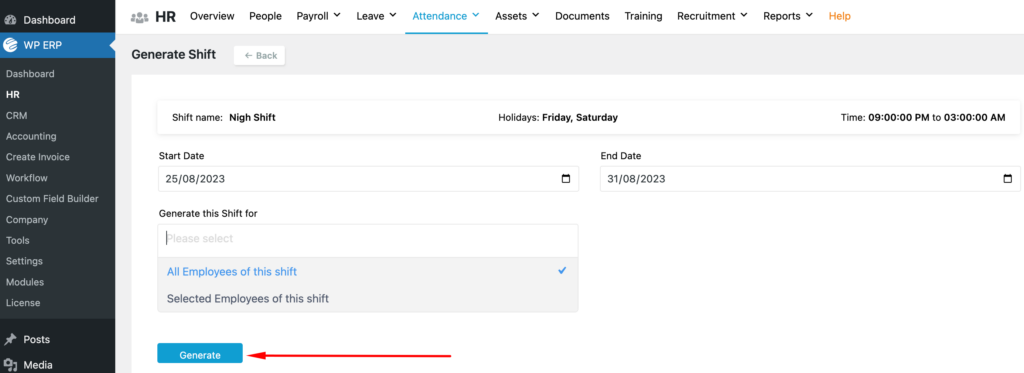
Note: The employees you are assigning to the shift, can only check in and check out until the end date of that shift. After the end date of that shift, those employees can not check in or check out. You have to generate a new start and end date for that shift and assign the employees again. Only then they can check in and check out again.
Multiple check-ins and multiple check-outs:
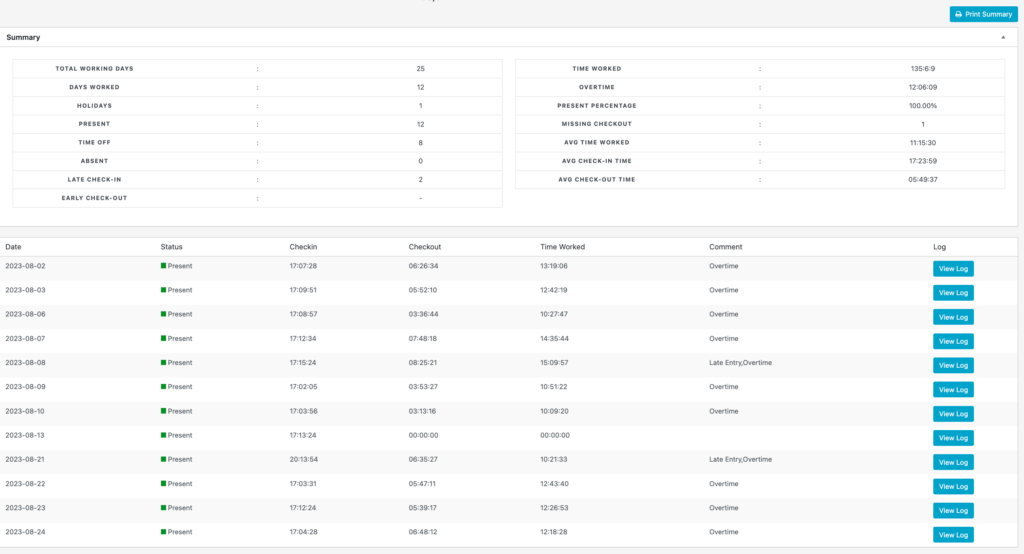
We will be discussing the “multiple check-ins and multiple check-outs” feature. In the older version, you can check in and check out only once. But now it can be done multiple times.
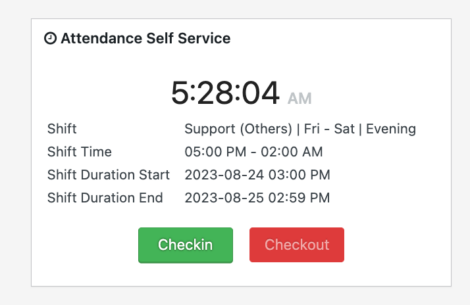
As you can see from the screenshot, the Shift duration is 2023-08-24, 03:00 PM to 2023-08-25 02:59 PM, and the shift starts at 05 PM and ends at 2:00 AM. We have maintained a 24-hour time for the shift. We have kept the grace period before check in to 2 hours.
However, you can edit the grace period as per your company policy. So if any employee checks in at 04:30 PM on 2023-08-24, he/she would have come early by 30 minutes. That time will be added to his previous day’s working hours as overtime. That employee has to check out before at 2:59 PM. If he fails to check out it will be considered a missing check out. So he/she has to check out and check in again.
If someone checks out multiple times, only the last checkout time will be shown in the employee profile. After checking out if someone checks in again, his/her working time will resume from his/her last checked out time. That means after checking out, the working hours counter will be paused. This process will continue for 24 hours. After that, the new shift will start.
4. Creating a List and Managing Employee Attendance
Navigate to WP Admin Dashboard → WP ERP → HR → Attendance.
You will view all of your attendance lists.
To create a new attendance list, click on the Add New button. You will view all your available employees. Besides that, if you are using an external device to log attendance, you can use a CSV file from that device and import that data into the HR system.
Admins can manually enter attendance logs for each employee.
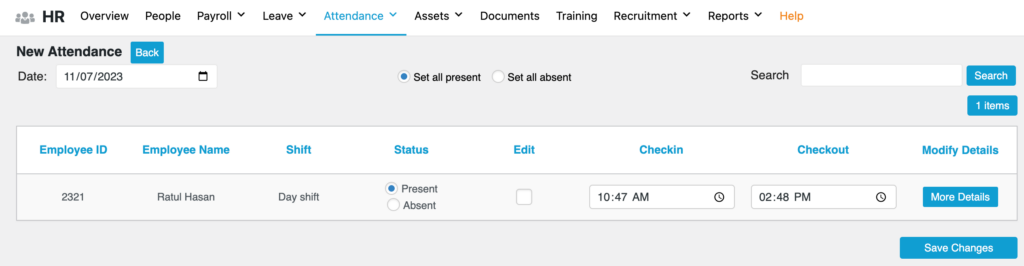
1. On top of this modal, there is a date field for selection. Besides, there are checkboxes for marking all employees present or absent.
2. Selecting the Present radio button will set that user to the default office hours.
3. Selecting the Absent radio button will set that user to default office hours.
4. To import from an external device, navigate to WP Admin Dashboard → WP ERP → HR → Attendance → Tools. and select the CSV file.
5. You can also manually input time by clicking on the field.
There are options for setting all of your employees either present or absent at once. You can also specify check-in and checkout times for each of your employees manually. When you are done with editing, hit the Save button.
5. Reviewing & Filtering Attendance Records
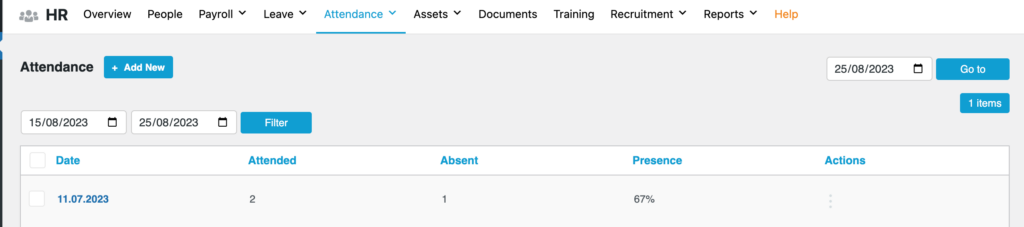
After creating and managing your employee lists, you can review the records of your employees’ attendance. Navigate to WP Admin Dashboard → WP ERP → HR → Attendance → Attendance and select an attendance list by clicking on the name (attendance date in this case).
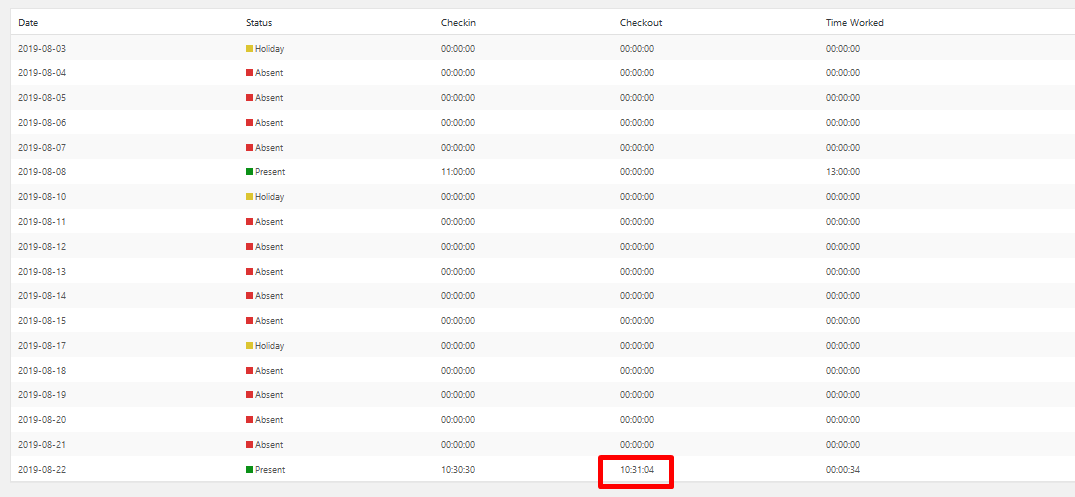
You will find the list of your employees, their ID, name, department, status (present or absent), check-in time, checkout time and total work time. There is a bulk action option and from there you can delete records if required.
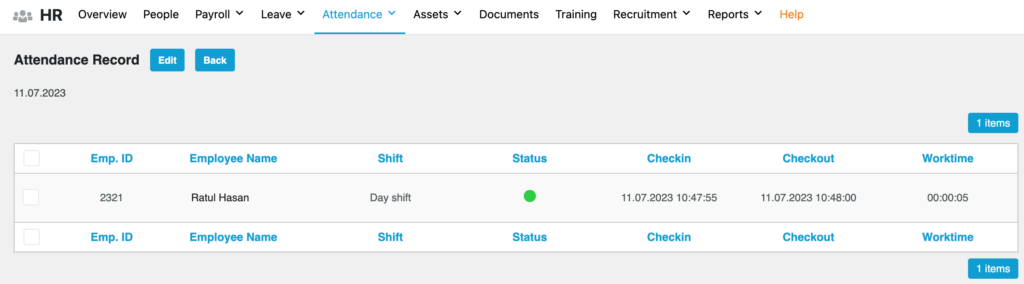
You can also filter the attendance list by different duration including today, yesterday, this month, last month, this quarter, last quarter, this year, last year and even custom.
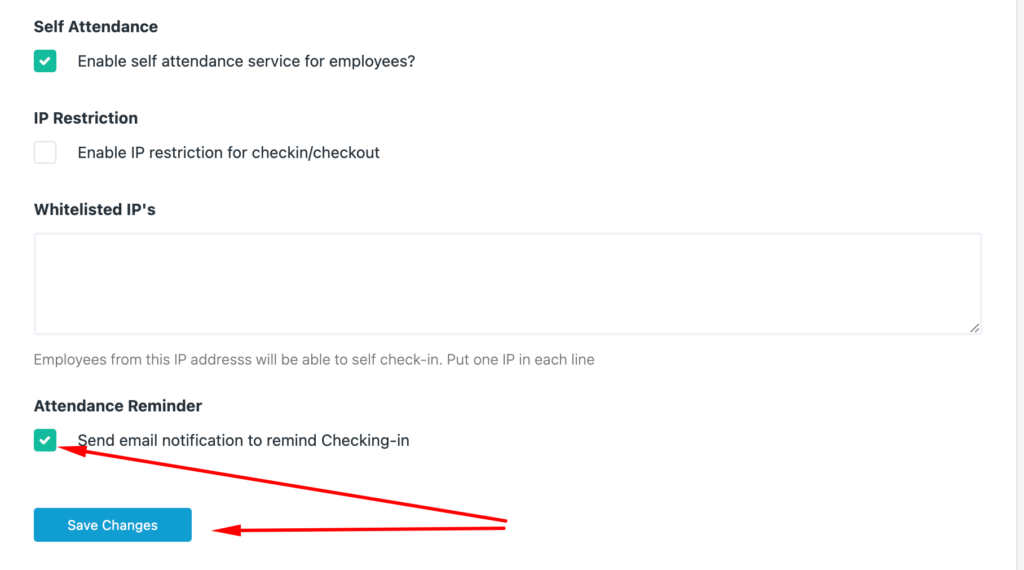
6. Set Up Reminder Emails For Employees
You can also set up email reminders for your users/employees when they have not checked in on time. This reminder email will be sent to the employee after the Grace After Check-In period is over.
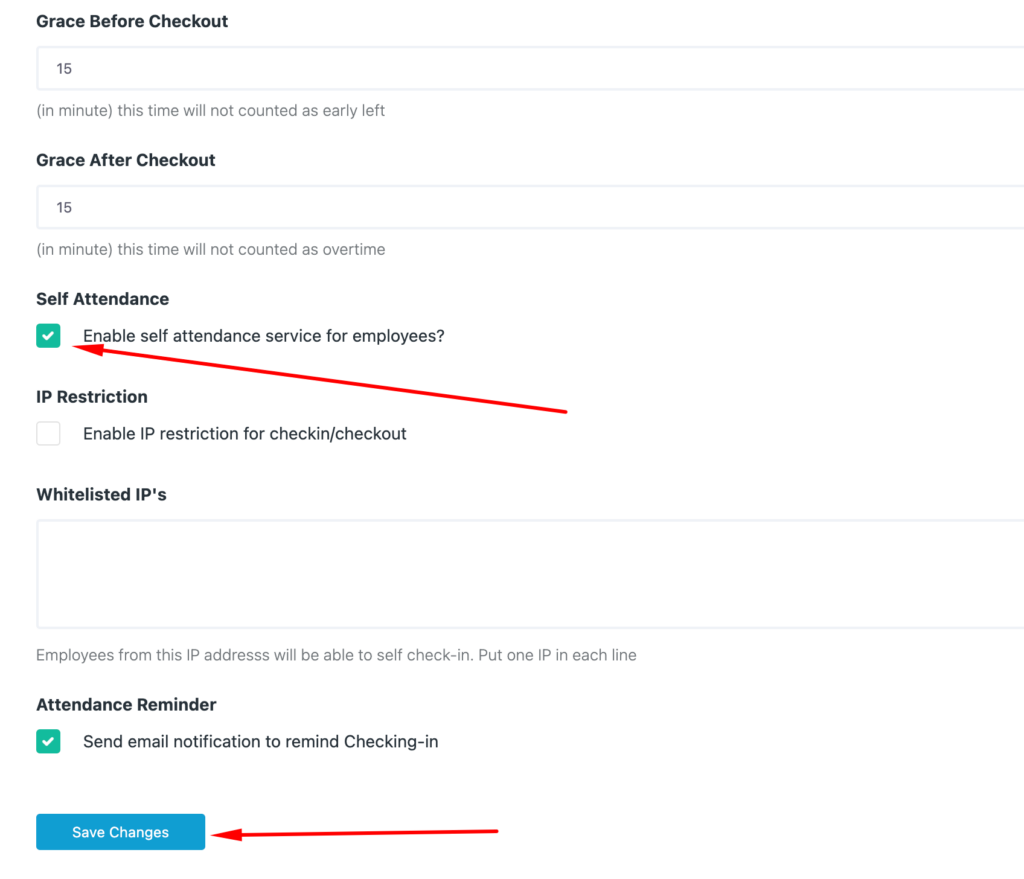
To do this, navigate to ERP Settings → Settings → HR→Attendance.
Enable the checkbox for Attendance Reminder, Send email notification to remind Checking-in.
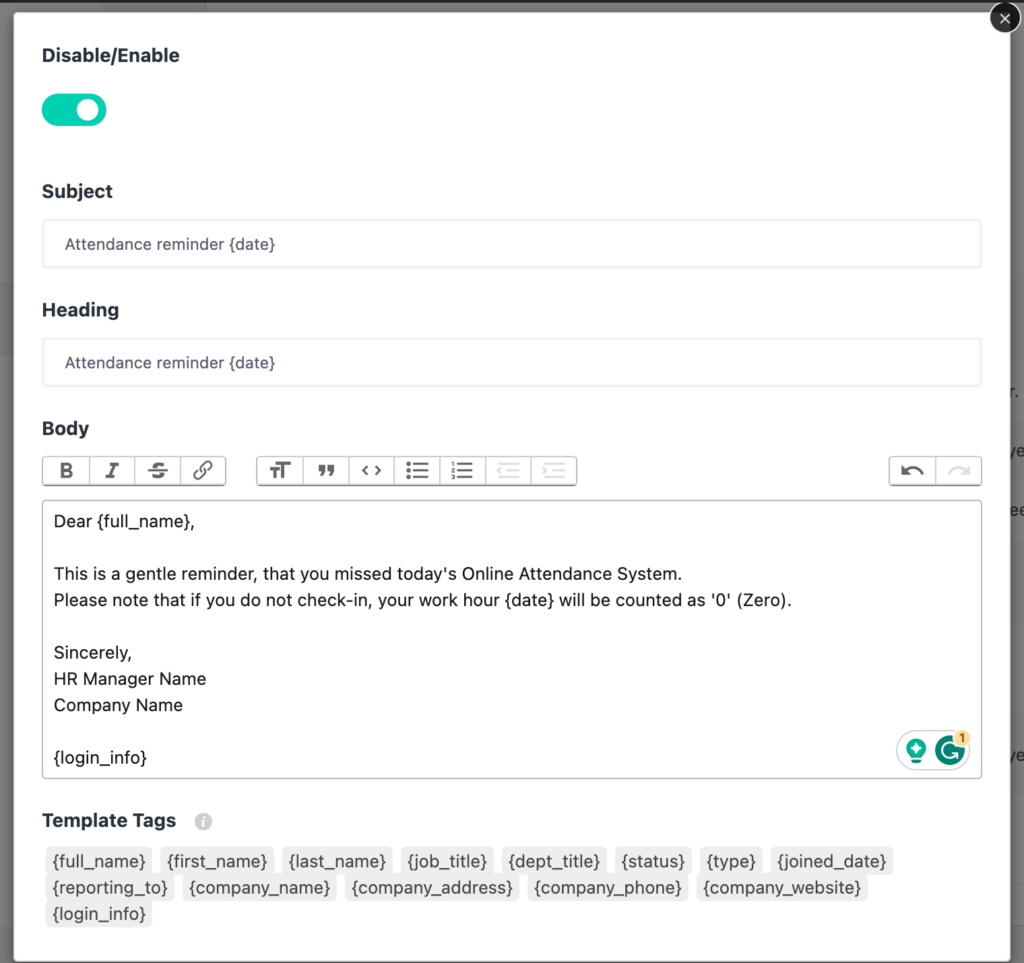
Configuring Reminder Emails
Go to ERP Settings→Settings→Emails.
Scroll to the bottom of the page to find Attendance Reminder and click on Configure on the right.
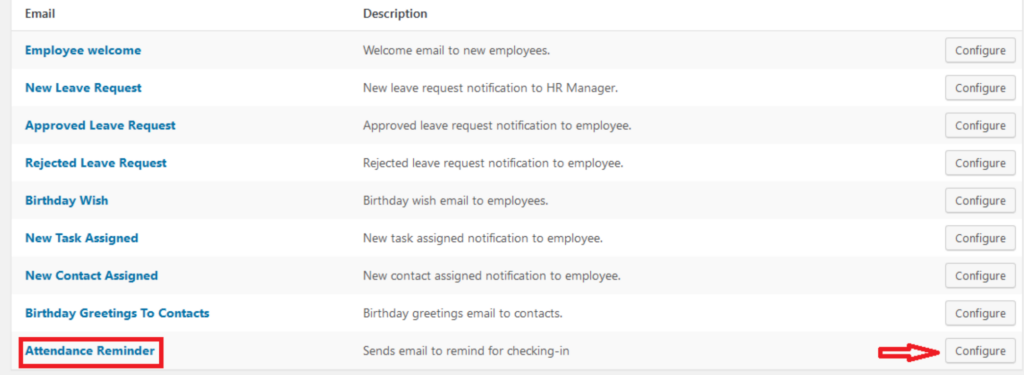
A new page will open for you to configure and modify your email content.
On this page, you will type the subject, heading, and content for the email that the system will automatically send to your employees if they have not checked in within the grace period time.
In other words, the reminder email is sent when the Grace After Check-In period is over.
7. Enabling Self Attendance System
The employees can check in and check out from their own HR Dashboard. You have to enable the feature from ERP Settings → Settings → HR → Attendance → Enable self-attendance service for employees.
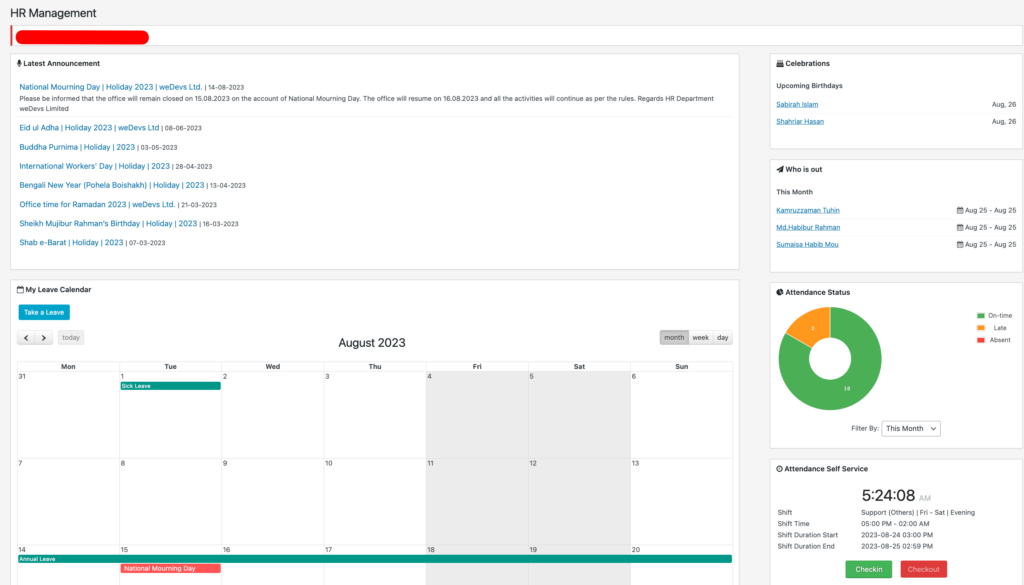
Employees can log in to their HR profile and check in and check out by themselves from the HR Dashboard.
The latest version of Attendance now shows the time you checked in and your spent working time within the widget, as shown below:
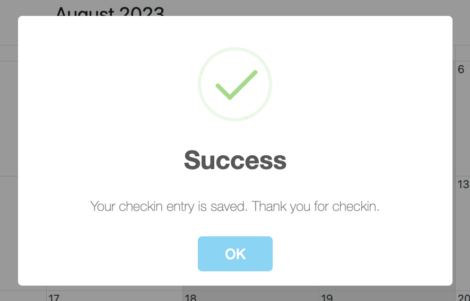
After a successful check-in, your employee gets a success message.
In the case of IP Restriction, your employees cannot check in if the device they are using is not White-listed. In short, if you are connected to another network other than the one specified by your workplace, then you cannot check in and check out.
Users will get a warning message if they try to check in with non-connected devices.
Both employees and the HR manager can view employee attendance status records from the employee profile page.
To view this go to WordPress dashboard → WordPress ERP → HR → Employees. Select the employee whose profile you want to view.
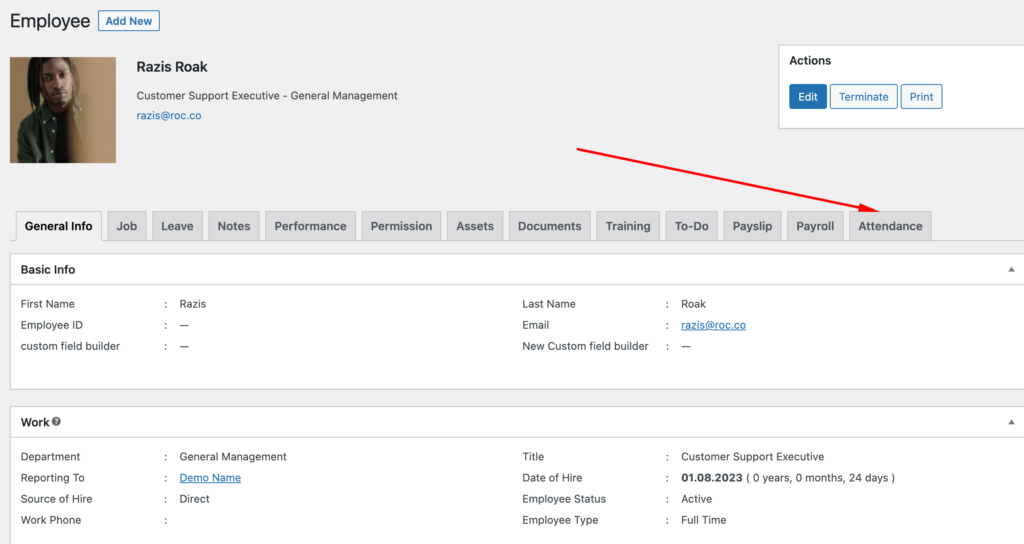
Then select the Attendance tab from the top.
8. Attendance Report
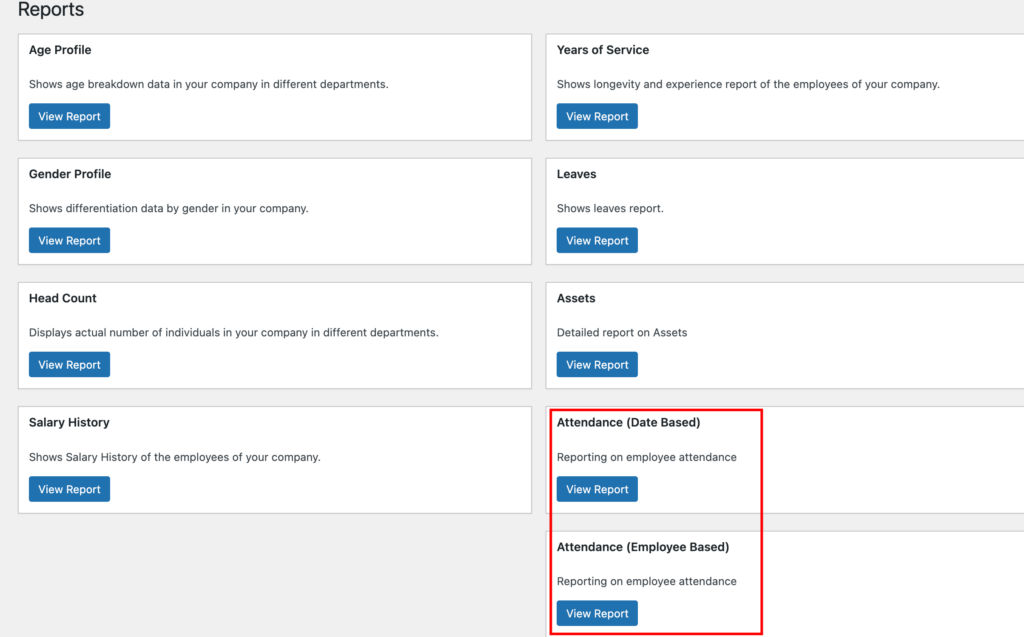
The utility of this attendance system is the reports. Navigate to WP Admin Dashboard → WP ERP → HR → Reports.
Here you will find two types of Attendance Reports:
1) Date-based and 2) Employee-based.
Date Based
This report shows detailed information for employee attendance date-wise.
Admins can see the total number of holidays allocated, average absent, late, present, leave, and early leave:
- Total days: total time the HR selected from the filtering option
- Average Present: avg of the number of present combined from all employees
- Total Holidays: number of holidays for that time
- Average Absent: employee absent average for that duration
- Average Late: employee late time average for that duration
- Total Work Days: number of working days for the selected time
- Average Leave: average of the leave for the time selected
- Average Early Leave: average number of early leaves by all employees for that time
Admins can also filter the reports location-wise, and department-wise, and use a customized date range.
Location, Department, and Month to filter out the information along with two charts compiling different information.

Employee Based
Employee-based report will show all the employees in a list with their information.
The table presents the following information for each personnel:
- Present: Total number of present days for that employee
- Leave: How many days the employee took a leave
- Absent: Number of absent days
- Worked: Total number of working hours
- Avg. Work: The average number of working hours
- Avg. Check-in: Checkin average time
- Avg. Check out: Average of the time the employee checked out
Admins can also filter the report location-wise, department-wise, and year-wise.

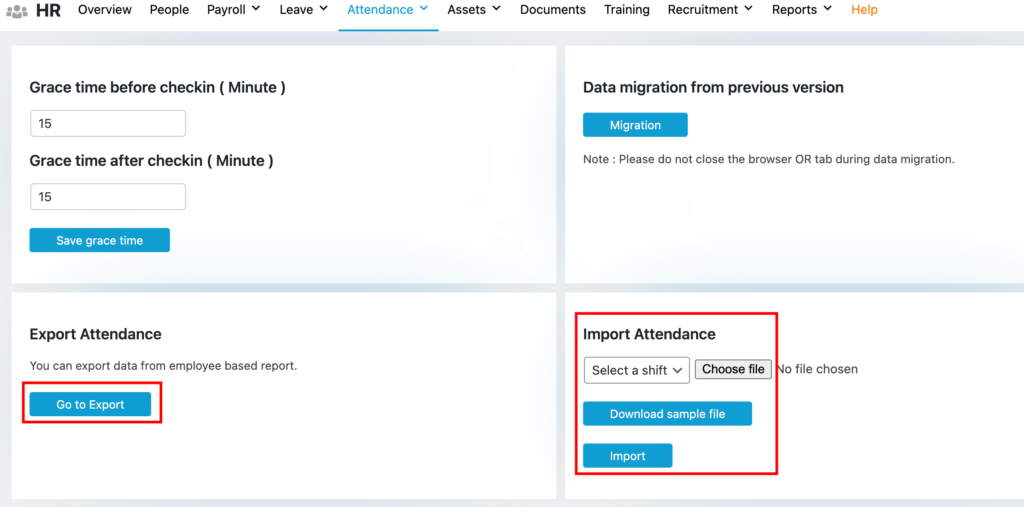
9. Import & Export Attendance Records
You can import or export your attendance data. Just navigate to WP Admin Dashboard → WP ERP → HR → Attendance → Tools.
If you want to import your data, just select the shift you want to import to and also choose the file. Lastly, hit the import button.
You can also export the data from your Attendance extension in CSV format simply by clicking on Export, as shown below.
If you are confused about what kind of file you are going to import, there is a sample file for you to download and get an idea.
10. Editing Log File
Accidents tend to happen. If someone forgets to check in or check out then there is no need to worry. As an admin or HR manager, you can easily edit the log of the check-in and check-out time if any accident occurs.
To do that, navigate to WP Admin Dashboard→WP ERP→HR→Attendance. Then click on the Edit button.
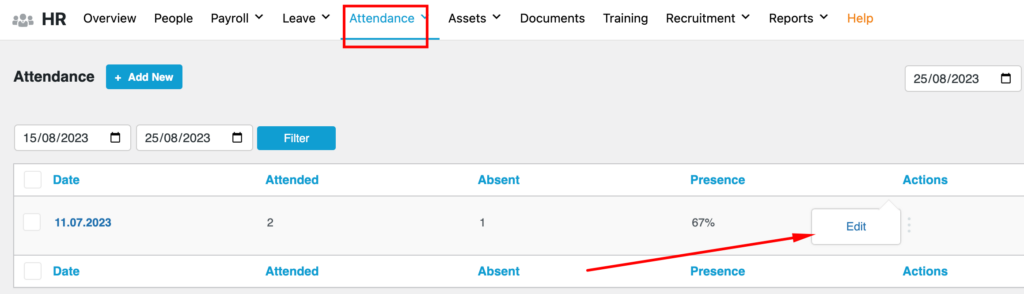
You will find a button called More Details. Click on it.
Note: If your browser doesn’t support the 12-hour format then the AM, PM will not show. Then you have to use a 24-hour time format. We suggest you keep your browser updated.

You will see the log file. You will see the check in and check out times. As we have multiple check-ins and check-out systems, you can view the whole log of when the employee checked -in and checked out.
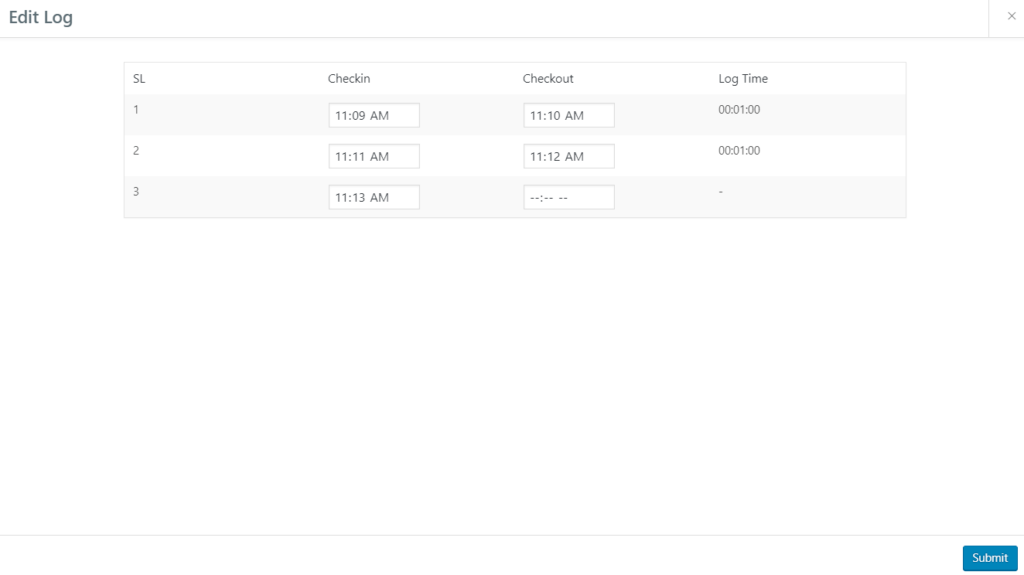
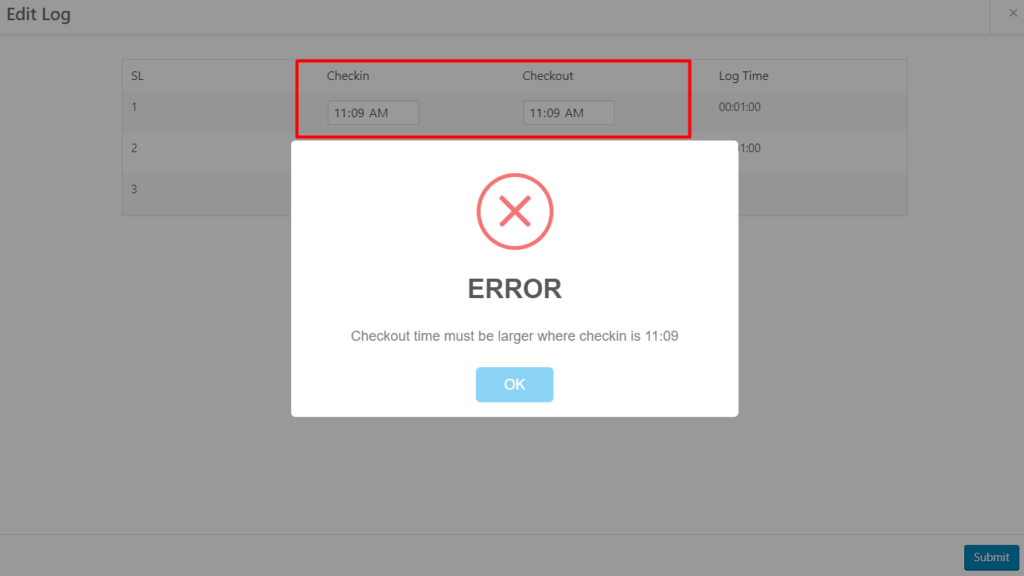
Note: When you are editing your log manually make sure the check-out time is larger than the check-in time. And also the next check-in time is larger than the last check-out time.
For example, If someone checks in at 11:10 am then when you enter the check-out time it has to be 11:11 am. Then the next check-in of the same person has to be 11:12 am. Otherwise, the system will give an Error message.
Sample CSV File
If you are confused about how you should format your CSV file what type of data should be there, then this is a reference file for you.
Download the Attendance CSV File
FAQ
- I can not find the self-attendance option on the HR Dashboard. What should I check?
You have to enable self attendance feature from wp-admin → Settings → HR → Attendance and you should have an employee profile to see the check-in and check-out options. - Can employees check in and out more than once a day?
Yes. In this new version, employees cam check in and out more than once a day. - What happens if there are duplicate entries? Or, What if I import the same file twice by mistake?
While the CSV file is being imported, there is no client or server-side validation. So, the system cannot tell if you are uploading the same file or data twice. As a result, it will create duplicate entries.
Only the HR Admin and System Admin will have access to the importing feature, we instruct you to use the feature with caution. - How to delete test attendance data?
The attendance add-on stores all the data in the `erp_attendance` table. You can edit or delete any entries from the database using PHPMyAdmin or any other database administration tool you like. - Do we have hardware support?
Not right now, but we are already developing something similar. - What happens when I am using Attendance with HR Frontend?
If you have both Attendance and HR Frontend, then you will get an integration. But this integration only gives two widgets and a new tab to your employee profiles. You cannot view or manage the attendance of your employees from the frontend. Your employees will be able to self-check-in and checkout from frontend and the attendance tab on their HR profile.