
Advanced Leave Management System
You already know about the leave management system of WP ERP. You will get all the basic features of a leave management process. Now, we have added an advanced leave management module in the WP ERP Pro version. You can call it a major update from the free version.
WP ERP Pro has included the Advanced leave management features so that the company owner can create advanced leave criteria & policies with ease. So if you’re an owner, and want to bring a different leave system on your HR policy, you can easily do that in the following ways.
So let’s see how to utilize advanced leave management for your company step by step.
How To Purchase & Activate The Extension
You don’t need to purchase the extension separately. When you buy the WP ERP Pro version, you will find this extension built-in. All you need to do is activate the module from the module dashboard.
How To Create Advanced Leaves (For Admin)
As an admin, you can create different leave criteria for your employees.
Create Half-day Leave
First of all, you need to create a leave policy (Half-day leave).
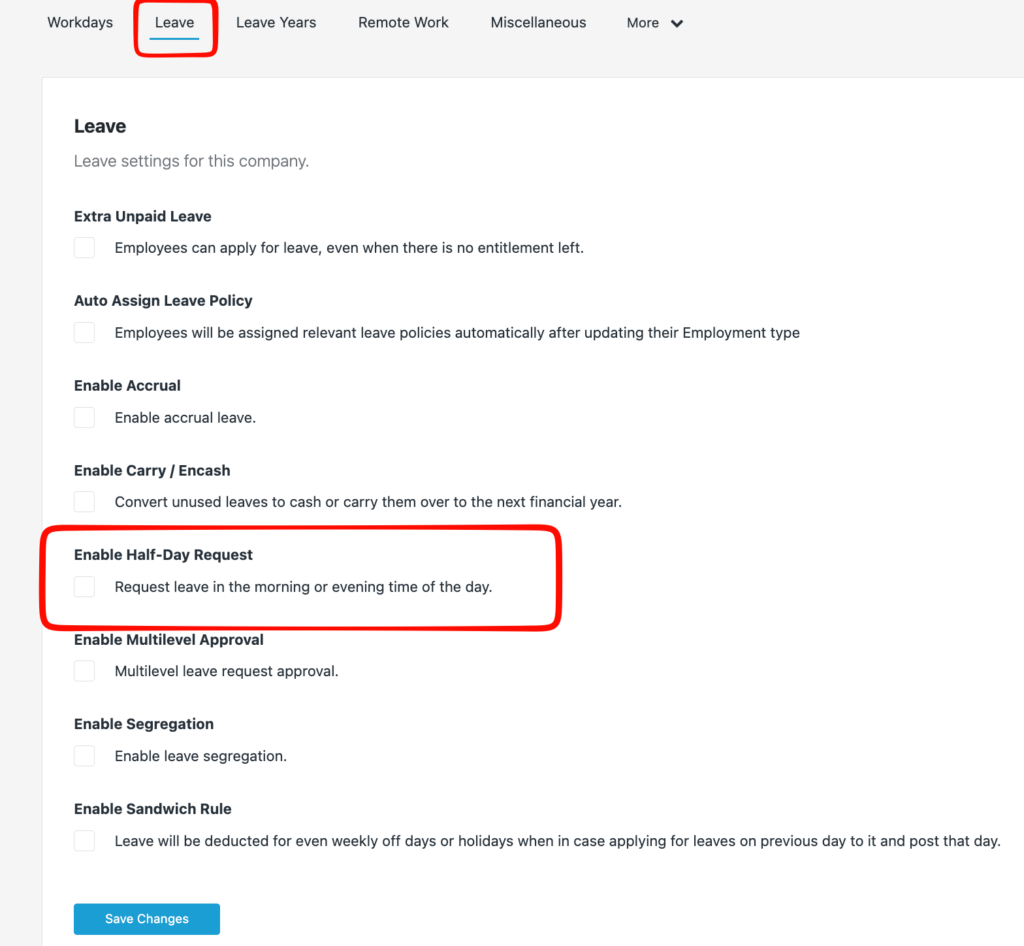
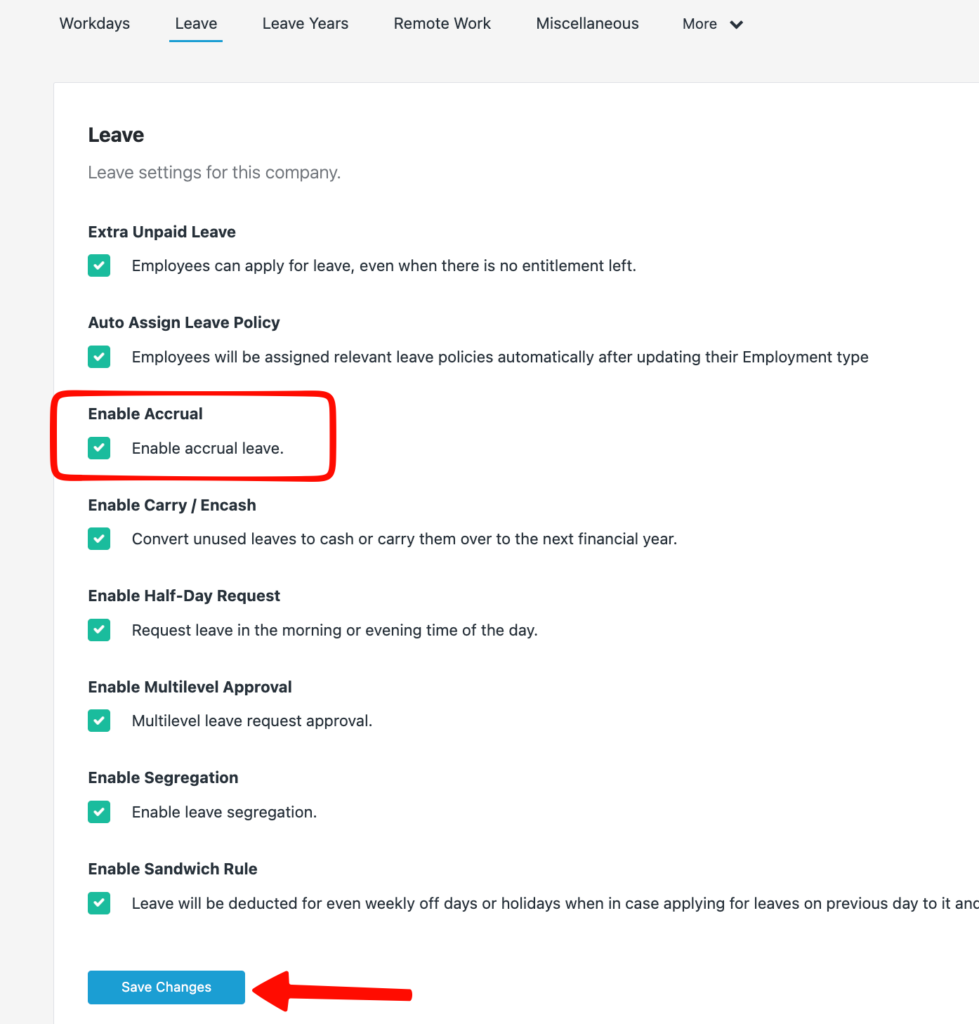
Navigate to the WP ERP > Settings > HR > Leave > Enable Half-Day Request
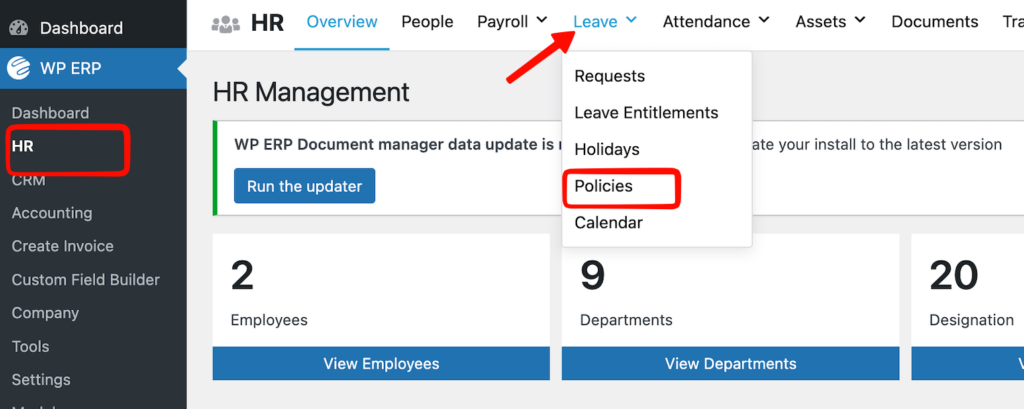
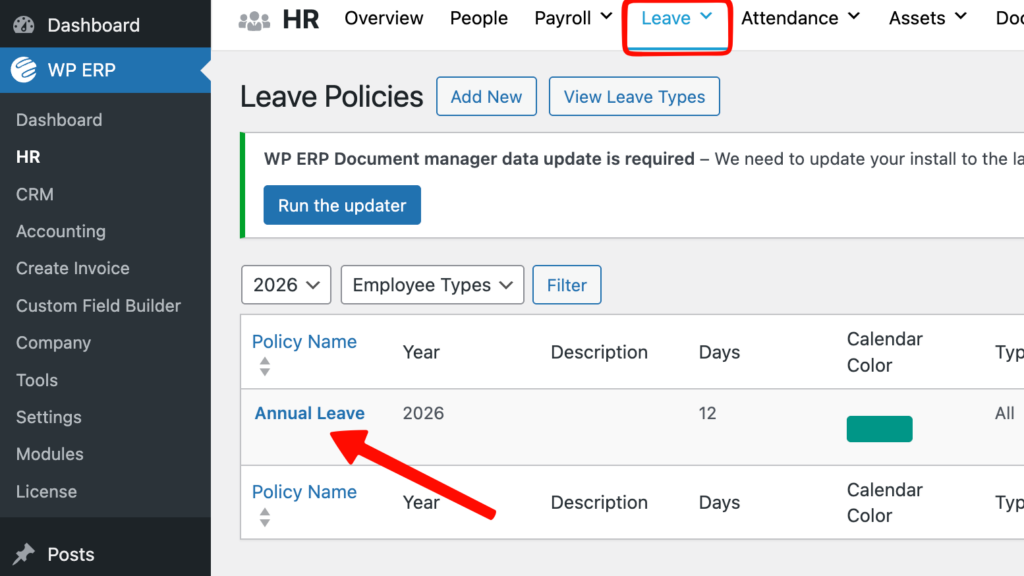
After that navigate to WP ERP > Settings > HR > Leave >Policies
You can stay with your current policy or create a new one. It’s all up to your company’s leave policy.
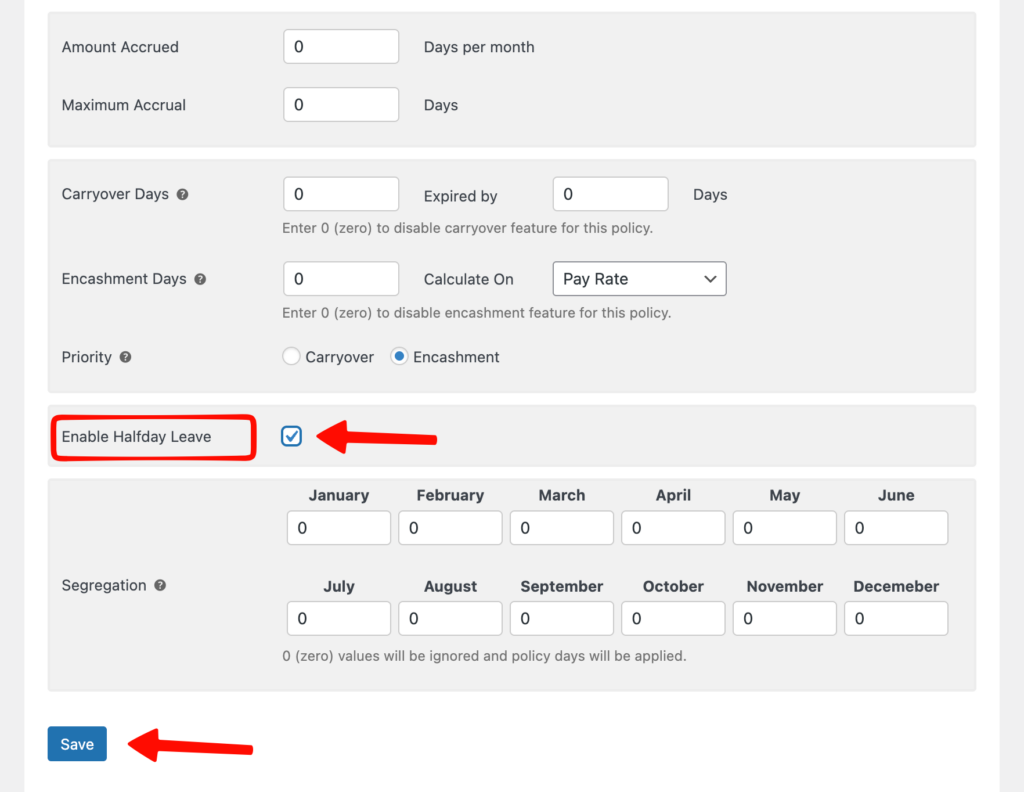
So to enable half-day leave, select your choice of leave policy, then scroll down, enable ‘Half-Day leave‘. That’s it!
[Note: In this case, Half-day leave is in casual leave policy. Or you can use it on the other leave policies. It’s your choice]
Must Read:- How to entitle leaves for all the new & existing employees
Create an Accrual Leave
If you want your employees to earn or acquire leaves, you can use this feature of WP ERP Pro. Basically, employees can earn accrual leaves as an Annual leave. So using this feature you can set it on your leave policy.
Let’s see how to do that:-
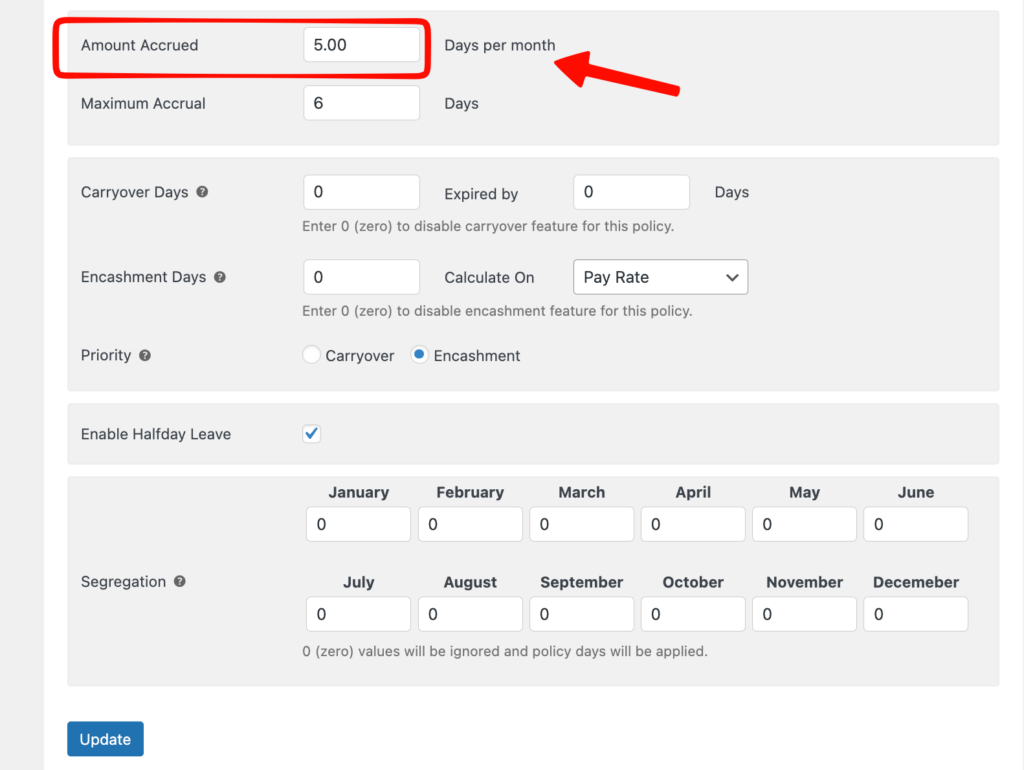
Navigate to WP ERP>Settings>HR>Leave> Enable Accrual Leave
Navigate to your leave policy page. Select annual leave or your preferred leave policy.
Next, scroll down to the page, and you’ll see two options.
- Amount accrual:- The amount (Day) that an employee will get per month.
- Maximum Accrual:- Maximum how many days you want to give to your users.
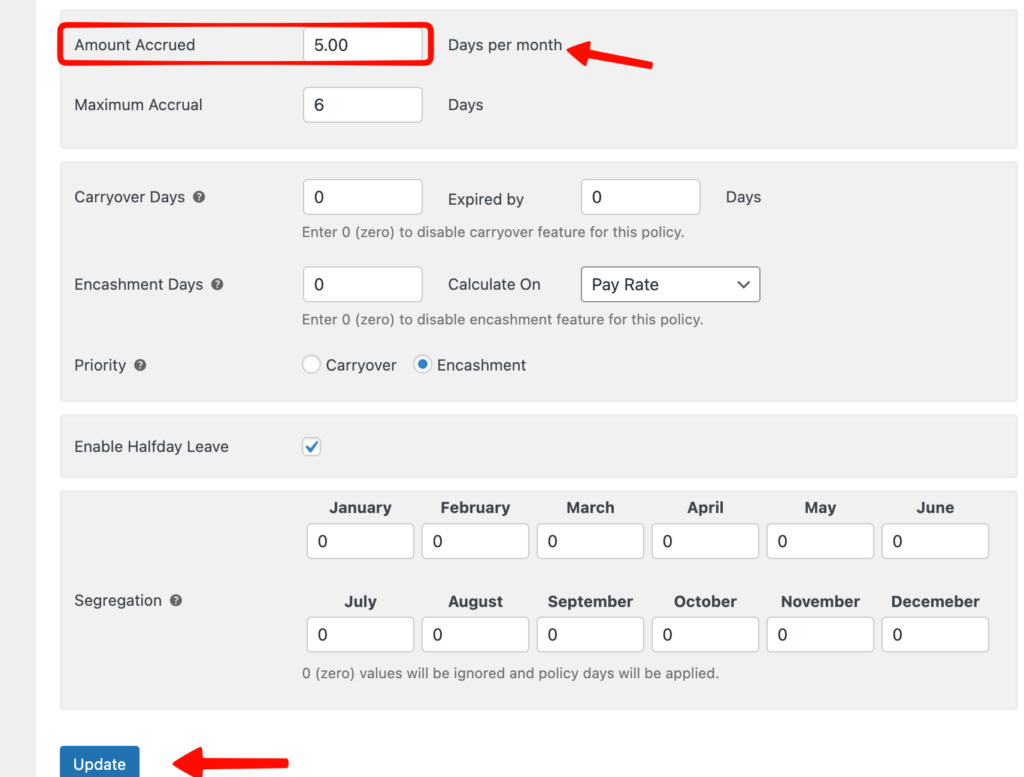
So after that click on the update button when you’re done with it.
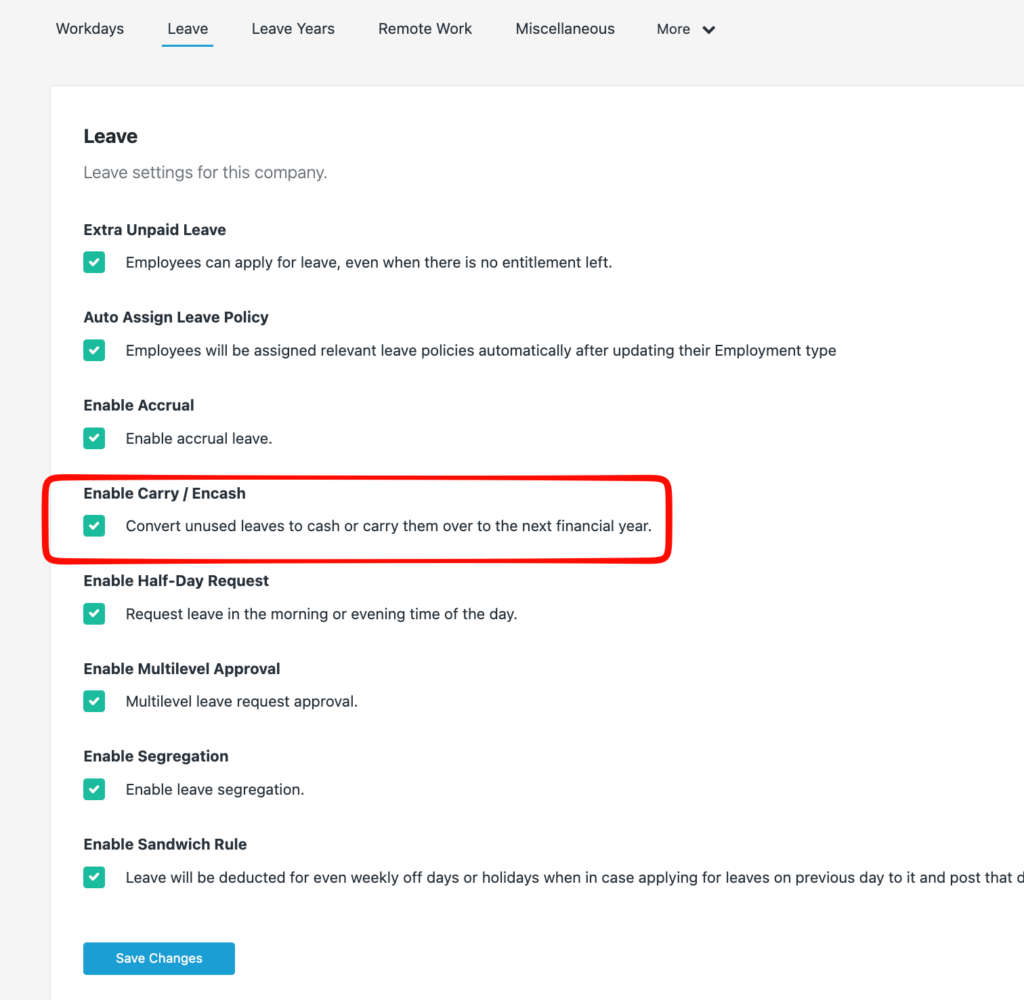
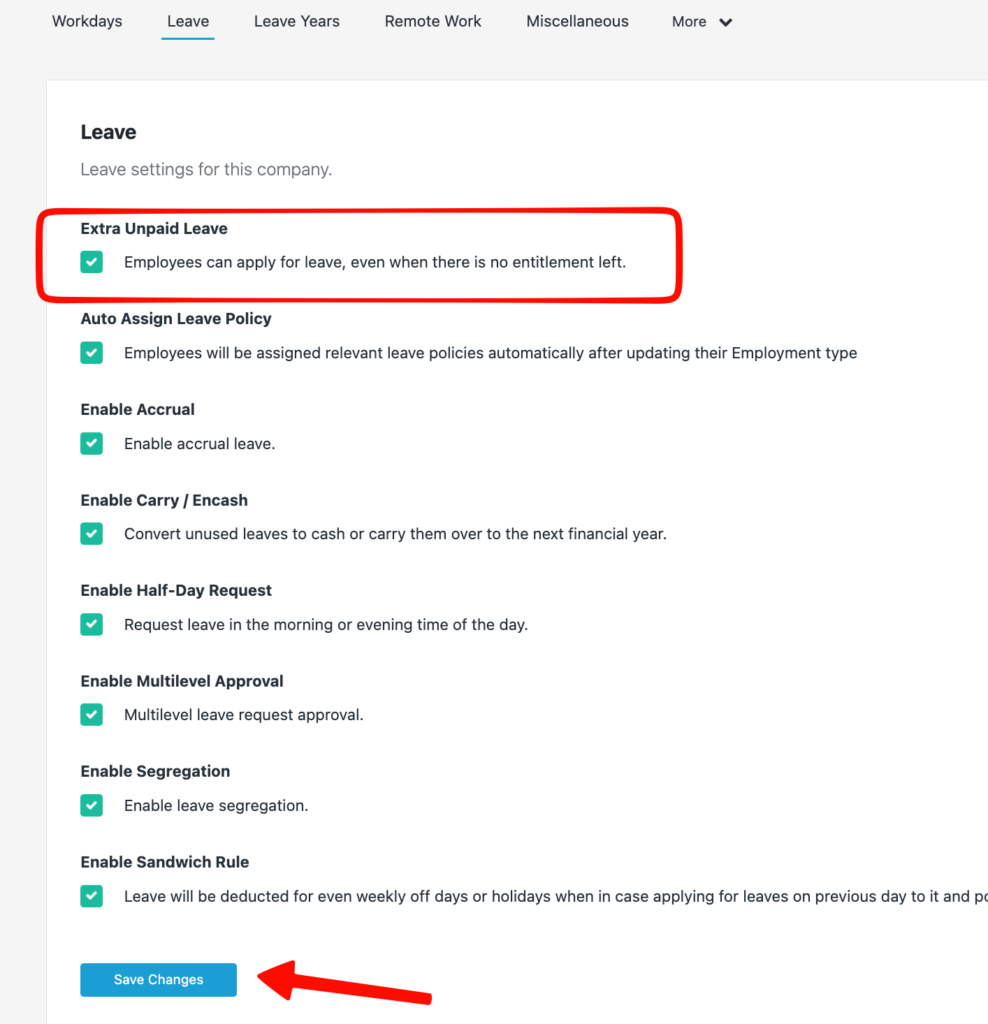
Enable Sandwich Rule
If an employee has taken leaves from Friday to Monday and resumes his duties on Tuesday morning where Saturday & Sunday are weekly off, his/her leaves will be included as 4 days.
Let’s see how to enable sandwich rule for an employee using WP ERP Pro.
To enable the sandwich rule, navigate to WP ERP> Settings>HR>Leave> and Enable Sandwich rule.
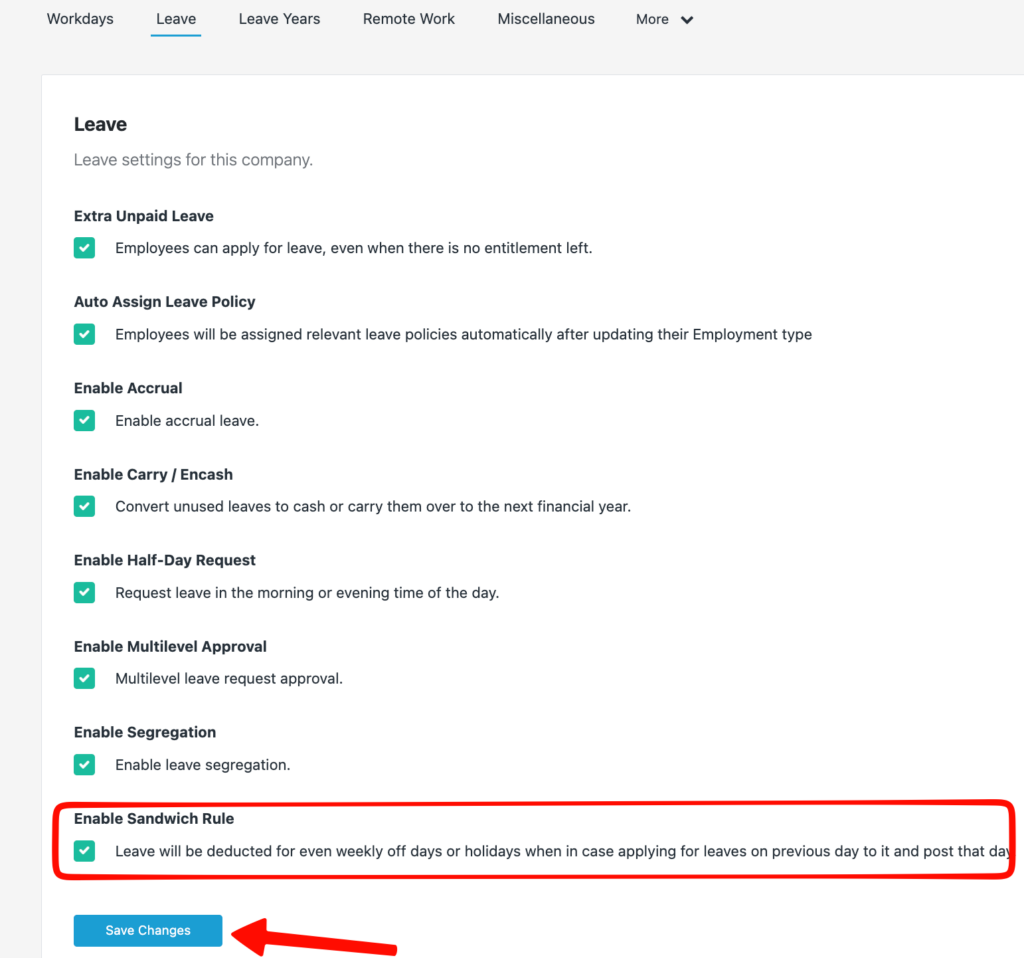
So after enabling this feature, the leave will be deducted for even weekend days or holidays when your employees apply for leaves on previous day to it and post that day.
Here’s how it would look like:-
Suppose, 28th august is a holiday which is Friday. And next two days are also official weekend.
So when your employees will apply for an annual leave. It shows that it’s counting 5 days. Though the working days are only two days.
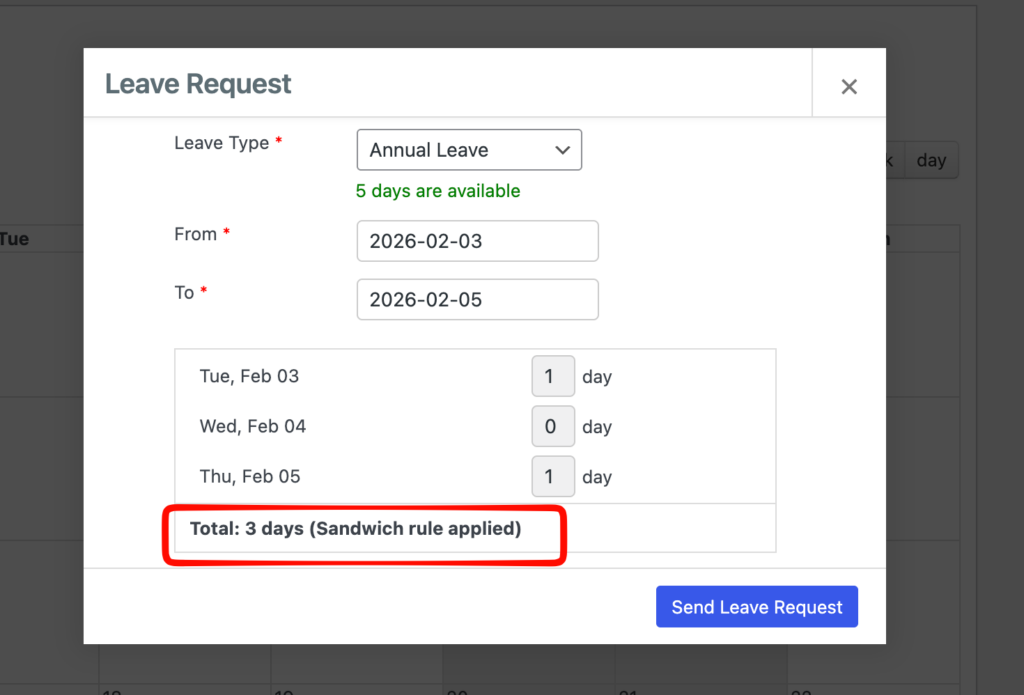
So this is how the sandwich rule works.
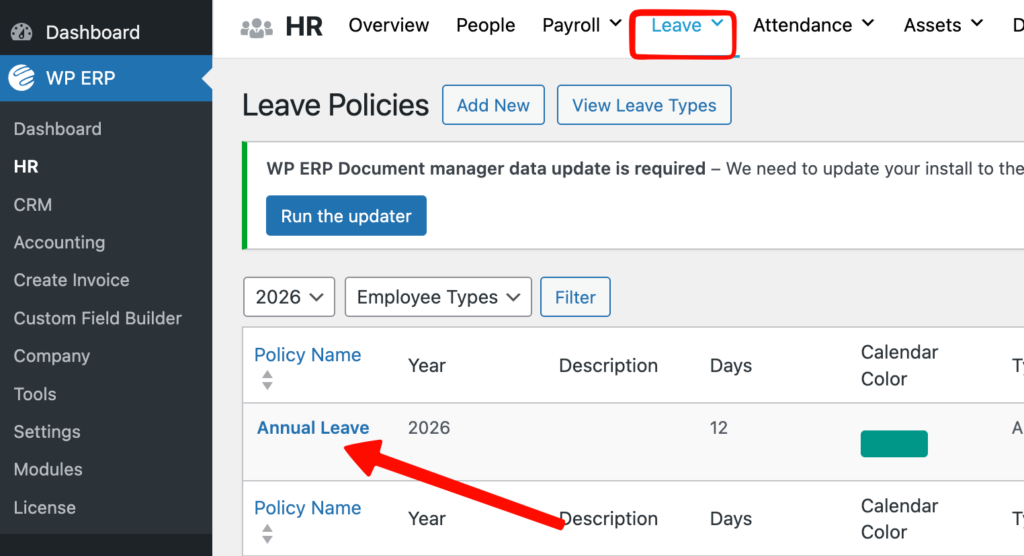
Create Leave Carry Forward & Leave Encashment
It’s a conversion of unused leaves to cash or carries them over to the next leave year.
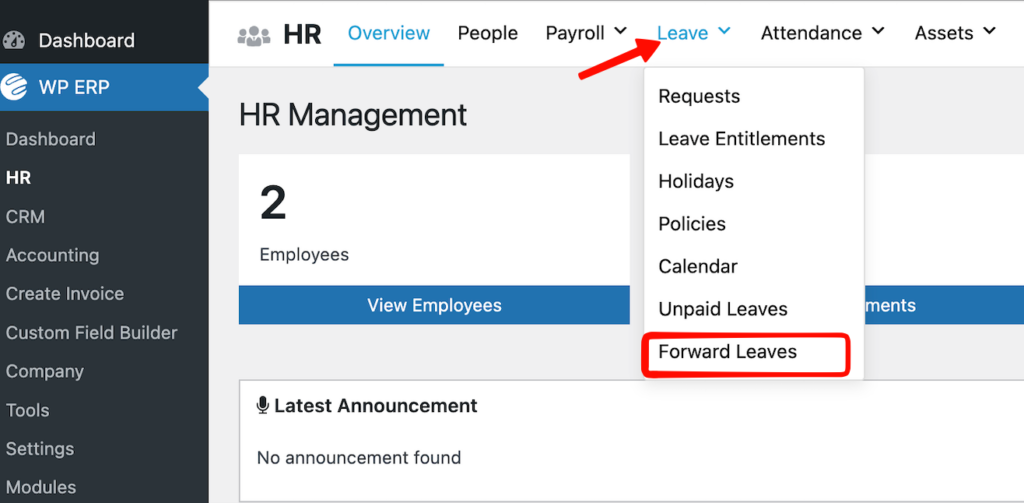
To create ‘Carry Forward Leave‘ and ‘Leave Encashment‘ for your employee, navigate to the WP ERP>Settings>HR>Leave> Enable Carry Forward & Encash
And then proceed to your leave policy page. Select the annual leave policy in this case.
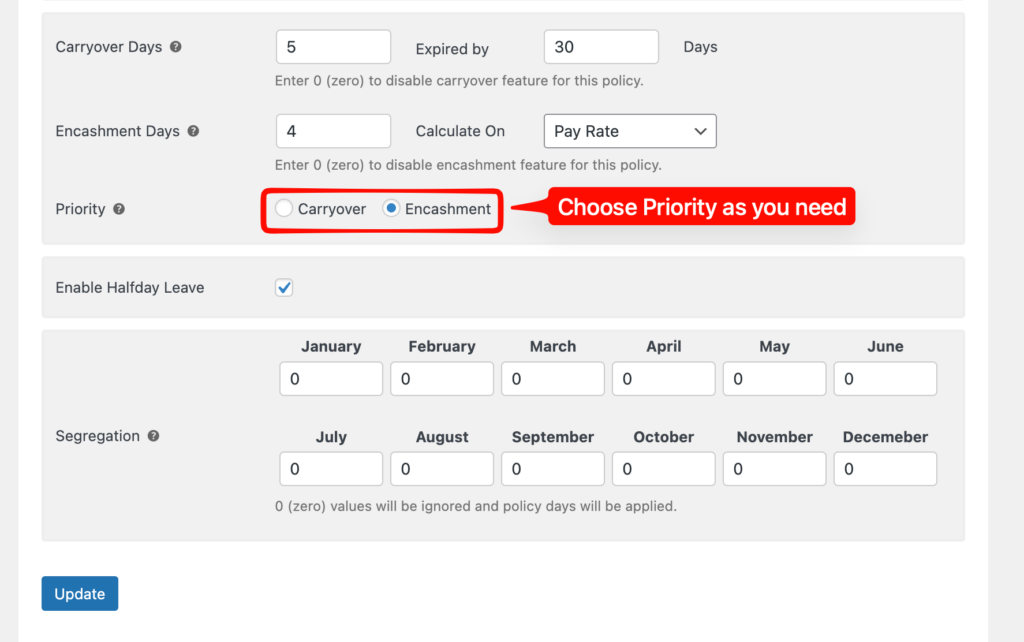
Next, slightly scroll down to the page. And you’ll find two options.
- Carry Forward Days:- Let’s say you want to give 5 days that your employees can carry forward to the next financial years. But they have to take that unused leaves in 30 days.
- Encashment Days:- Leave encashment means to an amount of money received in exchange for a time of leaves not taken by an employee. And the money will be calculated with the employee’s pay rate.

Also, you can set the priority for that purpose. As we selected annual leaves, so carry forward leaves can be applicable in this case. Therefore, you can disable leave encashment giving zero (0) value.
So after you click on the ‘Forward Leaves‘ option, you get all the details here. Therefore, you can easily take the necessary steps from here.
After the end of the working years, you’ll be able to see who (Employee) will be carrying leaves & who (Employee) is getting the encashment from the forward leave page.
[Note: In the Annual Leave Policy, carry forward leave was applied. And in the Casual Leave Policy, leave encashment was applied]
If any employee gets five leaves from the previous year, it will be added to the next leave year. But employees must take that leaves in the given time set by the company leave policy.

Unpaid Leave
Unpaid leave is a period of time of extra leaves that someone is allowed away from work for the holiday, sickness, or other special reasons, but in that case, they are not paid for by the company
However, let’s see how you can easily utilize this feature for your employees with WP ERP Pro.
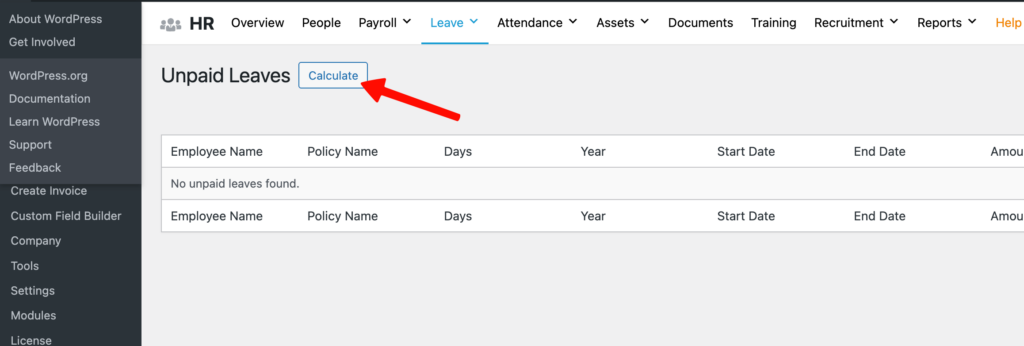
To enable ‘Unpaid Leave‘ navigate to the WP ERP>Settings>HR>Leave> Enable Unpaid Leave.
Then go to the WP ERP>Settings>HR>Leave Management>Unpaid Leave

After that, you’ll get the Unpaid Leave dashboard where you can easily sort out according to your employee’s unused leaves. Therefore, you can finalize the money amount by clicking on the ‘Calculate’ button.
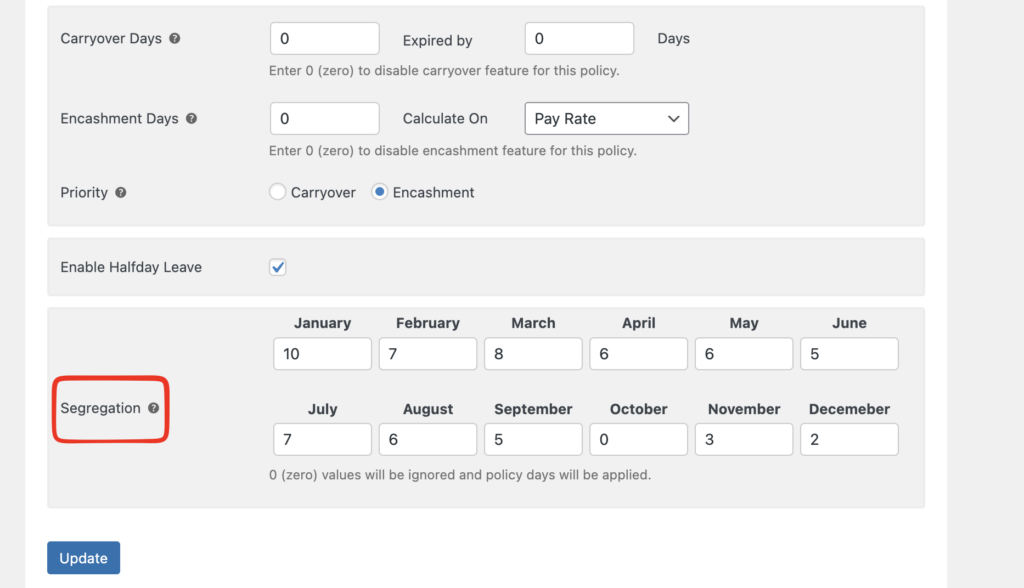
Apply Leave Segregation
Basically, leave segregation is the process of giving leaves according to the joining date.
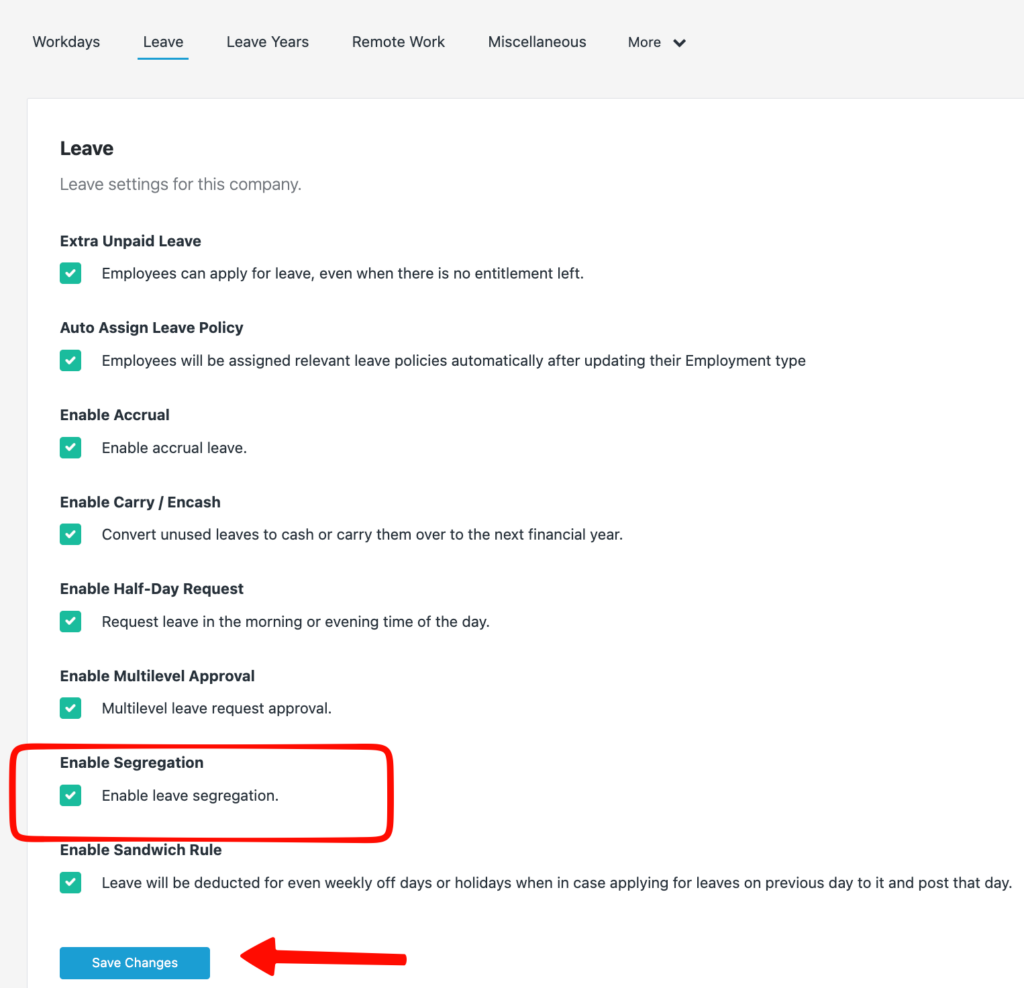
First of all navigate to the WP ERP> Settings>HR>Leave>Enable Leave segregation.
Now navigate to the leave policy. And select any of your leave. Then slightly scroll down to the page. You’ll get the ‘Leave Segregation part‘.
You can set it in different ways. Either you can set the same time for the entire year, or you can set it as a category-wise. For example, if any employee joins in the month of August, she/he will get 6 leaves. And if he/she joins in September, she/he will get 5 leaves.
So the entire process totally depends on your leave policy.
Multi-layer Leave Approval
In a general HR system, if any employee applies for a leave request, the HR manager should get the leave request. And if has enough reason to accept, then HR Admin will accept it.
But in the advanced leave management system, that leave request will not directly go to the HR admin. Rather it will go to the perspective department head. So if s/he accepts it, then it will go to the HR Admin. Therefore, the entire process is divided into two parts.
Here’s how this process will work, Employee Applies for a Leave Request>Department Head will check & Update>HR Admin will finalize the leave.
Well, let’s see how it will work with WP ERP Pro:-
Apply for a Leave (Employee View)
First of all, employee will apply for a leave. To do that, navigate to the WP ERP>HR>Take a leave
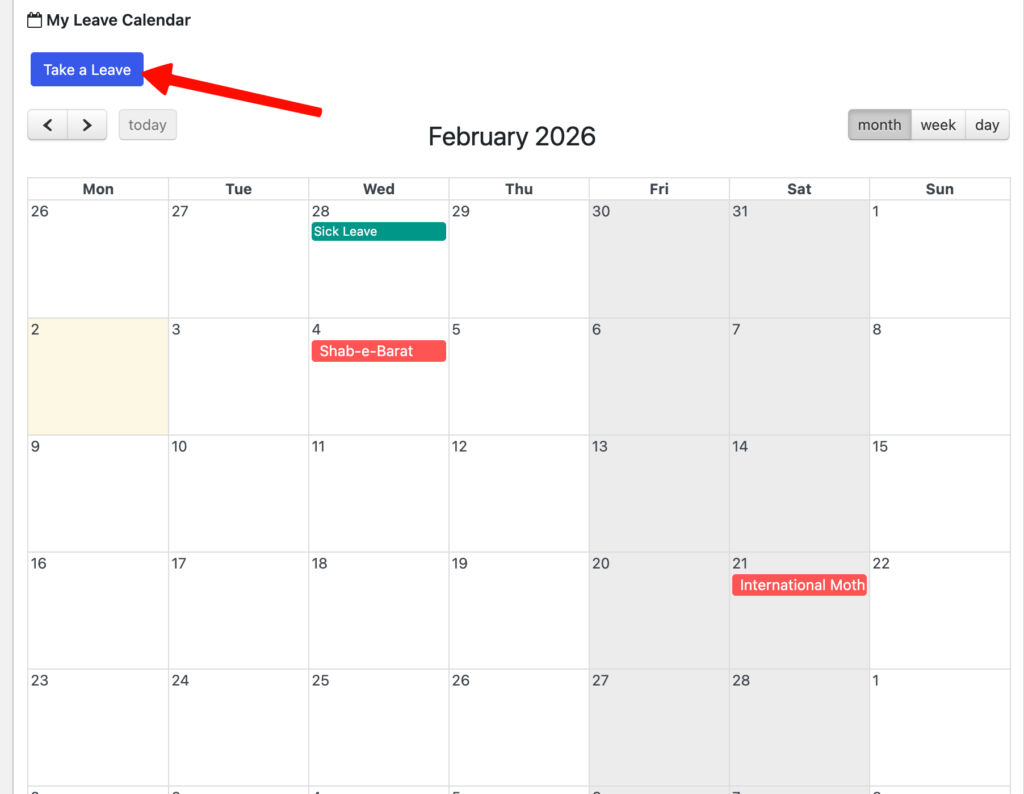
Fill the criteria, and hit the send request button when you are done.
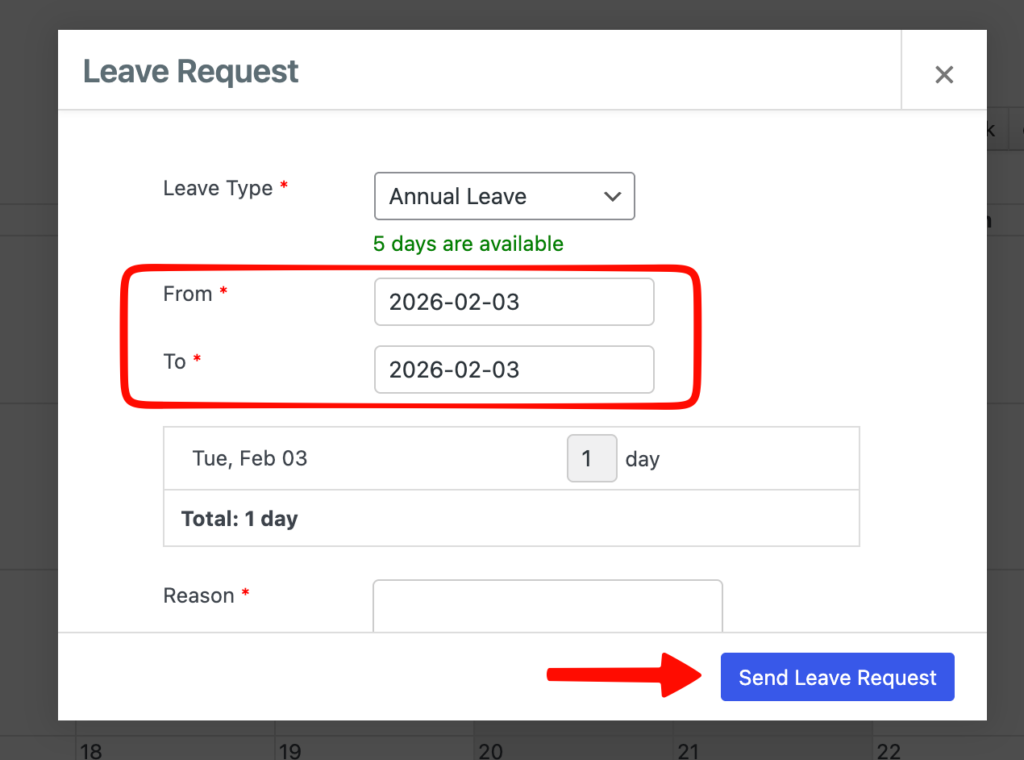
As MR, Fahim is a content & marketing department’s head, so he will get the leave request.

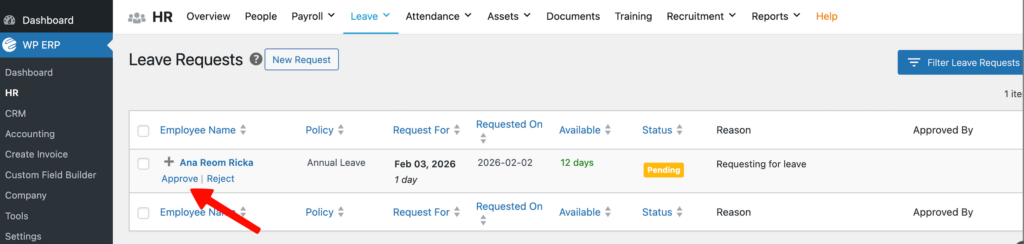
Accepting Leave Request (Admin/HR Manager’s View)
Navigating the same page, Admin can easily see who sends the leave request and if the department head has accepted the request.
So he/she can see the leave request is still in the pending column. Therefore, the admin can finalize the leave by clicking on the ‘Approve‘ button.
How To Utilize Advanced Leave Management (Employee’s View)
In this section, we’ll show how should an employee apply for different leaves using WP ERP Pro.
So, let’s get started:-
How Apply for Half-day Leave
First of all, login as an employee and then navigate to the WP ERP>HR Dashboard>Take a leave.
As you’re going take a half-day leave, so select casual leave from the menu. After that, you’ll get an option where you need to turn half-day leave on.
So tick the half-day leave and select the shift (Morning or Afternoon). Then select the date and click on ‘Send Leave Request’. After that, it will be sent to your prospective department head for approval.
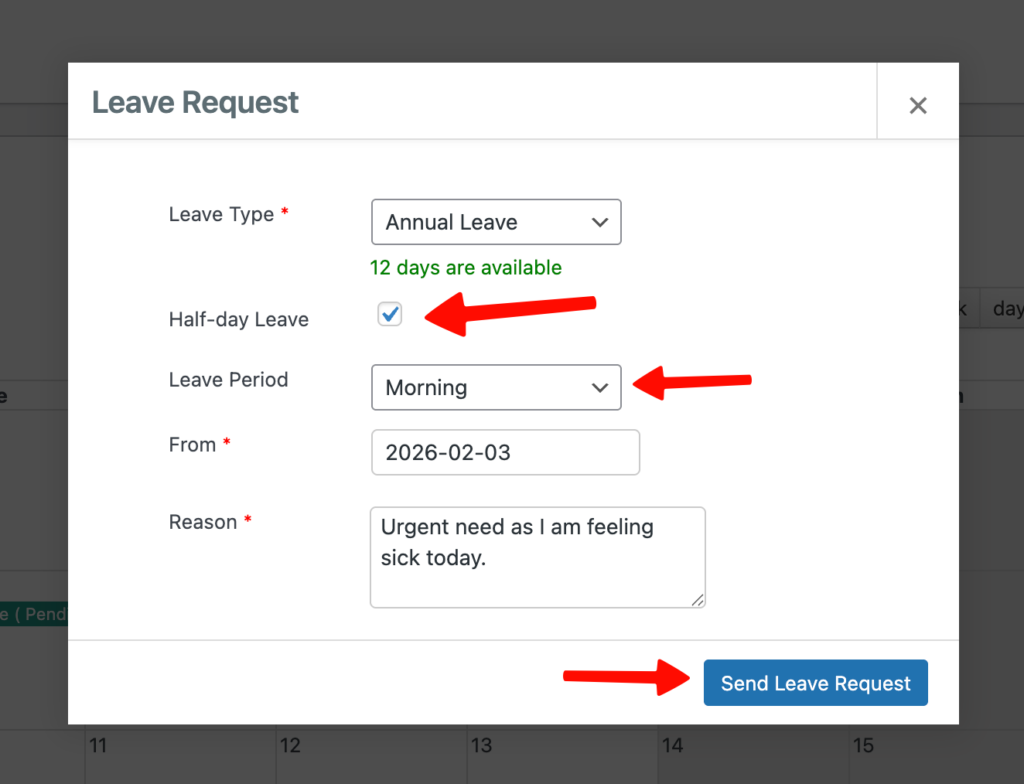
So if the leave get approval, you’ll able see it from WP ERP>HR>Leave

How to Acquire Accrual Leave
Basically, employees have to acquire or gain accrual leave. So this process totally depends on the company’s leave policy. Either you can get it in the casual leave or on the annual leave.
So, per month, one leave will be added to your current leave, and you’ll get a maximum of 5 times.
Get Carry Forward Leave & Leave Encashment
Basically, leave carry forward & leave encashment is set by the company’s admin or according to the leave policy.
So if an employee has not used his/her annual leave in the current financial year, according to the policy s/he can either carry his/her leave to the next year or get the money for unused leave.
Unpaid Leave
Suppose, an employee has 5 casual days. And s/he has taken 7 casual leaves, which is 2 more days from the assigned casual days. So in that case, 2 days will be counted as unpaid leaves.
And at the end of the year, according to the leave policy, the amount (money) will be deducted for 2 extra days from that employee’s salary.