Creating a New Account in the Chart of accounts
Adding accounts in WP ERP Chart of Accounts is very easy. To learn how to add new accounts in Chart of Accounts, go through this documentation.
Adding a New Account
You can add new accounts to asset, liability, equity, income, expense, asset and liability.
For example, you want to add “Snacks Expense” account which is not included out of the box in the chart of accounts.
Step:1
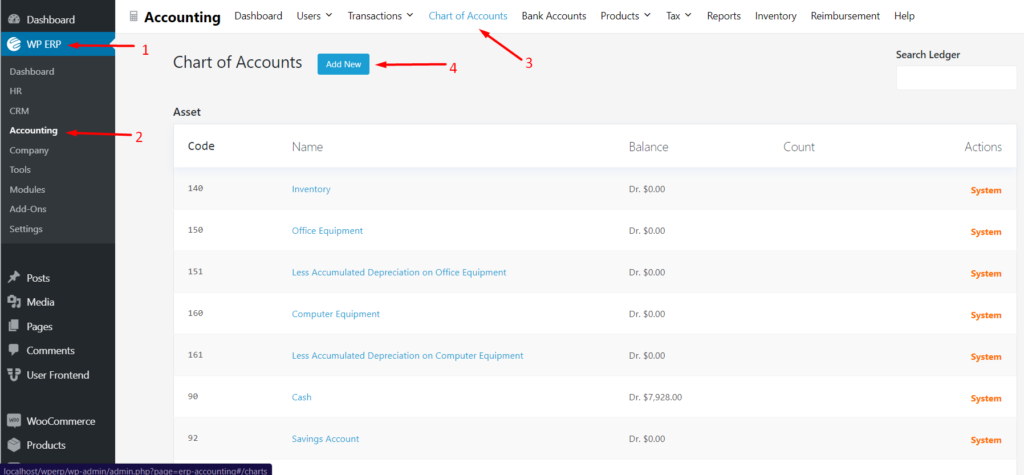
To include or add this account into the system, go to the WP Admin Dashboard → WP ERP → Accounting → Chart of accounts and click on the Add New button.

Step: 2
Select Expense from the dropdown, as “Snacks Expense” belongs to expense account type.

Step: 3
Then write “Snacks Expense” in the Account Name field.

Step: 4
Finally, hit the “Save” button to create the account.

That’s it!
Please note that,
- WP ERP uses a unique code against all accounts so that you can refer to a certain account easily. However, entering this code is optional.
- When creating a new account, please make sure you have selected the chart correctly. Otherwise, it can jeopardize your entire system.
Editing an Account
Click on the three vertically aligned dots to get the edit button to the right side of an account. The accounts marked as “System Account” cannot be edited or deleted.

That’s how you can add an account to WP ERP Accounting’s Chart of Accounts.


